


SwedishLuthier
-
Posts
2,147 -
Joined
-
Last visited
-
Days Won
17
Content Type
Profiles
News and Information
Tutorials
Product Reviews
Supplier Listings
Articles
Guitar Of The Month
Links and Resources
Forums
Gallery
Downloads
Posts posted by SwedishLuthier
-
-
Just out of curiosity. Do you have a link to those four string bridges? Never know when one can need one...
To create a mathematical correct (don't actually know if thats how its done...) you can use a standard 24 3/4 fretboard and chop it iff at the 5th fret, That will leave 18.542" witch is pretty close to 3/4 of the original scale. I just finished a shorter scale 6-sting acoustic together with my daughter were we chopped of the tree first frets to create a slightly smaller guitar. Worked pretty good, although the scale length ends up at "just over" 21", not spot on.
-
Dimensions will probably be fine. You need to change body transition and a lot of other stuff but width and thickness can be used fro those drawings
BTW, what hardware are you planning on? Have you found a 4-string bridge, pickup(s) and things like that?
-
-
Welcome to the forum!
I have not seen many tenor plans at all. However my auction (far from an expert) is that it is a more or less ful size traditional guitar body (from parlour to dreadnought) with a slightly shorter and thinner neck. So with a bit of creativity you might be able to take a standard drawing (lots of free ones out there), thin down the neck and move the nut/head to were the second or third fret is on the drawing. If that doesn't work out let me know as I might be able to draw something up for you and convert it to PDF so that you can print it at a print center or similar.
Oh, I didn't notice that this was posted in the solid guitar section. So read my answer with that in mind
-
Very Nice. Is the neck oiled? Locks like no lacquer at least...
-
Agreed. I ordered the newest version with roller bearings and wow, that is even better.
I had not seen that yet. I'm going to have to check it out. I actually had you figured for a powered blade system.
SR
Nah, my table saw isn't accurate enough and I don't have space for another machine so I have to stick to the Stewmac mitre box
-
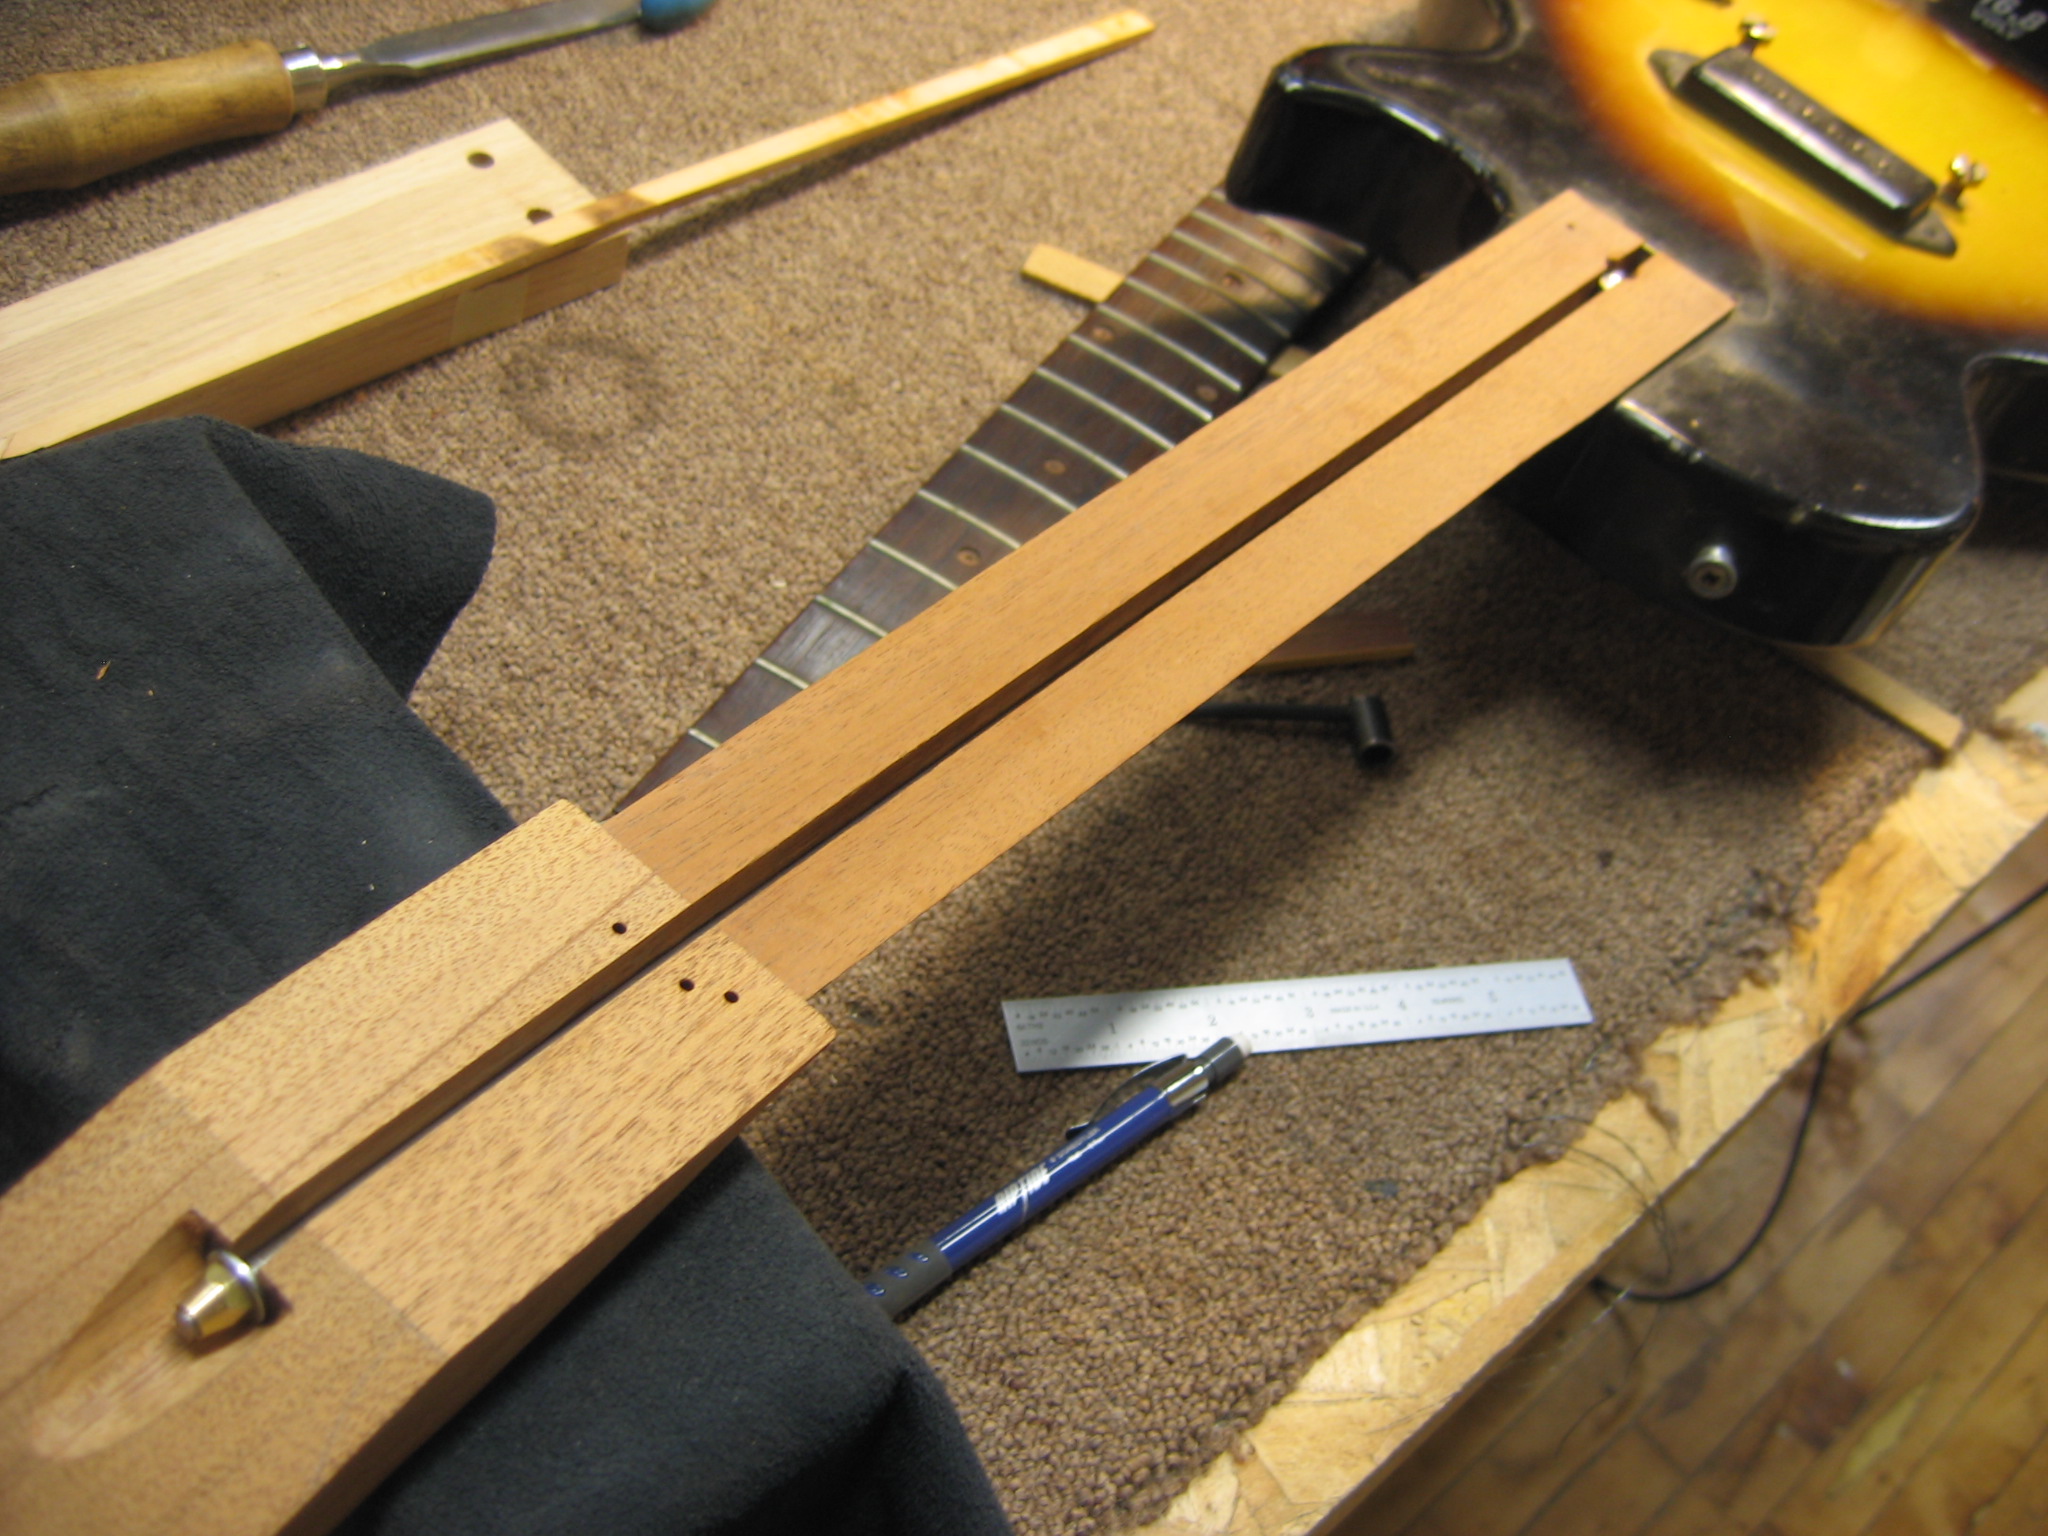
I bought the maple from "Hades Roasted Maple". It's some great looking wood, the only thing that I had to adjust to is the "roasted" smell.. couldn't realize how was my router burning the neck blank with my careful feed rate.. not to mention hand sanding.. than it came to me that's just how it smells

Thanks for the info. I checked their inventory and there wasn't much to show, but I'll keep an eye open. I would love to get my hands on a top like that to match the neck blank I already have.
-
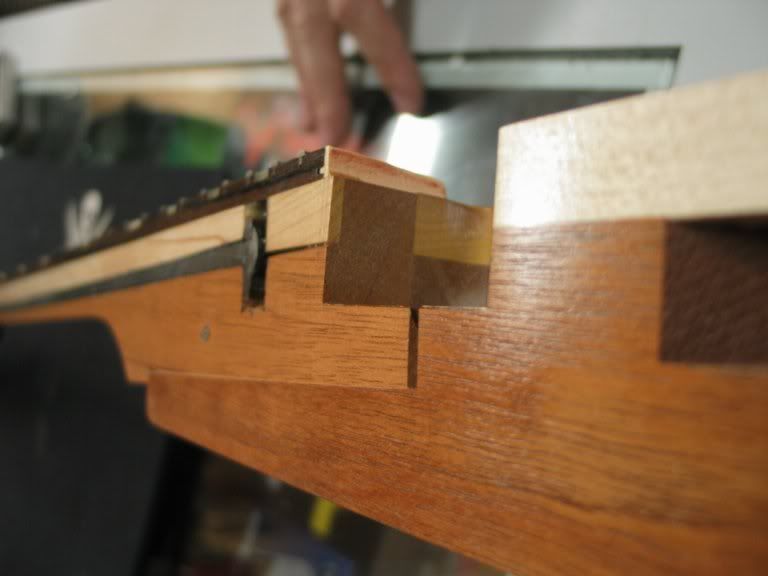
Once the side was square and true to the top of the neck, I could cut my headstock angle.

I love using my plane for a sanding block in these situations.

I flattened the fretboard stock the same way and got on to cutting frets.
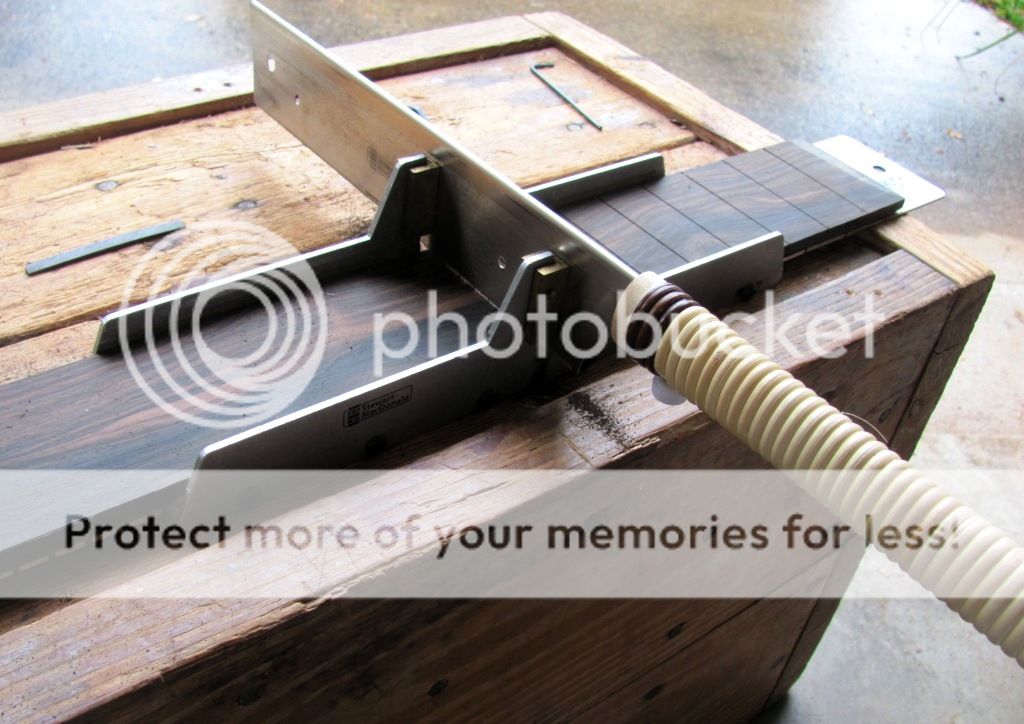
I use the Stew Mac miter box. The upgrade to this pull saw is so worth the money.

SR
Agreed. I ordered the newest version with roller bearings and wow, that is even better.
-
If you are concerned about installing the bushings for the bridge before the finishing for a test fit you can do one of two things: finish it with the bushing in place (put a screw, rolled masking tape or whatever in the holes and you should be fine) or place the bridge on the face of the guitar with a few washers in place of the real studs. Just make sure that the bridge is clear of the face of the guitar and that will be the reference point of the lowest possible action.
I would use a shim for this. As Custisa mentioned it is but way if you're not totally confident in your woodworking skills. Make stack of veneer or get a few different bit os wood with different thickness and place this in the body end of the neck pocket. When you find the action you like with the bridge in place and a steel ruler placed on the bridge/first fret you can measure the thickness of the shim. Then you can make a wedge that taper from that measurement down to nothing and make it fit the pocket perfectly. If you feel for it you can even glue it in place.
Personally I like the synthetic string trees. They are slippery and doesn't grab the strings as a traditional Fender one.
-
Watching youtube for sound comparisons... good luck!
 The sound is compressed and very few of us have even half-decent speakers connected to our computers. The story proves exactly that: We want to hear a specific thing ans tend to look for the proof that support our case.
Re: microphonic pickups. Her's an interesting experiment (at least somewhat scientific) that is easy to conduct at home. Connect a pickup that is un-potted to your amp, no instrument at all, just straight to the amp. Now tap the pickup with your finger, just knock on it. There will be sound produced by the pickup. Do the same thing with a vacuum-potted pickup and there will be virtually no sound at all. Now the theory: Those two pickups will sound different in the same position in the same guitar. Even if they are CNC-procuced to extreme tight tolerances with the only difference that one is potted and one is not. Why? Because the vibrations of the complete instrument is affecting the sound. one pickup will "pick up" the vibrations of the guitar in a different way than the other. If we continue the same thought experiement: Will changing the way we attach the pickup to the guitar affect the sound? Probably, as it will change the pickups relation to the strings vibrations. Will changing the material in the bridge affect the sound? Probably as it will change the way that the vibrations from the strings are transferred into the body and thus changing the way the pickup vibrate in relation to the strings. Will "magically" changing the wood in the neck affect the sound. Probably, in exactly the same way. An so on.
However: Is there a "holy grail of tone wood?" In my opinion no. The use of specific wood are down to tradition. There is an at least somewhat scientifically project called the Leonardo Guitar Research Project were a set of as identical as possible acoustic guitars were made, half of them made from tropical wood (except for the tops) and half of them from other wood like pear, walnut, oak, ash, alder etc. In blind tests neither the player nor the audience could tell which guitar were made from traditional wood and which were made from alternative wood. However when knowing what guitar was made from what material there were a significant bias towards tropical wood.
My point? There are certainly "tone wood", however it might not be the species we think that will produce the best guitars
-
There are more factors that need to be taken into consideration, like how deep your neck pocket are, or thick your neck is in the pocket area, the make of the pickups etc. Unfortunately "strat hardtail" and "P90" Isn't enough info. My suggestion is to draw out a side profile with the exact height of your specific bridge, the neck pocket depth, the neck, the preferred string height at the 20'th fret etc. Then you can mark the desired string to pickup distance and finally easily calculate/measure the needed depth for the specific pickups you have. It doesn't have to be a nice drawing, just a line with all positions marked, representing the top of the body, and all other measurements marked above or below that line.
-
Looking forward to see more. Tele + Bigsby is among the best looking guitar IMO. However I prefer the B5 version with the adaptor plate. It brings a little bit less "metal" to the look. BTW were did you get the thermotreated maple from? I have seen neck blanks (actually I have one here waiting for the right build) but never fretboard blanks and tops.
-
Alternatively, there is PRS's way of making two way rods, which I want to try, but it will require a brazing setup, I think. They are a very elegant solution, low mass, and easy to make at home if you have a way to braze.
I made a search but couldn't find anything on that subject. Do you mind elaborate a bit? Very interested...
-
Looking great! Having seen Etna slowly pouring out molten lava in the middle of the night I must say that this is a great representation of that visual experience. Can't wait to see how it looks with the LED active.
-
The links doesn't work... I would go for this:
http://www.madinter.com/accessories/truss-rods/gotoh-two-way-truss-rod-electric-guitar.html
You need to check that it works with your specific design. Draw everything out in ful scale and check.
I would hovered rather go with the rod from rocking as it is shallower and made of steel. But the Gotoh rod will work just fine. And possible make the neck a bit lighter too, and that is a good thing in my book.
-
OK, the pictures you linked to shows the Fender bi-flex trussrod. Thats the one I linked to in my first post. To do that type of trussrod the original way you rout a curved channel from the back of the neck. That doesn't seem to be what you want to do. I try to understand what it really is that you want to achieve. Do you want to use a straight channel, double action trussrod, placed directly under the fretboard, but have it look like the Fender bi-flex trussrod? If so this is the way I would do it:
- Use a lathe to turn walnut plugs with a hole in the center to match the Fender style plugs (or buy them ready made, they cost from 5$ plus shipping and import taxes but if you don't have access to a lathe you have no choice...)
- Rout the trussrod channel from the top of the neck blank. Stop before you reach the nut area (draw this out full scale for the actually measurements). Like this 105392d1323672833-installing-martin-1-way-truss-rod-flat-headstock-2011-12-12-17-02-07-jpg
- Cut the headstock to desired thickness but leave the fretboard end squared off, not like the smooth curve it will have when finished. This makes it easier to do the next step. Like this: 02-tr.jpg
- Drill a hole to match the plug you just made and make sure you have the center of the drill at exactly the same position that the adjustment nut of the trussrod have. quite similar to whats done here, altho at the head stock and without a already cut channel and with standard drill bits.
- Insert the plug and check alinement, fit etc, glue it in when you know the fit and placement is perfect and proceed with shaping the neck.
It can also be done without the plug, just drill a smaller hole, like this: trussrod_565.jpg
Now to the original question: How to make a double action trussrod. Are you seriously saying that getting the trussrod from here in Europe is to expensive? 10.90 from Rockinger, I see that Madinter in Spain have the Gotoh style straight trussrod (not my preferred version but I have used it over the years) for 9,31 and I know that there are more suppliers here in Europe (I get it locally for 15 Euro and I'm considering that a good price as I don't need to pay for shipping as I can pick it up by myself...). Shipping should be minimal if the one at Madinter is acceptable and a very small cost compared to ordering special metal working tools like the counter clockwise tap and die. I checked and here in Sweden the cost för a M5 counterclockwise die is around 60 Euro! And a matching tap is 30 Euro. So if you don't already have those (a cost of 90 Euro), or have access to tools like that, and on top of that cannot figure out how to make the trussrod from looking at the pictures; do yourself a favour and buy a ready made trussrod. It will save you a lot of time and money
-
Gibson does not make a straight channel truss rod situated directly under the fretboard. They use a curved channel just like Fender, however they install it from the top side of the neck, rather than the back like Fender. In this picture the wood between the trussrod and the fretboard can be seen.
In this picture you can almost see the curved channel
Gibson have mede their rods this way from mid 50's Gibson and onwards when they changed from a straight compression type truss rod embedded deep in the neck, close to the back of it, to todays curved rod.
BTW, I forgot that Stewmac has a new double action rod available. Read my prior answer in the light of me thinking of the old versions...
If you have would like to make a trussrod to learn or from a "do everything yourself" wish, then I could understand it. However if you think that making one truss rod will save you money I think you are wrong. You will need to invest in both tools and time. I didn't really understand were you are but I guess Spain or at least Europe (like me). My suggestion is to check for a lokal supplier. Check out Rockinger.com in germany. They have a double action rod priced at 10.90 euro. That cannot really be too expensive, can it?
I don't mean to put you you down, but if you cannot look at the picture of a double action rod and figure out how to fabricate one the task of doing one yourself is probably to hard. Look at this picture:

You have one square bar with a nut welded to it at each end. Then you have a rod that is threaded in each end. The thread is threaded counter clockwise at one end as is the specially fabricated nut. The rod is first threaded into the nuts, then the nuts are welded to the bar and finally an allen head is welded to one end of the threaded rod. To do this yourself you need to get a counter-threaded cut and die (I think thats the name), make the special nuts and have access to an arc-welding equipment. The raw material itself would probably more than the the cost of a ready made trusted. My suggestion is still to shell out with the 11 euro and get a fully functional rod from day one...
-
I have investigated the double action rod really in my "building career". The conclusion was that I rather build guitars than weld truss rods. Here is the factory drawing for the Fender two way truss rod:
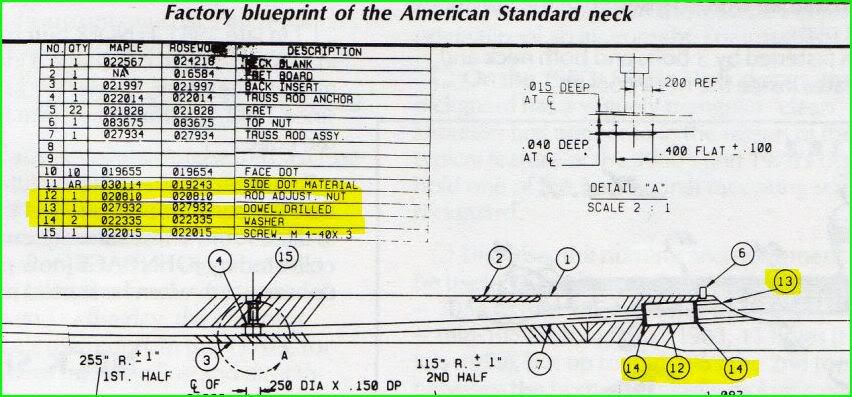
The Fender is made in a quite different way compared to the Stewmac version. Fender simply blocked the truss rod nut with a piece of wood, drilled so that you still can get an allen key though the hole into the truss rod nut. Stewmac use two threaded rods threaded into two brass blocks, with one of the rods threaded clock-wise in one end and counter-clock-wise in the other. They weld the nut to the rotating rod (top one is stationary)
I have used Stewmac trusses without any problem at all. I have however moved over to the type LMII sells, although I buy a slightly thinner version. Both works fine.
-
For acoustic Rosewood sides some recommend .09" and some others as thin as .08 for tight cutaway areas.
-
Steam or heat should do the trick. 3/32 is pretty thick, what wood are you playing on using?
-
I think a lot of guys can help you with that. If you state your location you might get more help.
-
First: Welcome to the forum.
Secondly; Wow! That s lot of options and a lot of switches. Just so that I get it right; you mean that you are using two "hot rail" style (or similar) HB pickups in the place you usually put a single HB? I am very curious about how big difference you will have between, say the coil closest to the bridge compared to the coil closest to the neck. The distance isn't that huge. Anyway, looking forward to see (hear?) the end result
-
Looking really nice. Not my personal choice for colour, but hey, its your guitar. Congrats on a really nice build
-
Generally some good points. However the assumption that pickups are not microphonic are not 100% accurate. You have a full range from "completely dead" pickups to "extremely microphonic" when considering how much they react to actual vibrations in addition to the change in magnetic field. You can add a metal cover or have the wire in the coil(s) really loose and the pickup will scream from feedback (in a very un-musical way) if you use even a touch of gain or play at sound level just slightly above bedroom level. That feedback is a reaktion to the pickup reacting to physical vibrations, so for those pickups the above statement are not entirely true. On the other end of the spectrum you have you EMGs and similar pickups, with completely solidified coils, cast in epoxy, with no possibilities to have any internal parts resonating to vibrations. You will however still mount them with a spring loaded system into a ring or pick guard, or directly in the body wood. Now we have eliminated the internal resonance. But we still have a physical resonating system were the pickup *might* move in relation to the strings due to resonance in the body and/or suspension system (screws, springs, rubber tubes, plastic etc). If the pickup vibrate in relation to the strings that will affect what the pickup "read". And the vibration of the pickup will be affected by the physical construction of the guitar.
A thought experiment: Test a set of HBs on a solid guitar (any wood, construction etc). Then move them to a typical big body jazz guitar, mounted to a vibrating top made from spruce or similar wood. Will the output (signal level, tonal spectrum etc) from the both guitars be the same? Probably not. It might maybe be a bit extreme to compare those two situations, but it "proves" that there is a difference in sound and the difference is based om the constructions of the two guitars -> how the guitars that the pickups are mounted to vibrate -> there is a difference between how different wood vibrate -> The wood do change the sound of the finished guitar
Now to the question if wood type A always will produce a specific sound and if you can scientifically "calculate" the sound of a guitar before you build it based on the wood and construction choices. No you cannot!. I have the same experience as guitar2005. There can even be big differences in sound (vibrational response) from different parts of the same board.
To conclude, the thing about pickups being non-microphonic is only partly right. And even with totally "dead" pikcups there will be a certain influence in the tonal output of the pickup depending on how the pickups themselves vibrate in relation to the strings and thus there will be a influence in sound from the wood and the construction of the guitar, however that influence is sometimes widely exaggerated.


 The sound is compressed and very few of us have even half-decent speakers connected to our computers. The story proves exactly that: We want to hear a specific thing ans tend to look for the proof that support our case.
Father/Daughter guitar
in In Progress and Finished Work
Posted
One evening a couple of years ago my daughter asked me if I could build her a guitar. I suggested that she instead should pick one of all guitar in the house. However she explained that as she have quite short fingers she found most guitar pretty hard to play. So I contemplated a bit on the topic and then put a Capo on a guitar to test out were she was comfortable to play. It turned out that at the third fret she could reach around and fret chords in a much more comfortable way. So based on that I drew up a smaller guitar, with a smaller body. It turned out it can be considered an Alto Guitar, having a 21" scale. Its a scaled down version of my current EvenStar Acoustic based on some ideas from the Kasha/Scheider guitars. The back and sides are Bloodwood, the top Sitka spruce, the neck is flamed maple and the fretboard, sound hole ring and bridge is also made from bloodwood
However when I presented the plans for her I got inspired by John's (Avengers63's) Father/daughter build and told her that I wasn't the one to build the guitar. She had to do it herself. To my surprise she actually agreed under the conditions that I should supervise the build and operate all dangerous machines (band saw etc). So we started this over two years ago. I forgot to snap pics on most of the process but some pictures exist and I would like to share them with you.
No pics of the sides being bent. I have a fox style bender with heating blankets and a LMI heat controller. I build with a quite heavy neck block that extend over the top/back pretty much like a spinach heal does. However I screw the necks on, more about that later. This is were we had the sides bent, the neck block contoured and the kerfed lining installed. The body was sanded against dishes clad with stick-it abrasive.
The top being cut out and the young luthier refusing to be on cam...
The luthier sanding top bracings to an arch, using a beam clamped to the top of a radiused dish to ensure they are perpendicular to the surface
The top bracing system kan be seen here, in rough shape, still not glued to the top.
The top being glued to the sides
And the luthier still refuses to be on cam...
I must mention that she was 16 when we started this build. She has now turned 18, soon to be 19. Time really fly...