


SwedishLuthier
-
Posts
2,147 -
Joined
-
Last visited
-
Days Won
17
Content Type
Profiles
News and Information
Tutorials
Product Reviews
Supplier Listings
Articles
Guitar Of The Month
Links and Resources
Forums
Gallery
Downloads
Posts posted by SwedishLuthier
-
-
First off: Welcome to the forum!
I cannot really help you with the wood drying questions as I have never used "green" wood except for one time. That time it was a guitar top made from a lokal timber and I just re-sawed it to just over 10mm, clamped it hard to a very stable wooden shelf with wooden sticks making air circulate over and under each board and let it sit for 6 months. The wood was decently dry when I got it (about 14% moisture content) and I got it down to 4% after those months.
Regarding you question about how to monitor moisture content; There are quite simple and cheep tools for this, often available at painters supply shops and similar but those are really only working on freshly cut surfaces. As soon as you cut a bord the surface start to loose moisture but the board will generally have a higher moisture content than the tool will show. If you are going to try to dry this wood yourself I recommend that you seal the end grain as wood loses more moisture through its end grain and if the ends are getting dryer than the rest there is risk for more cracks to develop. Use wax for this
The crack will glue nicely with a bit of low viscosity CA, no problem. Wick it into the crack until you see that the crack doesn't suck up more glue and (if possible) clamp the crack.
-
-
Thats just so sad. I wish there is anything we could do to help.
-
1. I have never seen read-made templates for those bridges. However, if you want to, and if you are willing to take all necessary measurements, I can make a drawing for a template. If you feel that you can make a template from a paper original you should be fine and if not, go to paragraph 2...
2. Look around, talk to your lokal guitar shop, if they cant help you they hopefully have a name locally.
3. Without the guitar at hand it is impossible to say. However you need to measure the string length, not the distance from the nut (or any fret) to the studs. The construction can be different, thus requiring different placement of studs. You need to measure the distance from nut to the saddles of the bridge, or really the break off point for the string to the nut.
If you would benefit from help with the template drawing PM me and I'll draw something up. I'll post the result here for anyone to use.
-
I'll include a mini tutorial on the whole french polish process.
That would really be great!
-
Just beware that the dye might (will) wear off over time. Of cause you can just dye it once again.
-
Don't try to read something into what I wrote. I try to write what I think with no hidden messages

I have only responded to what you wrote, nothing less, nothin more.
-
My friend. You first state this
Has to disagree, the 10 applications of true-oil is way thinner than 5 coats of lacquer.
This is weird... because I never stated that 10 applications of Tru-oil is thinner than 4-5 of lacquer.
When you, in an earlier post said this:
10 coats of tru-oil seems like a huge waste of time. If you want a thin "organic" finish as you say (Whatever that means), you can apply 4-5 coats of lacquer.
OK, you stated thin, not thinner, but if that wasn't the quintessence of your statement, please expand
Next you continue with this:
You then go on to say that tru-oil will soak into the wood, but lacquer does that too, unless the wood is sealed 1st (but I didn't mention anything about sealing the wood).
I never said that lacquer doesn't soak into wood. I said
You have to remember that it takes 2-4 applications before the oils stops soaking into the wood and start to build a film (of cause depending of what type of wood we are talking about).
So please have a look at your own style of posting before saying thing like this
Funny how people read posts on this forum lately.
Stating things like that have a tendency to bounce right back at the originator. Lest agree on refraining from that...
To the actual case:
To my personal experience (from 25 years of using different types of lacquer and maybe 10 years of using try-oil) true-oil will soak into wood much deeper than lacquer. It also takes a few more applications before you have "saturated" the wood with true-oil compared to when using lacquer. When I shoot lacquer I always have a film build up after the second application, but often already after the first. With Tru-oil, to my experience, you need as stated 2-4 applications. Remember that I stated that I apply the oil in very thin layers, thus requiring more layers before the formation of a film. However your milage may vary
And also as already stated: 10 applications (actually a few more when adding the sand level/reoil-process) of Tru-oil is for oil-over-stained-wood to ensure no sand throughs. For true oil over natural wood you can get away with as few as 3-4 applications but generally seldom more than 5-8 applications, once again depending on the type of wood you are working with
Everything I state is based on how I make things and are not in any way "laws of physics". I just doesn't agree with you statement that using a few more coats of true-oil is is a waste of time compared to shooting a few less coats of lacquer. You have to look at the total process. When shooting lacquer you need to ad time for spray gun assembling before shooting and dissembling/cleaning after the application. Repeat that up to 5 times depending on your total process (OK kan be as little as once of twice) and you have quite a lot of time spent on spray gun maintenance alone. Then you need to add time for thinking the finish, adjusting the spray gun etc etc. You also need to spend time to buff and polish the finish after maybe 5 weeks of drying. Compare that to using oil; you grab the bottle Drying time for the oil, when applied thin enough is 45-60 minutes. That is a time saving process.
-
 1
1
-
-
Has to disagree, the 10 applications of true-oil is way thinner than 5 coats of lacquer. The way I apply the oil at least. And ten layers was if doing a Tru-oil-over-stained-wood finish to avoid sanding though the oil. The oil has to go on thin as it will not cure hard enough if applied thick. You have to remember that it takes 2-4 applications before the oils stops soaking into the wood and start to build a film (of cause depending of what type of wood we are talking about). The application of oil might take a bit longer, yes, but you make up for that as you don't have to sand and buff and polish the finish. And I never said that it was a fast finish...
-
I have applied try-oil over dyed wood several times. There is no more problems than applying a sprayed or other type of wiped on finish. As with all finished you need to learn to work with the stuff and there will for sure be some misstakes (heck, I have sprayed water based lacquer for 20 years and sanded through a trans-tint layer the other day...).
To be successful you should really make sure that each layer of oil is as flawless as possible to eliminate the need for sanding (OK, that goes with all types of finishes) and make sure you have plenty of layers on before sanding. Also make sure you don not try to sand all un-eveness in one session. I build up al least 10 layers using a smal patch of cotton (old bedsheets are great) before sanding. When I start sanding I sand ever so lightly using 1200 grit or higher, only taking of the "highs" in the finish. Then I apply more oil, sand, oil, sand until I have a completely smooth surface. Then you can either continue to buff as you would with a traditional finish (I haven't tried that) but that will take away some of the finish and the risk is that you eventually will cut through the layers. What I do is that I apply a few more coats of oil, this time applied with a folded coffee filter, more or less polishing the surface with oil, rather than applying a layer. this will fill the scratches from the sanding process and create a semi gloss surface. There will be a few small specks of dust in the finish but those can often be rubbed away with a soft cloth. This all produces a nice "woody" surface, not a glossy lacquered feeling, but something very organic, and for me, that is the purpose of using oil finishes.
-
1
-
-
Re the effect of the paint: Have you stringed her up and tested the sound after the repair? I wouldn't be too concerned about ruining the sound unless it is a top notch sounding guitar
-
My suggestion, for what its worth, is to strip the burst and start over. One rule I set for myself (but sadly not always follow) is to test on scrap material. Obviously you cannot test the reapir on scrap, but the sun bursting technique can and should be tested om scrap. The key to a nice burst is to feather the solid paint very lightly. Start with the spray gun, or the can, at about a 45 deg angle to the top, aiming it at the very edge of the body, almost missing the guitar. Lay down thin layers and build the burst in several applications, taking the guitar out in good light to check the progression between applications. I think that even though you need to have a pretty wide burst on account of the placement and size of the repair you can still make this a nice looking guitar. A simple thing like scraping the binding and abalone (?) purling clean would also help this look better.
The main problem I think most see with the burst on display is that it is to wide and to opaque.
However my heartfelt suggestion is to not try to fake age. Very few reliced guitars look aged, just reliced, and relicing a guitar is an artform in itself. So if you are not 100% confident on finishing, it might be a too big step aiming for a nice aged look.
On the up side you should have lotsa cred for trying a very tricky repair.
-
That. Is. So. Beautiful!
-
There is a album functionality here nowadays if you need to host pictures.
And welcome back!
-
Oh, thanks for the info. I actually got the Pro version right away
-
I'm always game for a guitar from you sir!
-
I thing the term is latching, switching buttons. Or something like that...
-
You need what I think is called a bi-stable switch. I'll try to make a quick drawing and get back to you
Edit: Here you go:
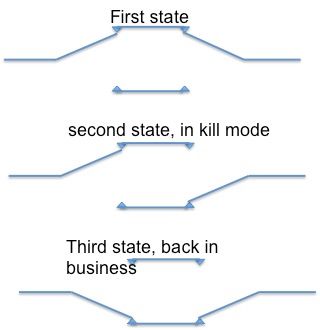
This means that when you have sound any of the two switches will kill the sound and any of the switches will turn it on again. Thats the first thing that comes to my mind. If thats not what you need, try to explain more and also why you need this "odd" configuration, that might help us understand your needs better.
-
Pretty close to spam this...
However I downloaded the demo version of Bias desktop (run it as a plug in in your favourite DAW) based on a raving review in a local magazine and was so amazed by the sound that I actually consider retiring my old hardware in favour of Bias for all studio work. For the first time I can really get that clean-but-heavy AC/DC-ish sound I'm always looking for but never really get with other simulation hard-/software. As soon as the christmas bonus comes in I'll sign upp for the pro version
My only complaint: I missed the black Friday sale...
-
1
-
-
Tung oil also tend to lift any grime off the wood so if you re-oil often the problem should be smaller.
-
And a decent sound...
Whats you r budget, that might help us star away from too expensive stuff.
I would change out the pickup and the electronics. Most electronics on low end guitars ar just that, low end stuff. There might not be a change in sound, but most likely you can hear it right away. Next thing is of cause the pickups. Shop around, try to get to listen, or listen on line, to several makers pickups before picking the one that you like the most. If you have access to tools and a certain level of experience with those you can even "go wild" and put in MM pickups or something that isn't P-bass-ish at all.
-
I have used Korin and I haven't had this problem
-
First of all: Welcome to the forum.
It might help if you describe what you feel is sub standard compared to other instruments. But my guess would be things like bridge, tuners, pickups and (most important) set up. The hardware is pretty staring forward to exchange if you feel decently comfortable with the most common tools and a soldering iron. The setup requires a bit more knowledge. But that is available on line and if you are willing ot research (or simply ask a more specific question here...) it is no real obstacle. I would start with a look at the nut, the truss rod adjustment and the bridge string height.
-
Nice guitar. The bridge shouldn't be a problem, it looks like a fully adjustable unit. The nut will need some work if the old fretboard was 14". An yeah, you will need all 24 frets...


Knightro Voyager
in In Progress and Finished Work
Posted