


a2k
-
Posts
266 -
Joined
-
Last visited
-
Days Won
9
Content Type
Profiles
News and Information
Tutorials
Product Reviews
Supplier Listings
Articles
Guitar Of The Month
Links and Resources
Forums
Gallery
Downloads
Posts posted by a2k
-
-
My son has been studying this video very closely. I've quizzed him on it and he seems to have a surprising good handle on the process. He thinks making a bass takes about 5 minutes start to finish, though.
-
On February 22, 2016 at 11:56 PM, Prostheta said:
I'm not entirely sure what the race is, or what everybody's trying to win. Internet hamper? Free hat? Pat on the back from Stephen Hawking?
I'm not much for hats, but a pat on the back from Stephen Hawking is a different story.
-
On February 19, 2016 at 4:17 PM, Prostheta said:
I couldn't resist such a bawdy joke.

Once I realized it, I had to resist running with it lest I dig myself in an even deeper hole.

-
 1
1
-
-
On February 18, 2016 at 1:55 AM, Original said:
Great documentation in this thread.
You've done very well for a beginner, and most of these lessons will reflect in all of your future projects. Nice work!
Thanks! I hope this thread will help other newbies see that 1) this is possible 2) their first project isn't going to be perfect but hopefully still nice, and 3) learn from my mis-steps they way I'm learning so much from everyone else that is sharing here. I gotta finish first, though...
")
-
1
-
-
17 hours ago, Prostheta said:
I'm not entirely sure about whether "drilling bride holes" is a necessary part of this working process, but whatever helps.

Ha! I just caught the "typo".
-
18 hours ago, curtisa said:
No video to see?
No video to see? It shows up for me. Anyway, here's the URL for cutting and pasting:
https://youtu.be/OHslyj38hXw -
4 hours ago, Prostheta said:
I'm not entirely sure about whether "drilling bride holes" is a necessary part of this working process, but whatever helps.
Sukayu Onsen looks awesome! What kind of tyres do cars need to wear up there? Friction or studded? Our little Micra has studded on right now, and given that it's hovering just below zero most of the time here, the roads are icy as hell. The Micra is a champ for sliding around corners and roundabouts. Not sure if it would manage too well there though; as soon as the snow starts to pack onto the road as ice it becomes hella bumpy and rough as anything. For one, I am sure I would not like to go to Lapland in the Micra anyway....
Yeah, pre-drilling bridge holes might be a little excessive, but for some strange reason getting the bridge centered and square at the right spot is one of those little details that stresses me out way more than it should.
Sukaya Onsen is awesome. The onsen (traditional Japanese hot spring) is in a super atmospheric old building. The water is acidic (they told us it has a ph of 4) so it stings slightly and you can't use soap before getting in. Super hot, too. Great way to end a day out playing in the cold.
We rented a van with friction snow tires. It came with some burly chains too but we didn't need them. Despite getting over a meter of snow the first 36 hours we were there, traction wasn't ever a problem. It was super light fluffy "blower" snow. It's only about a 45 minute drive to the ocean and from top of the mountain range you can see the water (if it's the one clear day they get in a month).
-
I've been making a big checklist as I I've been going through my first/current bass build. I do it mostly as planning - "here's what I'm going to get done this week", and I try to include all of the details, such as drawings, measurements, etc. required to complete each step to reduce the amount of improvisation (aka "winging it") I do. When I'm done with this project I plan on reviewing all of the steps to see what can be refined and also to fix some ordering issues I stumbled upon that made subsequent tasks more complicated. I'm sure it will help me next time, but I am faaaaar from a standardized/repeatable process.
One of the issues I've been finding with this approach is that I often walk into the shop with a specific task in mind, but I arrive just not feeling like that's what I want to do that day ("I just don't feel like using the router today"). Or I show up and just flat-out change my mind, like I've done with the body roll-over and forearm cut. I'm doing this for fun, after all. If this was a job, I'd need a lot more discipline (not to mention skill, time, etc.).
(Off topic thought related to 'jobs'- I wonder if I can deduct expenses for tools, materials, etc. of building from income made playing gigs the way I can deduct strings, instruments, etc...)
-
Last week I headed up to the northern tip of Honshu, Japan's main island, to spend a few days in the Hakkoda Mountains. The little enclave at the base of the mountains, called Sukayu Onsen, is one of the (if not the) snowiest inhabited places on earth. The trees get covered by a very thick layer of frost which they call "snow monsters". The forest seems very open and spread out, but that's just because the snow pack is so deep, you are walking among the very tips of the tall trees. We had a very rare clear day during our trip - here's a photo I took of the monsters:

And for reference, here's a picture of me taken on a "normal" day:

I'm back in the relative warmth of Tokyo now and got a little time in the shop yesterday. I worked on the transition between the neck and body (if this was a bolt on, it'd be the "heal") but didn't get any photos. I'm trying to get things as close as I can before glueing the wings on because access is going to be a challenge after that.
I also drilled the electronics holes. I spent far longer than I should have debating options for the control layout. I ended up going with a single ark that follows the lines of the bass, inspired by the 6-knob layout of Wyn basses. Here's a photo, and a test fit of the electronics cavity.


I ended up having to make my cavity about 1/4" deeper to allow the threads for the pots to have clearance. I realized a big part of my slowness is that I do many things, and then end up having to go back and redo or adjust many times. I know it's better to not cut enough than it is to cut too much, but I need to work toward "measure twice, cut once" instead of "measure four times, cut twice". I'm sure that will come with experience.
That's it for this week. Next week, I hope to:
- Drill bride holes
- Drill electronics cover holes
- Sand down the headstock plat
- Sand neck and body
- Test the finish options I got off amazon.jp
- Glue body wings (maybe...)
Slow and steady! I'm trying hard not to get my head too deep into my "next" project yet.
-
1
-
-
13 minutes ago, curtisa said:
Is there a real reason why you think the frets might need gluing? Are they gradually working their way out of the slots by themselves?
I wouldn't glue in frets unless there was an underlying problem to begin with - frets springing out of slots, slots too wide for the fret wire, fretboard material too weak to hold them etc.
There's every possibility that removing the frets to refit them again may result in the existing slots being widened to the point where you'll be forced to glue them in so that they'll stay put.
If it ain't broke don't fix it...yet
Thanks. The thing that's making me fret (sorry, couldn't resist myself) is that I was comparing my frets to another bass I have with a Warmoth neck. On the Warmoth neck, the frets are practically welded onto the fretboard. I'll keep an eye on them during sanding and such and if they seem to be moving, revisit this.
-
Okay, now I've got myself worried that because I didn't glue the frets down, they are at risk of moving. They seem tight enough, though I'm sure a knock on the side could move them. Should I:
1) not worry about it because string tension will handle this
2) put a drop of CA glue on the sides to hold them in place
3) pull them out and then glue them back in
Thanks!
-
Dude! I love this. Great way to sharpen your skills and make some low-consequence mistakes. Tear-outs are a bitch, aren't they? Amazing progress for two days worth of work.
I'd have a hard time keeping the breaks on and not rushing through things. That said, I'm seriously considering making a 100% standard Jazz bass as my next project as a skill building exercise (well, that and I have a color scheme I can't get out of my head).
-
1
-
-
2 hours ago, Prostheta said:
Loanwords are the same here a lot too. I used to have fun playing wordgames with verb types and grammatical structures, mostly using rude jokes as the basis. Much fun was had by all, or at least, me.
The one that always gets me to giggle is broccoli - in Japanese, it's pronounced "buh-raw-ko-ri".
-
I did two things on Friday. First I finished bringing the neck down to the target thickness (it as a little thicker than the body and needed to come down to give the bridge enough vertical space). Specifically, I brought down the thin area next to the fretboard with a router. This was a tiny bit tricky because I'd already radiused the fretboard so I couldn't use it as a mounting surface. So instead I came up from the other side using one piece of MDF as a riser and another as my guide for my template bit. Simple enough. Here's a shot:

Second, I put the frets in. I took extra care to make sure I had a good bevel on the inlay and I'm happy to report no cracking. I didn't use glue - the frets seem to be locked in well without. Here's an after shot:

I did figure out how to order on Amazon.jp so I've got some more finishing options headed my way. The wipe-on varnish I've tried so far produces an okay result but just feels too plasticy for my taste so I ordered some oil options. In case anybody ever asks, the Japanese words for "oil finish" are "oeru fuinishyu", written 'オイルフィニッシュ' (it seems crazy, but sometimes if you say an English word with a Japanese accent you get lucky).
This is a travel week for me so no progress until next week...
-
2
-
-
On February 4, 2016 at 9:41 PM, Prostheta said:
Where's the inconsistency coming from? I take it that the stringer is the bit that's not perfectly straight? I mean, to be fair you can adjust the outside imperceptibly (I'm sure you know this) however the stringer....hmmmm....a fine line. A sanding jig similar to a shooting board is probably the best idea. Looking at it, are the stringers slightly wider than the central laminates? You can probably adjust then with sanding, however at the very least they need to be done equally, and certainly balanced with respect to the central lams.
Did you keep the scrap from the outside of the body wings to use as glueing cauls? That'll help dial in a bit more clamping pressure. I'd glue the problem wing separately from the other, so that you can use a flat caul on the opposite side to make clamping easier and tighter.
I've got to get back in the shop and figure out where the inconsistency is coming from. I've got it in my head that the sides of the neck are straight and the body wing is where the problem lies. But I need to confirm this. If it's the neck, I could bring the side stringers in a little. They aren't wider, but I think as long as the pairs match it'd be okay. If it's the wing, maybe I can clamp it to a shooting board to plane it square (not sure if there is a shooting board in the shop but I'm assuming I can use any board that's long enough and has a straight edge).
I did keep the scrapes from the outside of the wings. They are a little "loose" after routing the wings down to size, but I think still useful for getting even pressure when clamping.
-
Cool idea about getting a sub-culture of guitar builders hanging out at the hacker space. As we see with this site, a group vibe and collaboration really helps everyone improve their skills and ideas more quickly. Several people here have expressed an interest in building a guitar, though I'm finding there is a big mental jump from "wanting to build a guitar... someday" to walking into a shop and getting started.
As for tools, I know nothing, but I sure do love the cabinet scrapers I bought. It really made neck carving (and many other things) a joy. I got this set - best $16 I've spent so far.
-
1
-
-
Oh man... these are beautiful! I am a sucker for a guitar with one knob.
-
1
-
-
Fantastic bass! It's fun to get to see these a project come together in time-lapse mode.
How's the final result in terms of playability and tone?
-
1
-
-
Got the koi cleaned up yesterday. Looks a lot better. It really sparkles in the light and almost seems like it's electric - really cool effect. I cut the fret slots and beveled the edges, but I'll so some reading on how to not ruin things when the frets go in. Here's a pic:

I also put the side markers in. Glow in the dark! Here's a night shot:

Now onto the trouble spot. I mentioned yesterday that I was worried about the fit between the neck and the wings - top wing, to be specific. It really needs to be tightened up a lot. Here's what I'm currently working with:

Tips on how to clean this up? I can trim back a very little without really messing up the shape, but I don't know how to make sure the resulting cut is totally straight.
-
Cool! Can't wait to see the rest of the build.
-
Looks and sounds great! Thanks for posting videos of the guitar getting played. That's something I'm always craving at the end of a build thread (and honestly, I feel like it should be a requirement for any Guitar of the Month entry).
-
12 hours ago, Norris said:
They are not so much structured classes as regular (once a week for 2 hours) workshop time with some experts and basic luthiery tools on hand. It's a privately run class, using a school's wood workshop. It's very relaxed, you can go at your own pace and get plenty of advice. Many of the "students" have been going for years
Sounds like a really cool way to work on this. Expert knowledge if you need it, shop time and tools even if you don't.
-
14 hours ago, Prostheta said:
Great to see more progress! Careful with the pearl next to the fret slots; the frets will happily chip your pearl on the way in unless you add in a small bevel with the corner of a file on the fret slots. There are other ways around this, however I am not an expert on inlaying as such; I am simply aware that this can be an issue.
Grab yourself some leather or cork to line your vise jaws, even if temporarily! The last thing you want is the vise screwing up your flat glueing surfaces. The neck taper faces are not parallel, so if the vise doesn't rack a bit (jaws going out of parallel to conform to the workpiece) then the jaws will be bearing onto a small area, generally the edges at the back. This might compress or mark up your surfaces.
Nice to see that you're being as adventurous as you can be with various techniques and ideas. A real primer in instrument making eh? Those benches look pristine....are they new, or have the previous users not had the heart to use them properly, and treat them more like furniture?

Thanks for the tips - I hadn't thought about the risk of MOP chipping when the frets go in. I'll add a bevel to the slots.
And I'll get my hands on leather or cork for the vise. Good tips - I'm actually a little worried about the joint seam between the neck and the wings - no light gets through, but the pieces don't fit together totally flat, so I can rock the wings forward or back. I'll be circling back with some questions/thoughts on the best way to fix this before the wings go on.
The benches are pristine. It's a combo of them being treated like furniture (don't mess up the fancy benches!) and almost nobody using the shop. People come in occasionally to cut 2x4's down for random reasons, but in the 4 months I've been at it, I am the only person working on a multi-day project. When I started, I was expecting the shop would be packed full of skilled wood workers who I could quietly watch and learn from, but unfortunately that's not the case. At least I have you all!
7 hours ago, ScottR said:Nice koi. I'm a fairly patient guy, but I always lose mine when inlaying.....
SR
Glad I'm not alone! This really has been an exercise in Zen and 'letting go'. In the end I think it'll be worth it - the inlay will serve as a nice centerpiece to the bass and a sort of souvenir of my time in Japan.
By the way, those of you who have been following along have probably figured out that I'm new to this and learning as I go. I appreciate all comments, thoughts, tips, etc. So if you look at a picture and think to yourself "I wonder why he isn't ___", let me know! My feelings will not be hurt no matter how basic the feedback is. Thank you!


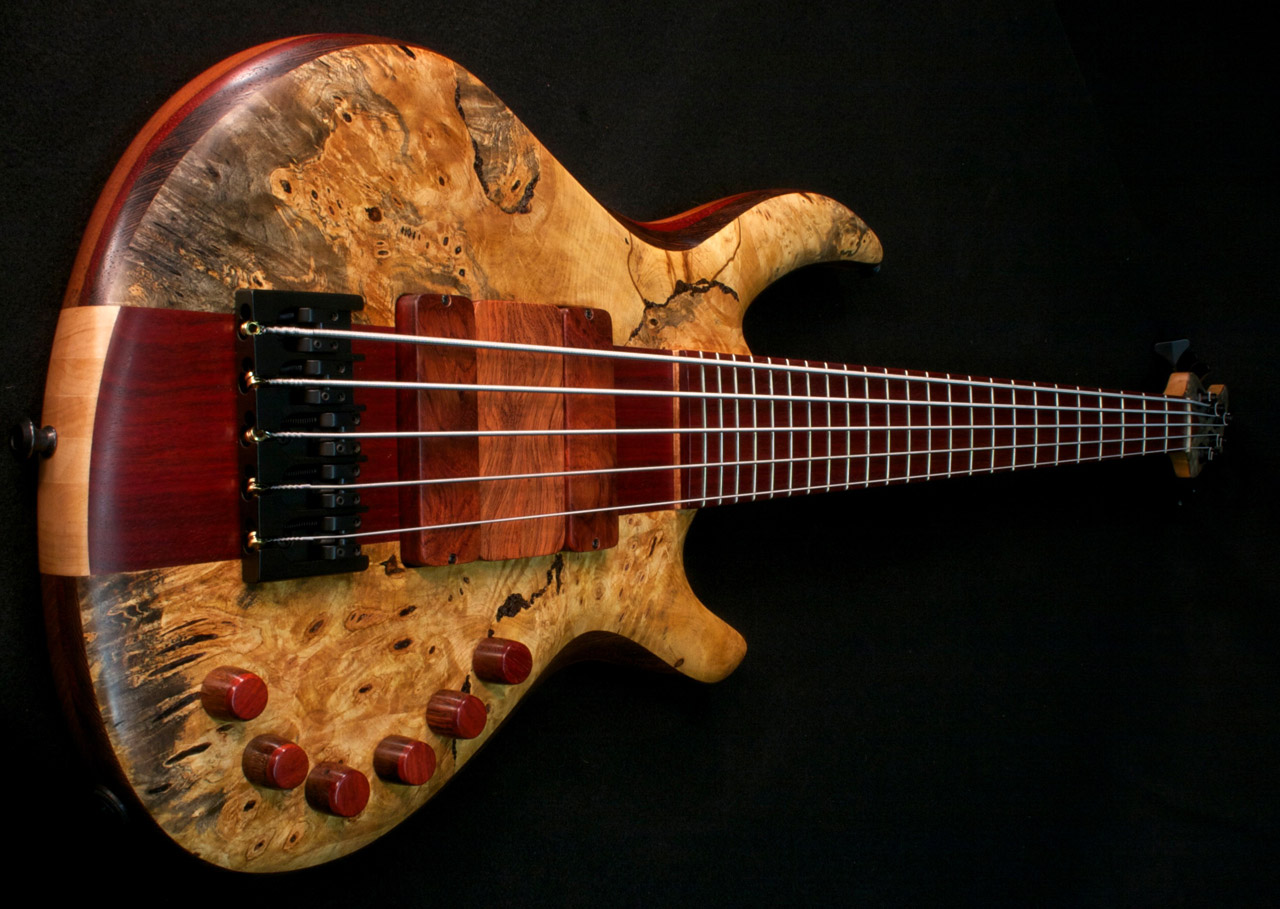
5 string bass build (it's gonna be HUGE in Japan!)
in In Progress and Finished Work
Posted
I am now paying the price for every time I finished a step with a rough edge or a little clean up needed and said "I'll take care of that when I sand." Am I alone in this bad habit? This is definitely something I plan on improving next time around. But for now, there are LOTS of little spots that need clean up.
It's frankly not photo-worthy, but just so you know what I'm talking about, it's things like this (where multiple passes with the template router bit left a ever-so-slight line & depth change between cuts):
Oh well... I'm happy to be learning.
The more interesting progress last week was gluing on the wings. I cleaned up the join area as best I could and glued them on one day at a time. Getting the wing to stay on straight is trickier than it sounds. Perhaps biscuits or pins would help next time. Here's the upper wing going on:
While that was drying, I took care of a few little things, like drilling the hole for the 1/4" output and holes for the cavity cover.
On Thursday I got back in and glued the bottom wing on.
After literally watching glue dry for about 45 minutes, I decided to do a test cut with my pickup templates. Good thing, too for two reasons. The first is that my 1/2" diameter template bit is too big to fit in the corners. I ordered a 1/4" bit - hopefully the smooth shank will do the same thing as the bearing. Second, I learned an important lesson about putting plunge router into a small template area. I didn't make sure it was all the way in before touching the edge of the template so I ended up cutting a small bit of the template before the bearing was deep enough. Oops! Glad I was practicing and not cutting into the instrument (can I call it that yet?). Lesson learned.
And finally, I did some finish tests of the Watco Danish Oil I'd gotten my hands on via amazon.co.jp. So far, I'm liking the feel of Danish Oil a lot better than the wiping varnish I'd tried previously, which just felt plasticy and artificial to me. I'm trying two color options (light and super-ultra-light). We'll see how it looks after a few coats, but I'm leaning toward the darker option. I also have some Howard Feed-n-Wax ordered to see how that looks on the sample. The color difference is more significant than it looks in this picture:
That's the weekly progress report. Up next: