


goat
-
Posts
392 -
Joined
-
Last visited
Content Type
Profiles
News and Information
Tutorials
Product Reviews
Supplier Listings
Articles
Guitar Of The Month
Links and Resources
Forums
Gallery
Downloads
Posts posted by goat
-
-
For a lower budget,one of those Epiphone Valve Combos go at a Great price,and they don`t sound too bad.
-
i'm gonna make a statement that will probably be seen as incendiary.
but what the heck, i've been known to throw gasoline on a fire from time to time.
for an acoustic, the type of wood (and construction methods) has a huge effect on the tone.
on a solid-body electric, not-so-much.
on a solid body, choose the wood for LOOKS. the bridge and pickups will have more effect on the tone, than the wood.

I agree with you Unk 100%
-
seeing gizmo's photoshop i think go for a normal through-neck as it dose look awsome =)
I`m leaning towards that right now,that photoshop looks neat!
I also have to scarf the headstock and may use a solid Walnut piece for that...
or
...use the Laminte Headstock with Walnut Veneers Front and back
??????????????????????
-
A little photshopping always helps with a decision like this i think
i love the full walnut top but exposed core can also look sexy id say it a hard one to call but it will look cool no matter which way you go
i look forward to updates
Hey Gizmo,that`s really nice how you did that.Thank you.
AND I do appreciate everyone`s input and I am not taking it lightly.
I am processing it all.
Thank you very much to everyone.
-
Nordstrand does sweet work on set necks, this may give you an idea.
http://www.nordstrandguitars.com/assets/im...nWei/final3.jpg
WOW! What is that Black I`m looking At in that heel????
That looks awesome!
-
Here is look at imho a perfect heel:
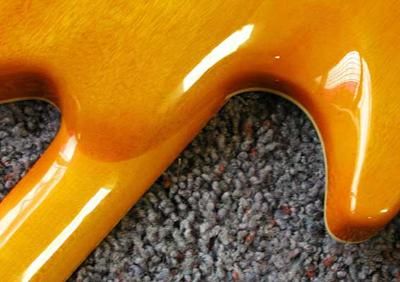
Yeah,That does look like the perfect heel!
I Likey!
-
Oh ya i love the shape by the way!
Thanks.I have Two Fender Jaguar Basses.The White one you can only get in Japan.The U.S.A. only sells Black and Hot Rod Red.
Anyway,I traced the the back part of the body of the Jag and Freehanded the rest.

http://i135.photobucket.com/albums/q130/goat552/DCP_3109.jpg
-
If going for neck-through construction, I don't see the point fo making whole body first, and not just the wings. Seems waist of wood in my opinion.
The wood is already solid.It was solid long before I got to it.
If I cut just the the wings,I`m still left with just 2-1/2 " inches of wood
Not useless,but not a whole other wing either.I know I could use it in other builds,but I`m not that worried about whats scrap and whats not.
It`s nice to have options.
I want the neck thru because of the comfort of the heel to the body.
I like your idea of a half set neck though.
-
I`m at a standstill wondering if I should make this Neck-thru visible from the front.
My original plan was to drop it in from the back so as not to split the one piece walnut body,
but the maple in the neck has pretty nice figure and I would then split the body into two.
What do some of you guys think????
http://i135.photobucket.com/albums/q130/goat552/DCP_3103.jpg
Should I make the neck visible from the front or leave it a one piece top?????

-
Thank you!
I think I understand.
It's the wood between the metal frets that are rounded a little?
I read somwhere (jemsite I think) a guy that rounded the edge with the whammybar, would that work?
It`s the corner ,where if the guitar is laying on your bench,the face of the fretboard meets the side of your neck,from the nut down to the body,both sides of the guitar neck.Not face and back.You will be rounding the EDGES of the fretboard(It would be all trim getting rounded if you have a border).and the ENDS of each fret.Not the wood on the face inbetween.
Think like the edge of a countertop or table.
Your quote above sounds to me like you are describing scalloping.
There is a tutoral somewhere on how to do`The rolled edges `(Like Wes described) that edges your frets at the same time.It`s like an angled block that holds a file that puts a uniform bevel on all the frets.Then the sanding sponge.I believe it is on the Jemsite.I also use that method.
I did it to a OLP Stingray copy and used that bass for several years.It fealt awesome.
(Sorry if my description is confusing
-
Beautiful work!
Is that a Lefty???
-
The Flame maple in the neck and the carve into the body look great!
-
IMHO The ones your Dad made look nicer.The contrast of the Wenge on the Walnut looks more interesting than the same color knobs.Especially with the Wenge in the body. Definately better than metal knobs,gives it a more classy look.(Lighter in weight too!)
Visually,to my eye it would look nicer if your lower cutaway went in more than your top one,in other words more access to the 24th fret.
But if thats what you want,It looks nice!
-
I'm going to build a non-reverse t-bird with a neck-through design, using a neck from Carvin.....

I've done lots of bolt-ons. I'm going to have to plane the body blank and the tongue of the neck to 1.5" before gluing.
Any tips or suggestions for this first neck-thru excursion? I'm really excited about going this new direction.
Get your bridge and figure out the neck angle(if it`s needed) before you glue the wings on.
-
Before the night is over, go back with a 1/4" chisel (or a screwdriver) and scrape off as much excess glue as you can. Your tools will thank you later. After ~45 minutes the glue is like leather and comes off rather handily.
Let us know how the joints look when you plane it down. Methinks you be needin' more bar clamps; the workmate and cam clamps might be over their heads for this sort of job. I personally use 1-1/2" aluminum angle on either side as clamping cauls, and 12 bar clamps.
Yeah,I know.I just did this for setup then I took it out and put a crapload of bar clamps.Thanks anyway for looking out for me!
12 bar clamps 4-8 cam clamps and a 8 inch wide bench vise.Oughtta do the trick
http://i135.photobucket.com/albums/q130/goat552/DCP_3101.jpg
-

Neck-thru laminate:
Maple/Walnut veneer/PurpleHeart/Walnut/PurpleHeart/Walnut Veneer/Maple
http://i135.photobucket.com/albums/q130/goat552/DCP_3092.jpg
-
I need to file the nut a little more to bring the strings down and then a few minor adjustments and I'll post final pictures.
I was not sure if you had a neck angle in there.I`m using the same bridges on my neck-thrubass and need to have an angle.
It`s much easier to have to raise the strings with the bridge adjustment.I wish I saw that on yours,but I think you started yours before I started my build.
-
...also,I`m not sure it`s there,it`s probably out of the picture,but that preamp needs a 9 volt
he he.........I wish it was something that dumb.......I'll try reversing the hot and grounds, and also grounding to the bridge.....
Most of all,let us know how good it sounds.
-
...also,I`m not sure it`s there,it`s probably out of the picture,but that preamp needs a 9 volt
-
-
I'm not even grounding to the bridge....
You should ground the bridge.Attatch a wire to all five and run it to the back of the volume pot.
-
Any ideas where I'm wrong?
Is it possible that all those seperate bridges need to be grounded to each other and then to the ground ?
-
Very Nice!
-
in the drawing you provided, "your" switch in it's center position would connect the top pole (center terminal) to both it's left and right throws. same with the lower pole.
.
I will go with the mini toggle Bartolini recommends.
after looking at alot of the higher end basses,the larger toggle looks kind of cheezy compared to the mini.
Thank you for the diagrams,
I could see myself using a ohm meter for days trying to find the right setup.The mini toggle will save me that hassle also.

Rolled Edges Fretboard
in Solidbody Guitar and Bass Chat
Posted
That`s the one I was talkin` about,Good find !
!