


Skyjerk
-
Posts
213 -
Joined
-
Last visited
-
Days Won
13
Content Type
Profiles
News and Information
Tutorials
Product Reviews
Supplier Listings
Articles
Guitar Of The Month
Links and Resources
Forums
Gallery
Downloads
Posts posted by Skyjerk
-
-
- Popular Post
- Popular Post
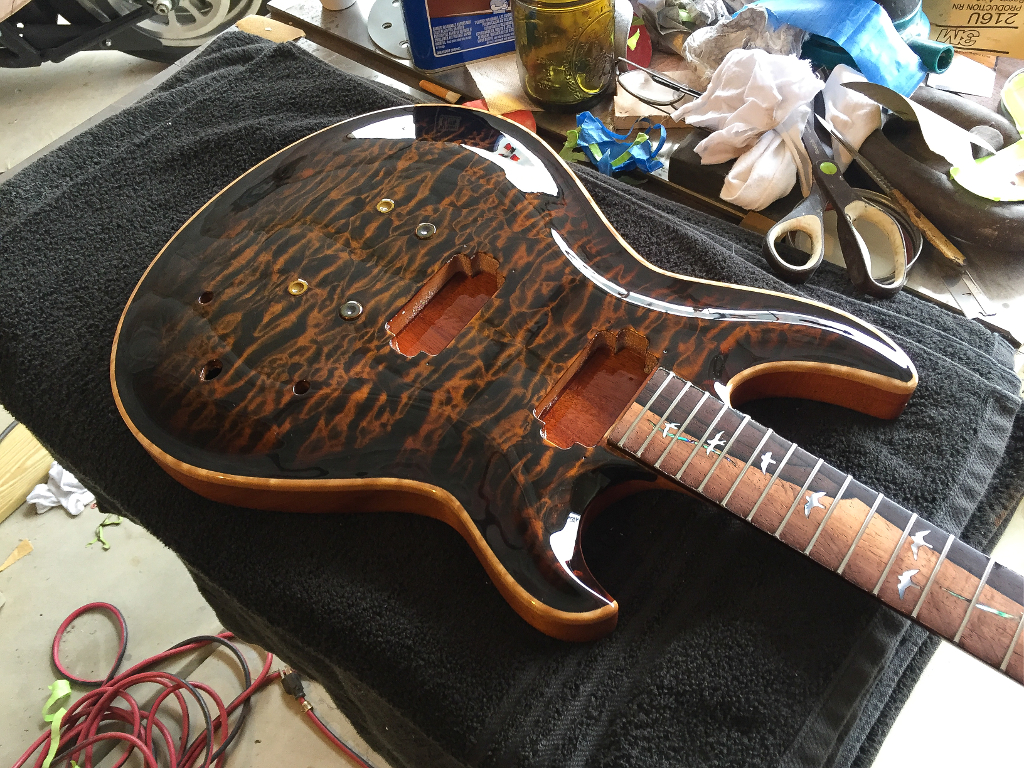
Just a different shot showing off the shape of the top.
Very minor ripples and orange peel remain at this point and should wet sand flat with minimal effort.
When shooting, I give the last build coats a full day to harden and then sand them flat using my random orbital sander and a 600 grit sanding disk. This literally takes maybe 5 minutes. Then shoot a final coat of clear thats thinned a lot so that it flows out nice and flat, and completely fills the scratches left by the 600 grit sanding.
This 5 minutes of work at this stage saves hours of wet sanding in a month since I've already removed 98% of the orange peel.
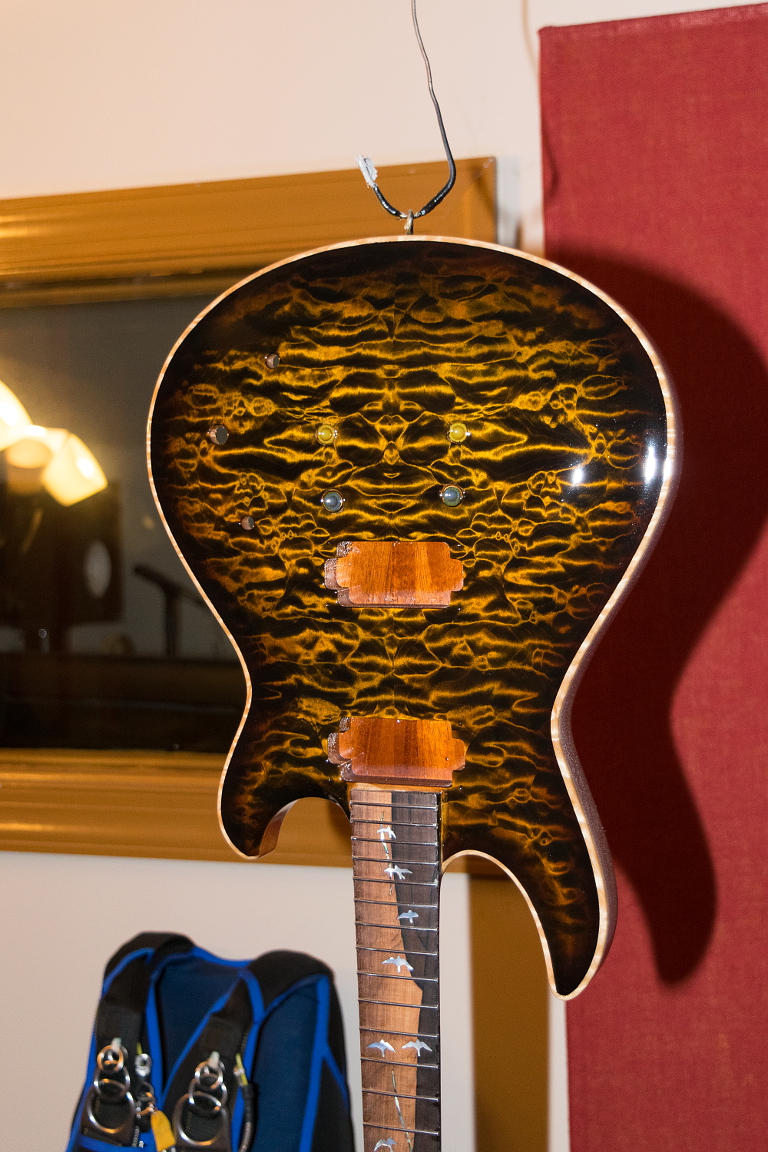
Also, I decided to finish the back and sides with a satin rather than the entire guitar being high gloss. the gloss will remain on the tops of the body and headstock.

-
 5
5
-
18 hours ago, ScottR said:
I'm pretty sure transtint is analine as well.
This was news to me, so I decided to look into this because I had never heard this said before, and I honestly didnt know.
According to the manufacturer "TransTint® Dyes are a solution of metal-complex dyes in a special solvent". Another source says "TransTints are formulated from light stable metallized acid dyes"
Aniline is apparently an organic compound.
based on this, I dont think transtint is aniline, but I cant find any information that specifically says it is or is not, so while I'm leaning toward "not", I wouldn't be prepared to place a wager on it
")
-
1
-
-
37 minutes ago, FINEFUZZ said:
This is a very stunning build. The fingerboard is SICK, and the quilting it very luscious.
Thanks! It IS luscious, isnt it?
That's a good word for it
")
I honestly didnt expect it to turn out as nice as it did. I surprised myself
-
2 minutes ago, ScottR said:
That's the way I pictured it going too. There must be some sort of clean up option though. The instructions said shoot 3 coats.
SR
Yep. I shoot 3 coats with 20 minutes in between them, and I clean the gun between each coat. I dont do a full disassemble, but I throw some acetone in the cup and give it a good swirl, open the mix all the way up till its flowing out nicely through the nozzle, then pull off the nozzle and air cap and swirl them around in a jar of acetone. Its a fairly cursory, 3 minute cleanup. Then I have a smoke or hit the head, then reassemble, mix the next batch, and shoot again.
After the 3rd coat I do a full-on cleaning.
Its a pain, but you DONT want any of it to kick while its still in the gun.
I really dont enjoy that part at all, and its also smelly
The results make it worth the hassle
-
1
-
-
8 minutes ago, ScottR said:
Thanks Chris. To clarify, is it this one: http://www1.inetba.com/simteccoatings/filecabinet/28x50app.htm
28x50 Clear Sanding Sealer/Filler ?
Is it nearly impossible to clean out of your spray gun?
SR
Oh, and I dont use my good gun to shoot this product. I use a cheap harbour freight gun with a big aperture. 1.8 or 2.0 mm. I clean up with acetone immediately after shooting it. Do NOT let it harden in the gun or you'll end up with junk.
Its fairly viscous. If you use it you'll also notice a slight pinkish color to it. This does NOT affect the color of the surface you're spraying. Ive shot it over bare wood and different color stained wood and other than the darkening you would expect when spraying anything on wood, no discernible change in the tint or color of the underlying surface. Its just like if youd sprayed lacquer on it.
-
1
-
-
Just now, ScottR said:
Thanks Chris. To clarify, is it this one: http://www1.inetba.com/simteccoatings/filecabinet/28x50app.htm
28x50 Clear Sanding Sealer/Filler ?
Is it nearly impossible to clean out of your spray gun?
SR
That is the stuff.
One caveat. Its very sticky and overspray that might float around will land on stuff and stick, including yourself.
Nitro is easy because by the time the teeny particles land on things its already dried, and brushes right off like dust.
Not this stuff. Its catalyzed, so it hardens in its own time depending on how much catalyst you add.
So, the rule of thumb when I spray it is to cover anything in my shop with sheets or drop cloths.
-
1
-
-
1 hour ago, ScottR said:
Killer finish. I learned something there. I would have sanded the black back too far.... and not have gotten the tiger eye effect.
Thanks for that. Where did you get the simtec easy sanding sealer? That looks like a fine product. To what degree did you sand it prior to spraying your nitro?
I wonder how your black transtint in water would have compared to the LMII analine? I'm pretty sure transtint is analine as well.
SR
Simtec comes from http://www.simteccoatings.com/Productlist.ivnu
you can only get it direct from them, but it's easy to order. I call and give them my order, shipping info, etc, and they email me a PayPal invoice. It's a great product, but it stinks

I sand it to perfection. Everything 100% flat and smooth, and flat and carved surfaces, edges, corners. Like it's the top coat, but it's a lot easier to sand.
then everything im shoot on top of it goes on perfectly
its a godsend for mahogany and even more for swamp ash. Once you sand it flat, it will never shrink into a pore, not even a teeny bit in 100 years. Your finish stays flat like glass forever. Well, until you bang and scratch it all to hell through normal abuse
-
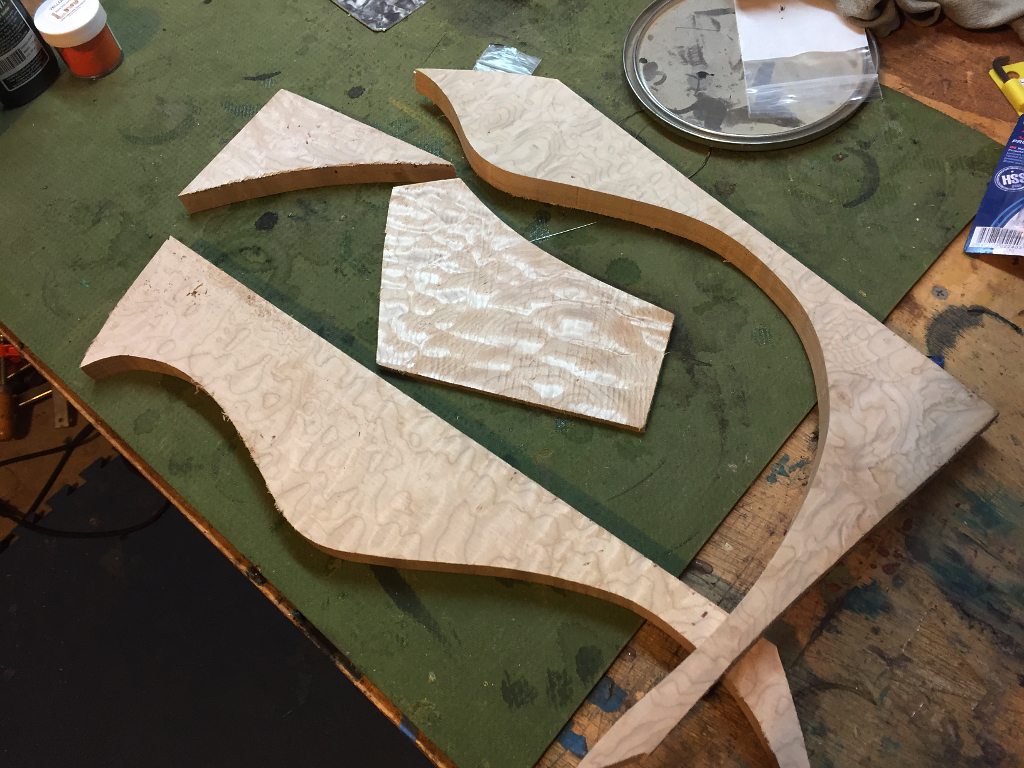
Ok, now we are up to last week.
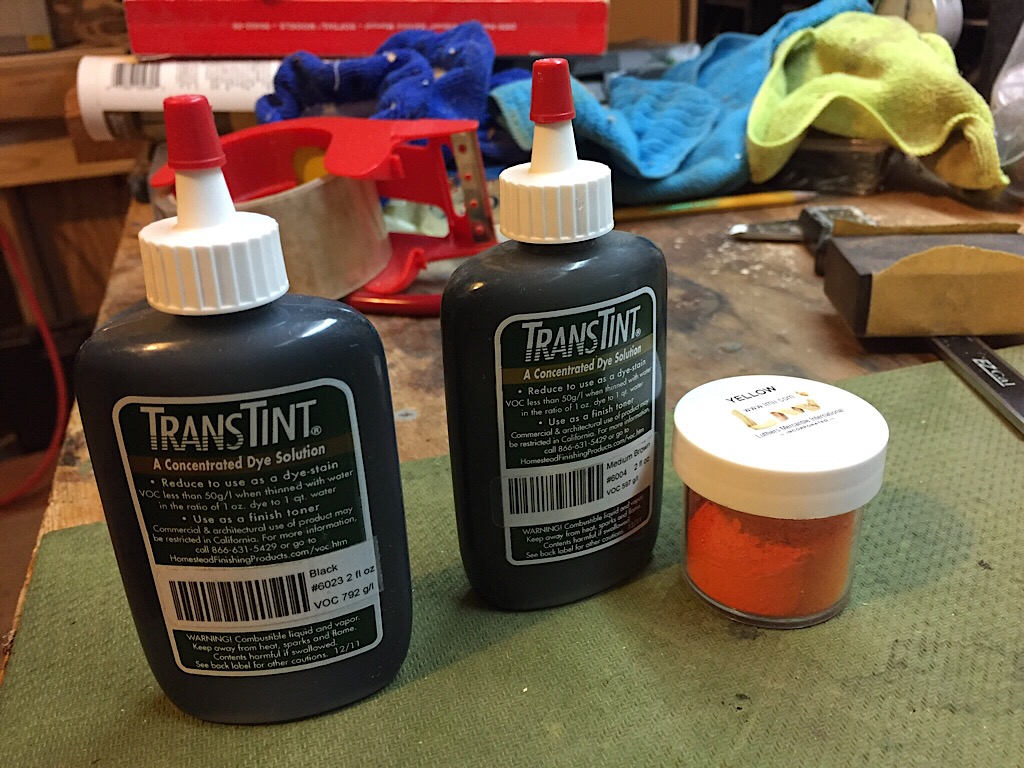
these are my colors

scraps from the top I used to test my finish plan

I wanted a dark grain fill on the mahogany so the pores would be darker.
This is timbermate mixed with dark brown dye

sanded off

Now on to the top.
First step is to seal the faux binding area so no colors bleed or splash onto it. I seal it with thin CA brushed on, and then mask it with this sweet green masking tape.
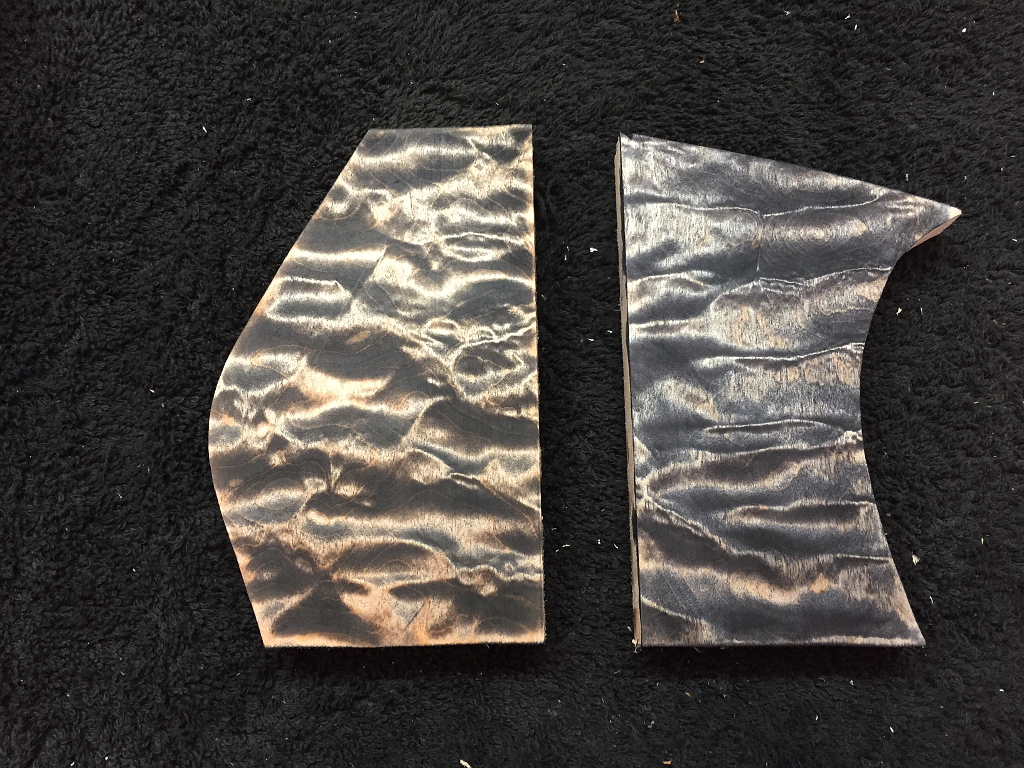
then the whole top is dyed black. In the past I've used transtint black mixed with denatured alcohol, but this time I did a test comparison using my old method on one piece, and LMII black water based aniline dye on the other
Aniline on the left, transtint on the right. Aniline wins hands down. It sands down a lot faster (less penetration?) and cleaner as well. the transtint side always looks a bit dirtier. Learned somethign new here and from now on its the aniline

That having been decided, I stain the whole top black with the aniline

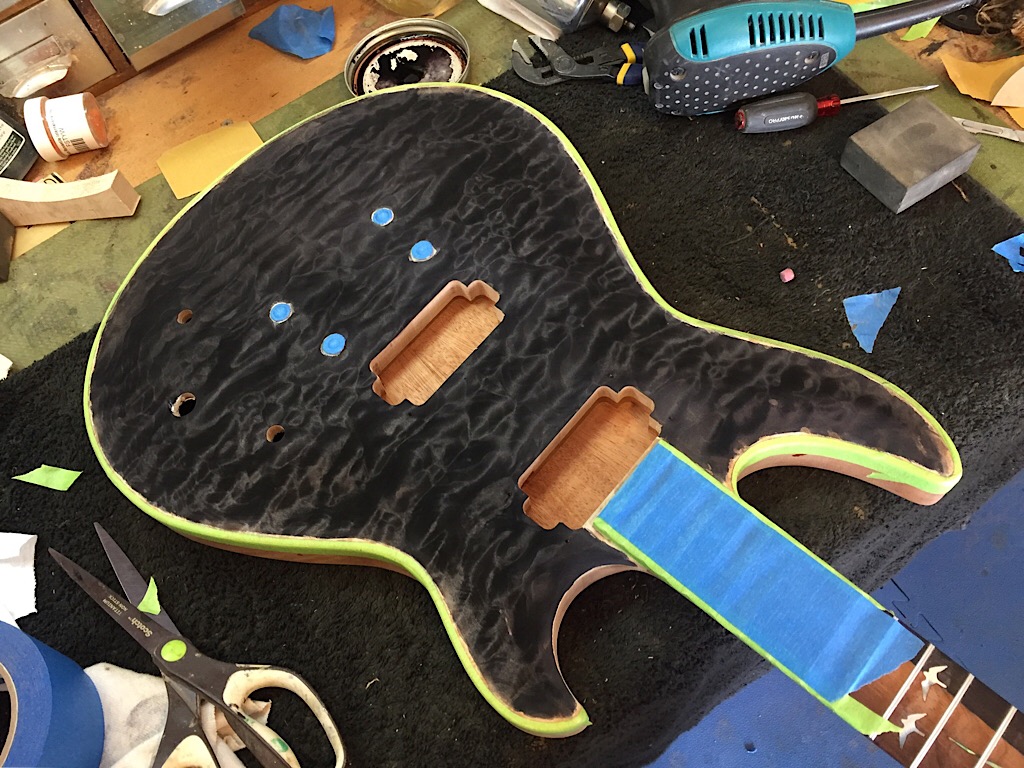
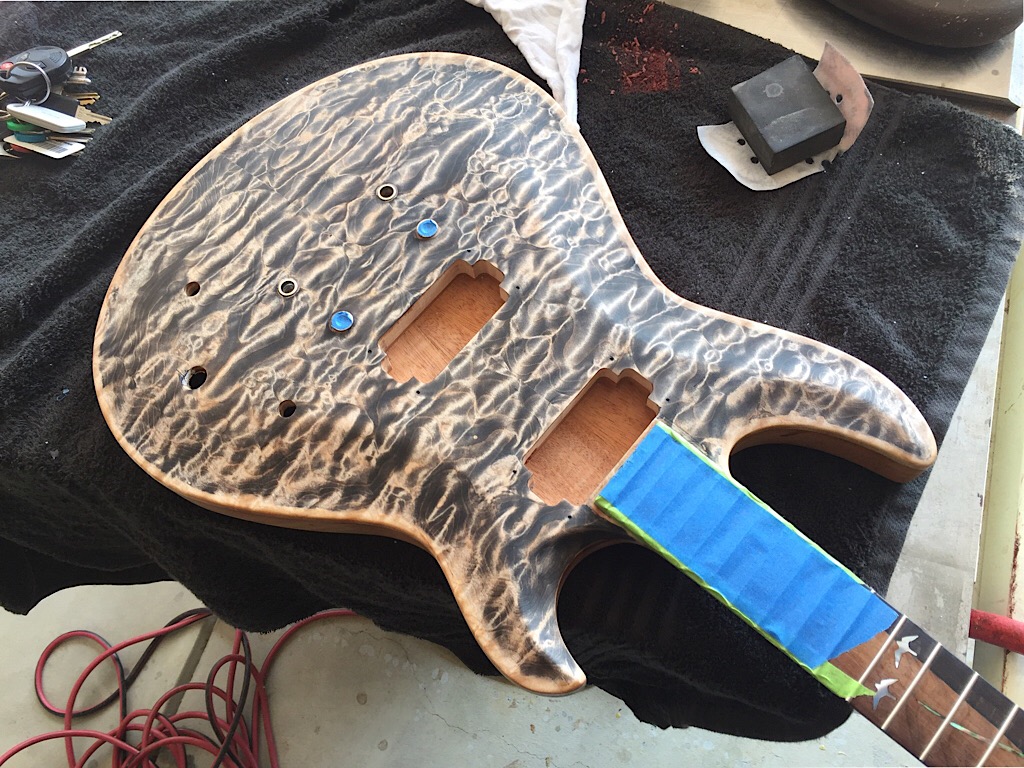
then sand the whole thing back. the trick with the tiger eye is to not sand it back too far. you want more black for this, with the clear areas being smaller. they will be bight highlights in the finished top. This was a big PITA and took a long time because I couldnt risk using an orbital sander. If you sand too far in any one spot its done. then you are re-staining and re-sanding.

then, after re-sealing the faux binding with CA, and re-masking, the whole top gets a wipe with yellow aniline. Its important to not re-wipe any area once its wet again, because that will pull the black back out and wreck it.
Its a wipte with yellow, then fold the cloth to a clean spot, and wipe a new area, and so on till its done. Never re-wipe over an area once its wiped. the black bleeding around into the yellow would ruin it.

This process is also repeated for the headstock. which although its much less area, is a bigger PITA because the faux binding area is so much narrower.
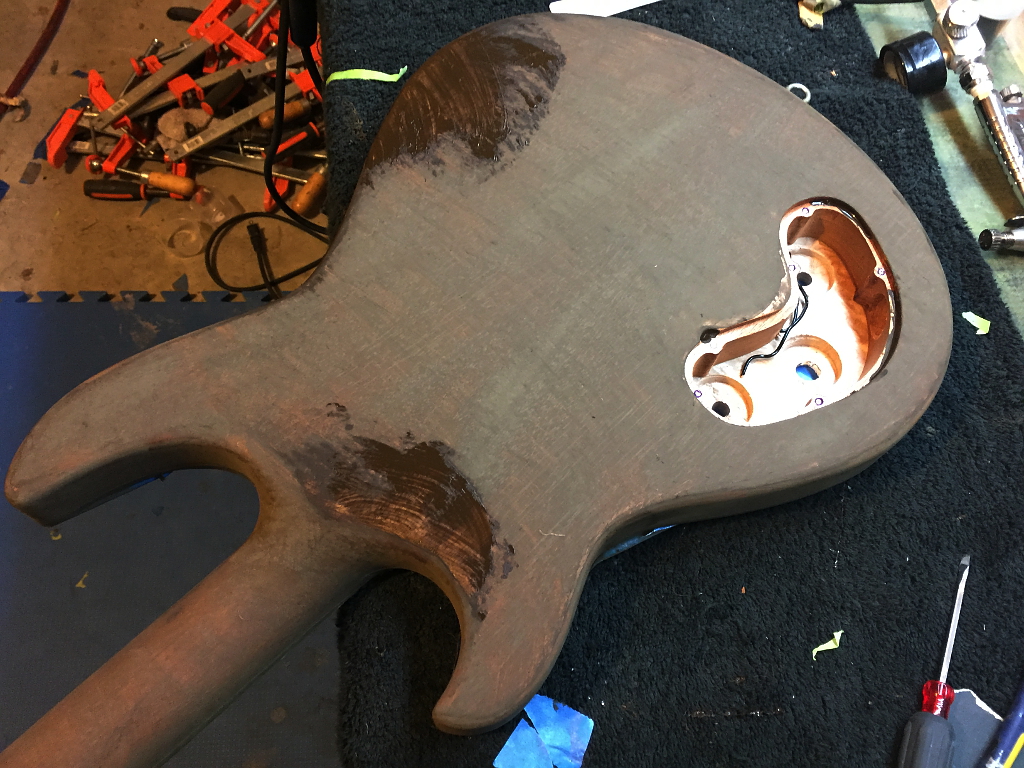
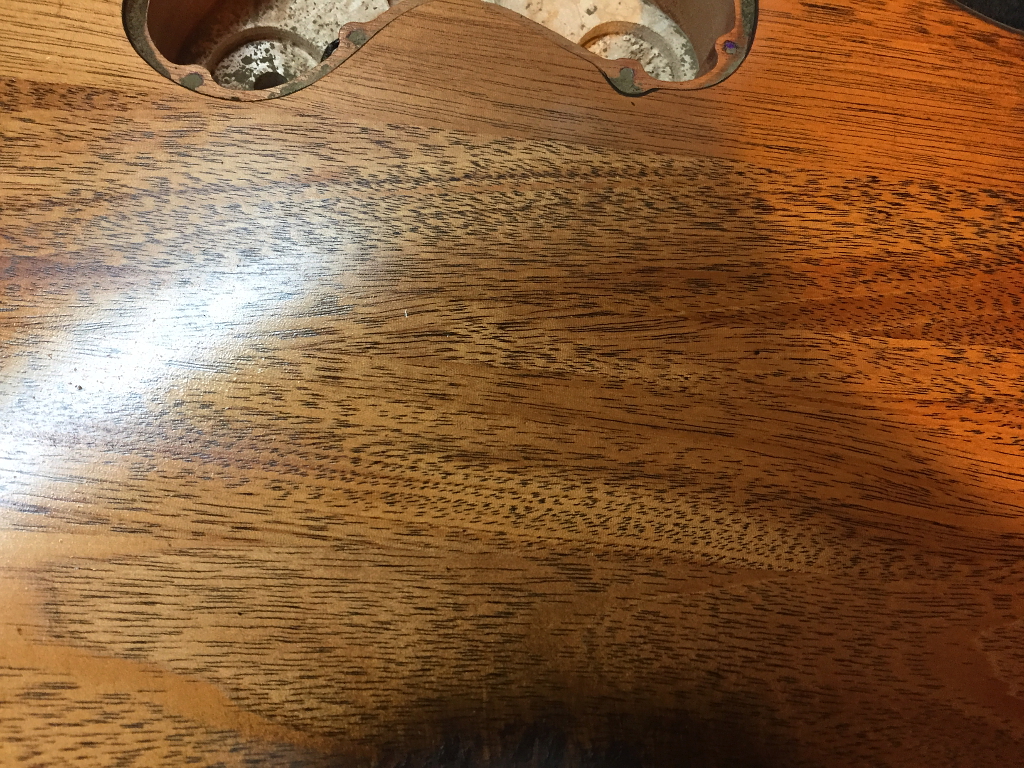
Once the yellow is totally dry I then seal the entire guitar, top, back, neck, and all using simtec easy sanding sealer. This is a sprayed on coating and really messy to work with, but its a catalized sealer and cures overnight. Rock hard, and will never shrink, sands very easily, and is totally transparent. You can use any product you want as a top coat.
This sealer is key to this top. If I went on to shoot the toner directly on the stained top, the dark figure areas would drink it up and it wouldnt pull the dark toward the brown you want for tiger eye.
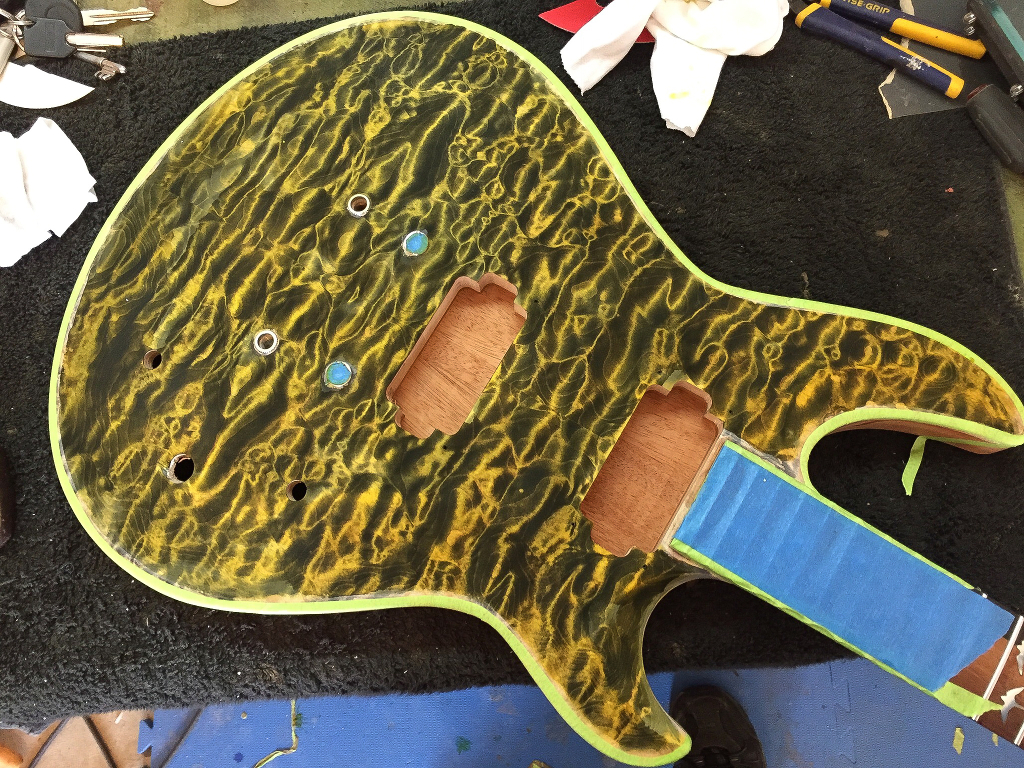
anyway, the next step is to spray lacquer mixed with medium brown toner. I used transtint for this. You spray the top very evenly and very lightly until the toner pulls the yellow over to a more gold hue and pulls the black over to brown.
I also shot a burst using the same toner, but mixed in a touch of transtint tobacco brown
I didnt take pix while I was in the middle of doing all this, but here she is right after.


A couple shots of the binding areas, that turned out great. Looks very different in different lighting. the previous two shots were with bright light shining directly on the top, the next one is in much lower lighting with no overhead light at all,,,

Ignore he orange peel if you please

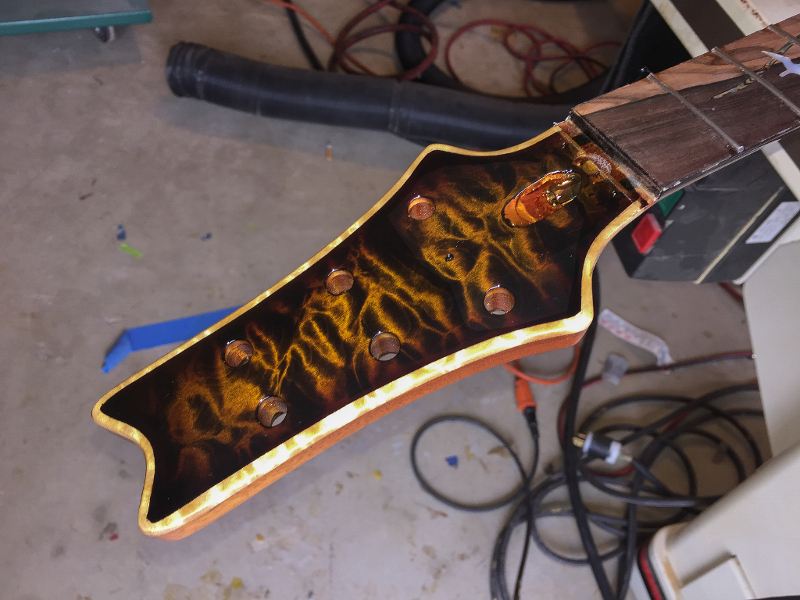
Oh, and headstock.,. This headstock pic is really bad and overexposed on the binding


So this is where I am now. Its going to hang and harden (this is nitro) for a month and then I'll bring it across the finish line hopefully by the weekend of Oct 27
I'll obviously post pix of the completed guitar
-
Not a lot of pix in mid-carve. just before and after really...
Before

Sort of in the middle

after...


OK, drilling the input jack hole I use my drill press.

This is for an electrosocket jack

Time to make the nut. This is an unbleached bone nut blank.

I rough shape this on my disk sander. Takes only a few minutes and smells really bad
Here you also see the TR cover I made but did not mention before now

I use the stewmac marking guide to mark where the slots need to go,

These

get em started

At this point I really need the bridge on in order to cut the nut slots to the correct dept. Cant do that without strings, cant put on strings without bridge and tailpiece.

all finished up with tuners installed,

I sand the nut up to about 1200 grit and it gives it a nice luster

At this point the "build" part is pretty much done. I cut the control cavity and holes for stuff and put on all the hardware because well, I wanted to see how it plays
Also made a rosewood cavity cover with magnets. You'll say "Why does the grain on that cover run 45 degrees off the grain for the body. Well it started out this way because it was the only piece of rosewood I had that was the right size, but was not big enough if I aligned the grains. I decided to go ahead with it, and re-make it at some future time when I had an appropriate piece of wood. Later on I decided I actually like it this way and probably will never make another cover.


-
11 minutes ago, ScottR said:
That Brazilian rosewood has got a ziricote looking area in it up in the highest frets. Does that happen often?
SR
This board is about half sapwood (the blonde color) and half heartwood.
the dark area at the upper frets has darker lines inside it. I think this is what you are referring to?
This is not uncommon in BR, I believe its called spider-webbing
-
Installing frets. I always use stainless. This is my handy dandy fret organizer. I paid lots of money for it. Really.

With stainless I radius to the exact same radius of the board.

Which happens to be 12"

Have to re-cut the slots in a couple places where the inlays cross the slots.

I also bevel the very top of the slot, particularly where the inlays are. I dont want the barbs on the fret tang to crack the inlays

I use this tool from LMII to undercut the fret wire. Binding or no binding, I just dont like seeing the edge of the frets on the side of the fretboard.


Clamp to the table on my drill press and use the fret file to file the frets in flush with the board edge


When preparing to install the fretboard, I stick a staple at each end of the neck, and nip them off leaving a couple short metal points sticking out. I align the freboard where it belongs and press it down onto those points, which dig into the underside of the fretboard. When I apply the glue and clamp it on, these keep it exactly where it needs to be.

This is the only part I use titebond for. Its theoretically possible to have to remove the fretboard, and if I use UF for this there isnt any getting it off.

All glued on.


-
OK, inlays.
these are the same birds I used for my first or second build thread here on projectguitar. I love them, but ended up selling that guitar so I needed to do another one.

Carve out the outlines with a scalpel


Used a trick I learned right here on project guitar to make the lines easier to spot. Chalk

routed the pockets out...


installed MOP side dots

Starting to look like a guitar


-
1
-
-
I didnt get pix of the rough carve on top. again you could see this in my phoenix build. I use a set of templates to route steps in the top that approximate the shape of the carve.
then into this jig which I use to route the pickup plane.

On this build the neck angle is slightly higher than the phoenix build because I'm using a TOM bridge for this as opposed to the recessed Floyd Rose on the Phoenix, so I needed more angle.
In this case its 4 degrees exactly, and the pickup plane is 2 degrees exactly.

Then some time with a random orbital sanded, and some hand sanding ...


Add the pickup routes and take a couple glamour shots


Oops. another gap in the process, but you guys all know how to radius, slot, and taper a fretboard...
Incidentally, this Brazilian rosewood fretboard was reclaimed from a house where it had been used for a wall paneling. I bought the one piece and it had a tongue along one edge, and groove along the other. After I cut those off I had about 1/8" to spare at the wide end to make the fretboard.
I can only imagine what that room looked like
Its about 75 years old and about as stable a piece of wood as Ive ever seen, and the tap tone literally rings like a bell. Smelled like candy when I sanded it

Of course at this point I had no choice but to drop the pickups into the body and do a mockup

-
So, speaking of that top....
Getting ready to flatten and square it up...

Cut off both edges...

flatten and smooth on the drum sander

peeled off a slice for a drop top on a different build and then resawed

planing the edges before joining the top

glued


Draw out the shape and rough cut on the band saw


I put masking tape around the body because the UF glue is REALLY REALLY hard to clean off after it cures

I like to challenge myself to see how many clamps I get get on when doing a top.
I think I have about 21 clamps on here.

If anywhere on the top needs a tight joint for functionality purposes, its where the bridge goes. Since I dont have any clamps deep enough to reach in that far, so I have a wood caul that, which a clamp on each end, applies the clamping pressure directly onto the bridge location.

Once the glue is cured (overnight) I use the spindle sander and a course grit to remove most of the excess of the top so the router doesnt have to get killed

then a different spiral bit to trim the top down flush with the body edge.

Giving us this

Happiness is a nice tight joint between body and top. Especially when the plan is faux binding


just a mockup

-
13 minutes ago, ScottR said:
Good to see you back Chris.
I can't wait to see what you do with the top, but the fretboard may be the star of the show!
SR
30 minutes ago, Mr Natural said:@Skyjerk 5a quilt and Brazilian rw . good Lord. nice wood man. as usual. looks like it will be, as usual-a beaut.
@mistermikev- regarding feet in photos- there is a many years long running inside joke that photos with feet are awarded bonus points around here.
bathrobes on the other hand...........

I was very much on the fence about the finish because I wanted a tiger eye, but its a challenging finish to get right, I'd never done one before, and that piece of maple was seriously expensive. I was petrified I'd wreck it, I almost backed out and fell back to another finish I knew for sure I could pull off, but lots of folks encouraged me to go for it, so I threw caution to the winds and was rewarded with exactly what I was shooting for. I think you guys will agree.
More to come shortly
-
This time my 5 1/2 jack plane for prepping the sides to attach the body wings

and flattening the bottom as well.

Lining it all up in my clamps getting ready to glue

Again UF glue. I want the best transmission of vibrations in all joints and of curse this is a joint that should never come apart

and clamped


That is one FUGLY guitar

hopefully my bandsaw can help with that fugliness...

better...

I attach the template to the bottom of the body using the CA and masking tape method

just give it a few minites to set. it really sucks when a template comes loose while routing,,,
Why write the name on it? The 22 Magnum and 24 Magnum templates look very similar.

over to the router table...

fancy pants spiral router bit...


and done


-
So you wont see much here thats different from my Phoenix build, although if youre like me you might enjoy it anyway
The end product will be different in many ways including its appearance Also, this build is currently nearly complete. I just shot the finish last weekend and its currently hanging while the nitro cures, so you wont have to wait long in this thread to see lots of progress. I'm a bit behind in posting a thread here on project guitar, but theres lots of good pix. hope you enjoy.
Heres the boards for the body and neck after Ive planed them down to the sizes I need.

My jointer is on the fritz, so I had to do a lot of planing the old fashioned way. Used my No. 7 jointer to prep the pieces for my neck laminate

Once ready, I use UF glue to glue and clamp. UF is my go-to glue for joints that I might never need to take apart. It has many of the qualities of hot hide glue in that when cured its super hard and very brittle, and doesnt dampen vibrations like other glues can do,

Once that bad boy is fully cured I draw the neck-through profile on the side of the blank and cut it on the table saw

different view...


This build gets a headstock that matches the body. Heres my top..

theres an obvious discontinuity here. You'll notice the carbon fiber rods are already in place in the next few shots. This is because I left my phone at work and so I didnt take any pix of installing those, but I think I have shots of routing the channels for those and the truss rod in my phoenix build thread if you want to see how I install them.


Gluing it on.... Its a bit thicker than your average headstock overlay, but I want a "faux binding" on the headstock as well.

After routing the neck and headstock shapes....


and drilling tuner holes

I love quilt. I always like to toss in gratuitous photos with a little naphtha to show the figure...

-
New build.
This is a similar design to the Phoenix 24 Magnum, but with some significant spec changes.
This build will feature the same basic construction methods, and materials, body shape, and top carve as the 24 magnum, but this one will have 22 frets instead of 24, a 25″ scale length instead of 25.5″, a fixed TOM bridge instead of a tremolo, a 3-way toggle instead of the 5-way blade switch, a Brazilian rosewood fretboard instead of ebony, and a quilted maple top instead of flamed, and will also feature a matching quilted headstock overlay. This will be my first build using pickup covers
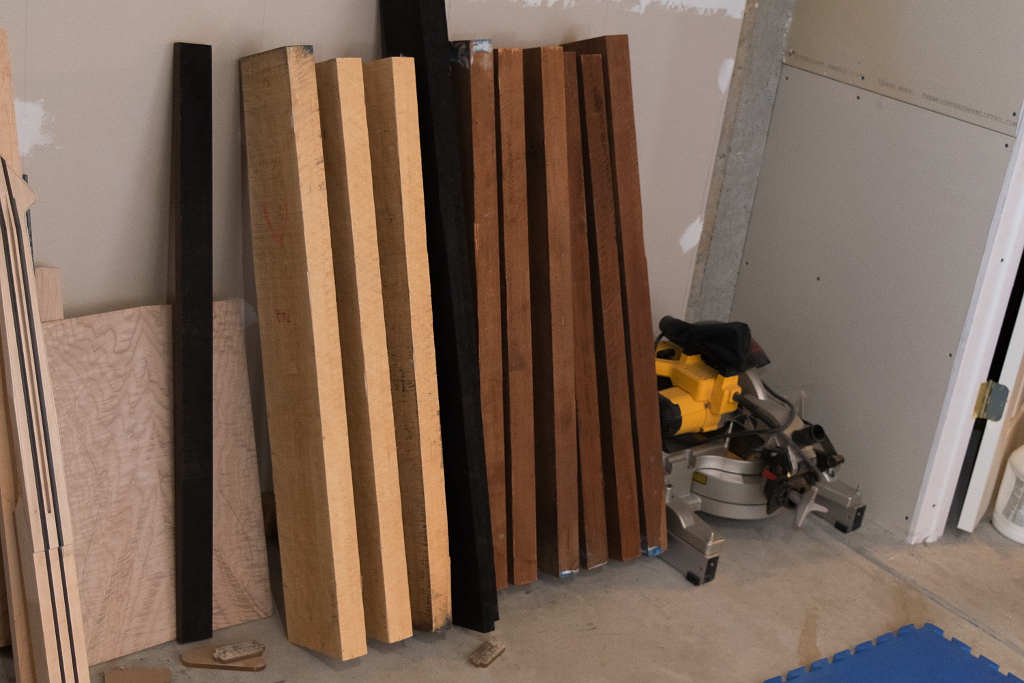
This is the block of maple the top will be cut from. Its freakin spectacular!

To the right of the wenge are 6 boards of genuine Bolivian mahogany (Swietenia macrophylla), 3 of those board will be used in this build

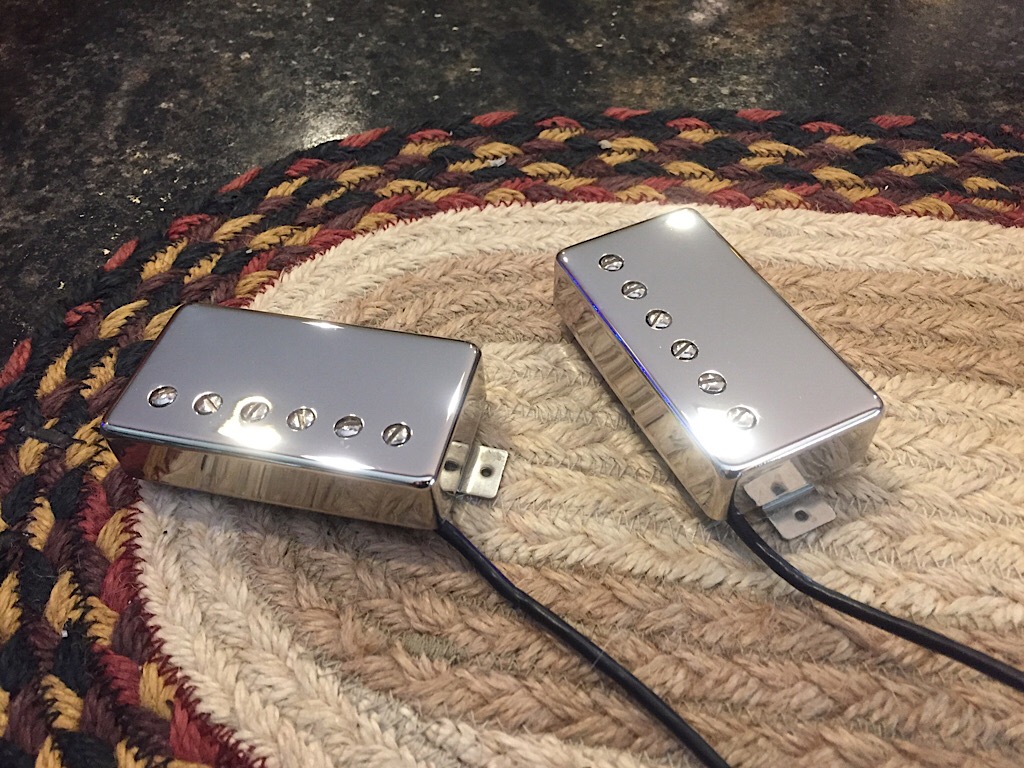
Bridge and pickup covers. These will cover Seymour Duncan JB and 59.

Heres those same covers after being soldered to a JB and a 59

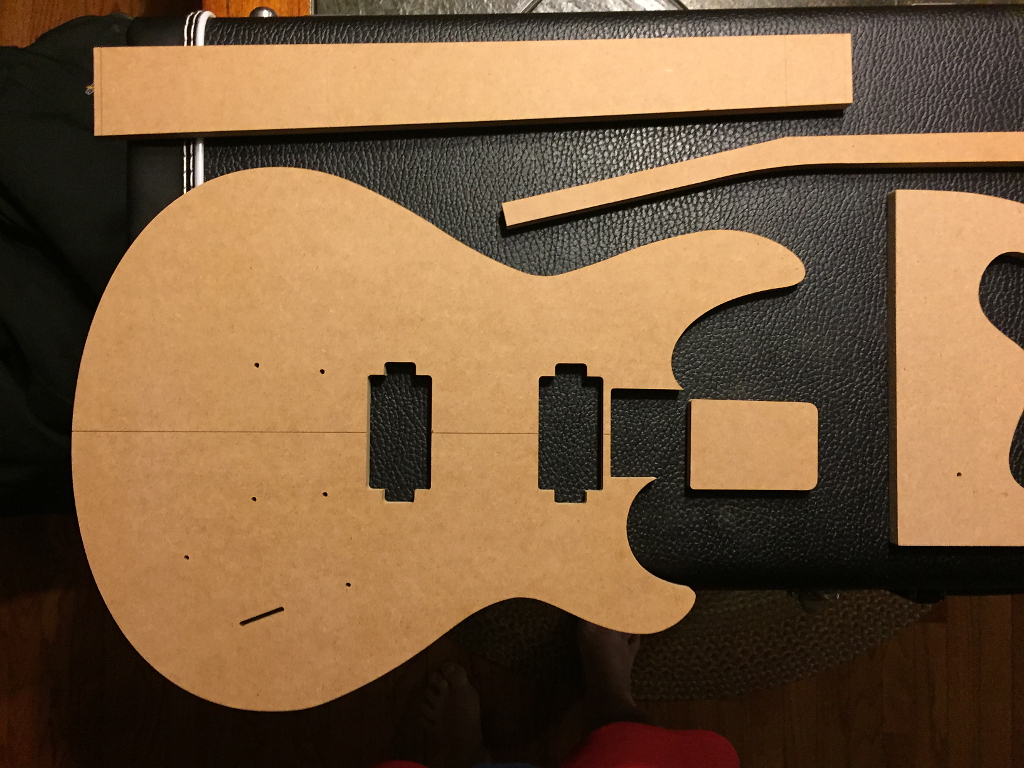
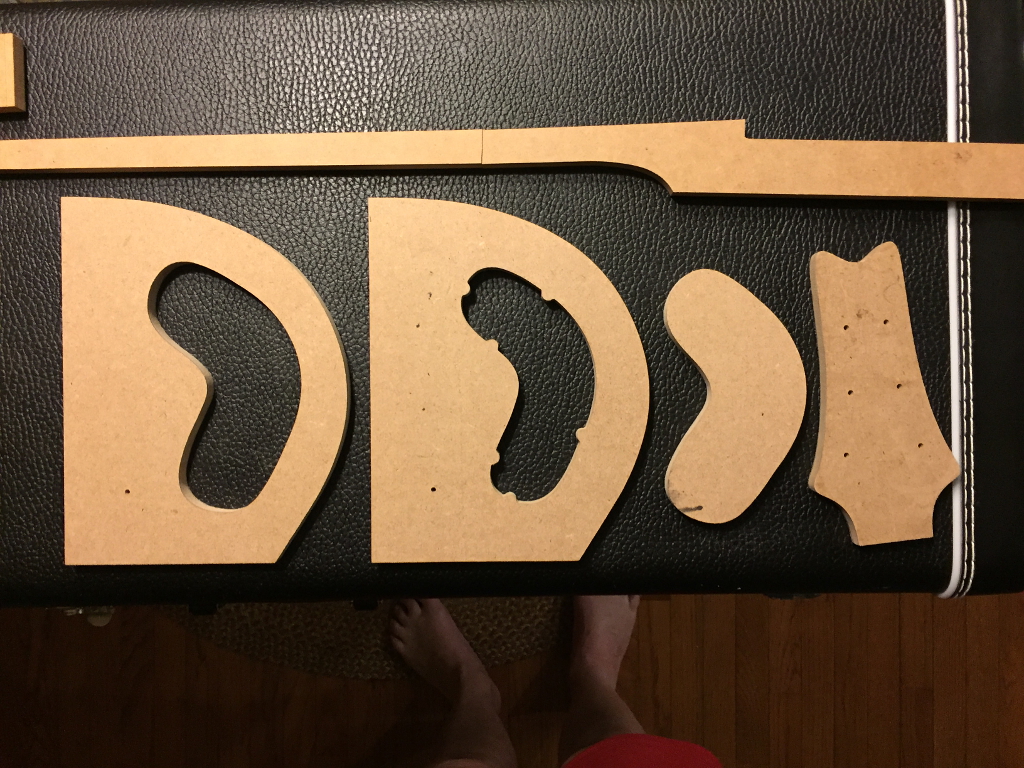
An array of templates I’ll use for the build. I designed them in CAD, and a business associate in Sydney Australia cut them for me on a CNC machine. I hate making templates myself simply because its time consuming, and I just dont have that much time


Brazilian rosewood fretboard blank with my bird inlays laid out on it.

-
57 minutes ago, beltjones said:
I will admit that after reading the backstory at around midnight last night I woke up my 6 month old and held him.
I'm so sorry for your loss. I can't even imagine...
dont ever let him go
-
Good morning all. I know as a builder on this and other forums that people always clamor for audio samples of the finished products.
I know I like to hear how these babies sound after following someones build thread
So anyway, heres a song that features both of my GOTM and GOTY axes. The Phoenix build, and the blue 22 special.


The rhythm guitar is the 22 special, and the solo is played on the phoenix.
Theres a bit of a story that goes with the song. The short version is the lead vocals is my son Chris and the vocal track was recorded just a few weeks before he died and was the last time I saw him while he was still living.
http://www.addictguitars.com/?page_id=4443
-
4
-
-
9 hours ago, Prostheta said:
Bloody hell Scott. You pull some real things out of wood every time! The roughly carved shots remind me of Morel mushrooms too.....yum....
Chris - do you have a leather strap for your edge tools?
Nope. In the skillz area, my sharpening skills are the ones most in need of improvement
-
2 minutes ago, ScottR said:
I did. I use palm gouges of various sizes and shapes to rough in my carves. Some of them show up in the background of a few of the shots.
SR
I've considered getting a couple to try them out, but I have a hard enough time keeping edges on straight edged tools...
-
1 hour ago, ScottR said:
That felt like a pretty productive weekend.
SR
That's kind of understating it a bit ;-)
did you use some sort of gouge to rough in those carves?
-
FWIW, I work out the angle and all the numbers in the design phase before a single tree is harmed :-)
neck angle is pretty crucial in a carved top guitar. Wrong angle and the whole thing is firewood because obviously you can't change it once it's done. Not something where you want to just wing it, and then try and work around the issues it might create if it's not right.
a traditional Les Paul has a neck angle of roughly 4.3 degrees, but I never cared for that angle, or how high it puts the bridge and pickups. In my own I reduced that angle to 3.4 degrees and it brought bridge, strings, and pickups closer to the top which is more pleasing to my eye and my hands
all my subsequent designs were the same. Both of my GOTM winners, the 24 Magnum and the 22 Special, are neck-thru with carved maple tops.
I use a free CAD program called emachineshop to design it all, and make sure the angles are going to work out right, then I make templates from the CAD files. Of course when you actually cut things nothing ever works out mathematically perfect, but it's very close and the variances are easily handled at that point.
my "process" is identical whether it's a Les Paul, or my own designs. If you're curious, my Phoenix build thread has a fair amount of detail on the build...


Finished pics! A Bitsa Dreadnought for me :)
in In Progress and Finished Work
Posted
This is awesome")
I've always wanted to try an acoustic build, but keep finding reasons to put it off. In reality I'm just chicken. Its a whole different animal than a solid body electric.
No matter how good my electrics are, I'll never consider myself a luthier until I can build acoustics...