


Muzz
-
Posts
1,435 -
Joined
-
Last visited
-
Days Won
45
Content Type
Profiles
News and Information
Tutorials
Product Reviews
Supplier Listings
Articles
Guitar Of The Month
Links and Resources
Forums
Gallery
Downloads
Posts posted by Muzz
-
-
there is just something so relaxing for a bloke about being in the shed, shearing off bits of wood.
only if they're the bits of wood you intended to shear off...

Hey Supp, yep it's the risk of the FUBAR that somehow makes it even more fun.
there is just something so relaxing for a bloke about being in the shed, shearing off bits of wood.Yea....
All alone.
In an isolated room.
Playing with your wood.
Naked.
if it was me naked I would need to keep my socks on, I need somewhere to keep my picks you need to get a new 'happy place' to go to I'll start you off, the two 22 year old Scandinavian girls that moved in next door, come round to your place to use your sun lamp, its been raining and ............
Guide hole for the output jack

Widening out the guide with a 22 mm spade, making sure the distance from the hole to the edge is 11 mm.

-
Doing the back counter was a great part of the shaping process, there is just something so relaxing for a bloke about being in the shed, shearing off bits of wood.
I started off with the sureform

When I started getting close to the lines, I switched to the rasp, see the lesson learnt at kindy, stay in between the lines was useful.

Then when it was almost flat, I started bringing it in really flat with a spoke shave, you can see the parts of the wood that have been shaved at this point. The spoke shave reminds me of a crab for some reason.

After this, all it needed then was the ends neatened in with a mini file and a tiny bit of sanding.

If you have only done tummy tucks with an angle grinder or a band saw before, give yourself a zen treat sometime and try it the quiet way for a change
-
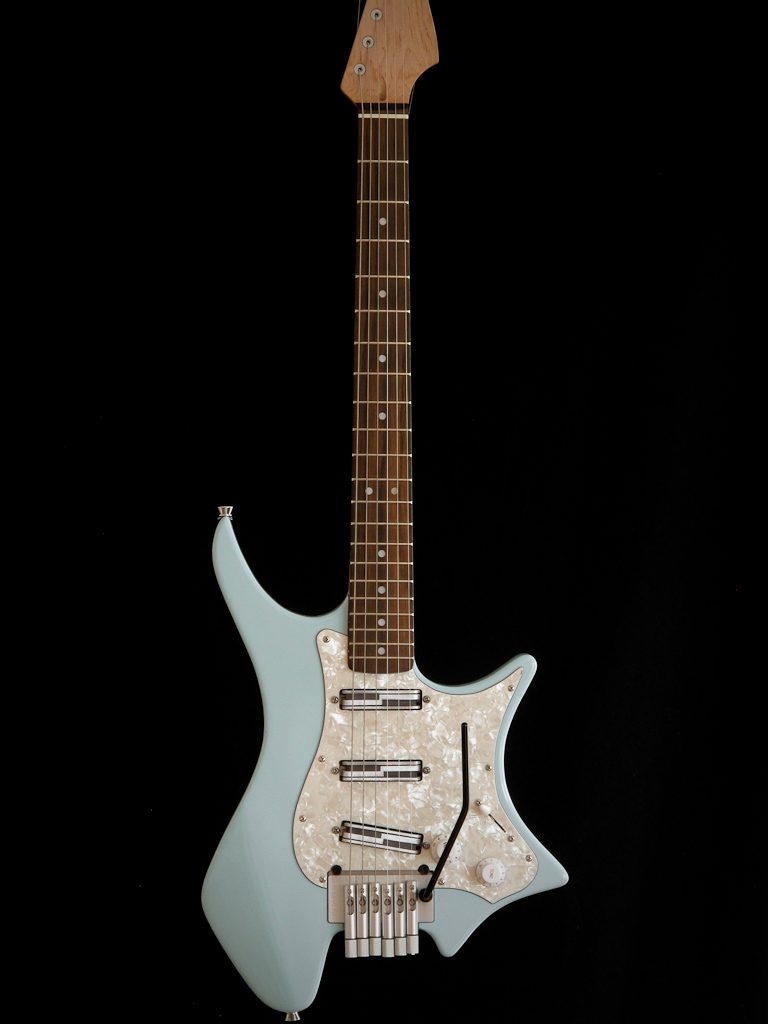
All three are great, but I especially love the blue one, it looks so sleek and cool.
-
You are a patient man , my friend.
I make my arm contours with a belt sander........ 40 grit , then 50, 80, 120 and then 220. Makes it a quick and easy process.
Love the toolbox.
oh - and the look af the mock-up. Very nice, indeed.
Hey mang, absolutely
 I have taken an experimental approach at various stages and tried to do things using some different techniques than you might usually see on this forum, but I never want to get stuck in my own rut or get imprinted with the first technique that works for me, so I am putting a belt sander on my Christmas list added your grit progression to my methods list
 The steps have gone, just a bit of tidying up to do,

Running a craft blade along the crease

Close to finished

Marking out the tummy tuck

This is going to be done the old fashioned way with hand tools.
-
That body is almost an exact copy of an Ibanez GIO 22 fret model, apart from the rear route, the only difference I can see with the model they sell in
is the top horn join stops just short of the neck join end, on the real Ibanez it is equal. I reckon you will be able to make a really good guitar out of it if you bling it up. You might want to consider, repairing the black finish, it looks like it is in good nick apart from the chips. It is probably a 5 piece basswood under the finish, don't know if it is worth stripping. Good luck with it. -
I didn't buy that guitar, it was a small scale thing. But, I'm making a new thread on my Ibanez rip-off, next to the Westone. Keep the front route!
Great, I'll have a look right after this.
I'm glad someone else has the same methods for figuring out string spacingYep, it worked well, can't wait to play Round and Round on it.
I'd rear-rout it, because then at least if you want to, you can buy long-shaft pots and use a pickguard - you're not restricting yourself to anything. But I'd still go for the pickguard, I think an entirely blue-stained ash body would look a little monotonous without a burst of any kind.A little bit of a burst would look good, yep whatever happens pickguard on will be the main state for this guitar.
Shaping up nicely . My gut feeling is to go for the PG. It just fits the build. *shrugs*Keep it rollin' !
Yep, to me the PG is now an important part of the build, I don't have the wood obsession to the point where I can't cover up a few square cm.
 Double sided tape ay now that is a good suggestion. I love scratchplates, they give an almost art deco look to a guitar and I love the challenge they are to make. I don't see the suggestion of a rear route as interference, it's a viable alternative, how would it structurally ruin this build?
I didn't say it would structurally hurt the build.
I was just trying to point out that you should just build what you want.
No wucking furries.
Tonight, I drew out the profile I wanted for the arm rest, split it into 20 x 3mm divisions and measured the depth of cut for each one. The router bit travels 55 mm in front of the router edge, so I marked out the lines of cut 55 mm back from where they would occur.

I used an Ikea shelf as a router edge guide, hey there is a use for Ikea stuff
and look Mike, I have the same toolbox as you 
Just got to smoth over the steps now

-
Go Stewey, this is gonna be a monster
-
Great project, that would keep me busy for 20 years, I am no metal worker but if you are I reckon you should be fine making the Floyd if you buy the saddle assemblies, that would be the trickiest part.
-
Time to put the hardware on the neck today. I drew out where the strings were heading and measured between them to get the anchor points for the string retainer.

I drilled guide holes on the drill press to make sure they were straight, took, Avengers' advice and reamed them out with the next size up drill bit, then Our Souls' advice and marked off the drill bit with tape so I didn't drill straight through to the other side like I did on the practice neck.

Then put on the machine heads, I never realised that the washers have an up and down side
you learn something new 
I'll take the stickers off when it's finished and strung up, it's a little ceremony, like taking the clear plastic off the pickguard.

-
Ughhh. Unless you are completely ruining (structurally) an otherwise good build don't listen to the external interference (no offense pauliemc).
Seriously it is one guitar. Build another one next year without a pickguard. Changing a pickguard is a PITA (i really don't like them)... heck that is why I don't build guitars with them.
It is just a piece of Ash...
And no more about leaving your socks on... that is what double sided tape is for.
Double sided tape ay
now that is a good suggestion. I love scratchplates, they give an almost art deco look to a guitar and I love the challenge they are to make. I don't see the suggestion of a rear route as interference, it's a viable alternative, how would it structurally ruin this build? Will rear route be bad for this project?I ignore or reject bad advice but I am always ready to consider reasonable and feasible advice. I tried a rear route out on the MDF model this arvy, happy to hear what you and others think
Marked out the holes, drilled right through with a 2 mm bit.

12 mm hole for the switch

Routed the cavity down 31 mm, put in a 18 mm wide seating for the switch.
 ,
, Which leaves 2mm depth easily for the plate. That is proof of concept, I'll ponder on which side to route.

-
As I wrote, I´m open to any suggestions. This is not a "by-the-book" build, it should be fun build
Thank you for your information
Oblaty or wang?
-
Wondering what this thing would look like with a pearly plate.
Pearloid rocks dude, get a pearloid pick guard for this thing.
REAR ROUTE !!!Route it from the back, screw the scratch panel man.
So I am thinking from your two bits of advice above that you mean screw that rockin pearloid pick guard to your guitar, OK then
There is only one other meaning of "screw the scratch panel man" but I can't do that (not that there is anything wrong with that) because it is against my religion.
Now obviously from the caps shouting you are keen on a rear route, which is in keeping with the Mr. Potato Head guitar philosophy, and all it would need would be a couple of long shaft pots

I am going to think about the feasability of this idea, but it is novel and that appeals to me.
No please...don't do the pickup gaurd. It'll look great with that stain....don't do it.It would look good with that stain wouldn't it, here is a pic of an ash body stained blue.

Now if I subscribe to the Mr. Potato Head ethos of guitar decoration, it could be played with the pick guard on when the mood takes me or it could be played naked, that means the guitar without a pickguard, if it was me naked I would need to keep my socks on, I need somewhere to keep my picks.
-
The holes in the headstock are a smidge too tight for the machine heads. I taped a ribbon of sandpaper to a dowel and wrapped it and sanded out the holes until the fit is snug.
That seems like the hard way of doing it. Wouldn't it have been easier to bump up the drill bit by 1/64" (or whatever the indexed bits are in Oz) and ream it out that way?
Hard
That's not hard, you try watching other folks make ten guitars in the time it takes you to cut out a blank, that's hard (Yes, I am a massive Glee fan, its the Western World's Bollywood) good thing I am not making one of these
Actually the machine head reamer is my newest invention, I am calling it dowel with sandpaper wrapped around the end. Of course I am the first to invent it. Yes in
we have both kinds of music, heavy and metal, and we have both kinds of measurement, metric and hopelessly outdated, illogical system. Metric system goes up in 500 micrometre steps. Starting to cut out the template, how did I ever survive without these mini files? Is it the same Trojan that makes raincoats? I grabbed them in an impulse buy off the counter at Bunnings and now I am totally dependent on them.

Used them to shape out the template

Positioning where the route will go

Got to get back to watching Survivor Allstars, talk soon.
-
I haven't piped up earlier but I enjoy watching this build evolve. I almost get a little sad when I don't see anything added for a few days.
Hey, glad you're enjoying this thread, I am working on the cavity route template at the moment,

funny looking shape
-
Now that's what I like to see, smooth sides and sharp edges
That timber looks so good I wouldn't be putting a cap on it, but I won't get upset if you don't take my advice, because only

do that
Lookin forward to seeing more of your build.
-
This is looking cool
-
Lovely piece of timber, great grain pattern join, what will you use to clean up the shape? rasp and spokeshave or router and template? All the best with it.
-
The holes in the headstock are a smidge too tight for the machine heads. I taped a ribbon of sandpaper to a dowel and wrapped it.

and sanded out the holes until the fit is snug.

-
Mucking around with stain and finish to get an idea if this is a good colour for this guitar

Practicing the arm rest on MDF

and the tummy tuck

-
All right
That shape is unreal, fantastic, I am going to enjoy watching this project, yep the Ibanez GIO necks are terrific. -
That crackle played hard to get, just to make you appreciate it more
it looks terrific. -
Thanks guys, I'm very happy with this one.Great work - reminds me in style of DougK's white Firebird. Sweet!
I do have to say though - the diamondplate looks kludgey and changes the otherwise great balance.
I know where you are coming from Prostheta. I am already looking to acquire something to replace it with. I think I'll give plain aluminium a go next, all polished up to a mirror finish.
Do you reckon I should make the entire pickup surround out of al, or keep the black on chrome look, or just black?
Fantastic bass, high impact, sleek, yep the bridge pup would look at home in an all black collar
-
hey man, does it make you as crazy that I just wing it as it makes me that you make everything perfect ?
Not at all, I dig seeing your builds on the interweb, I think you and I both put playability, solidity and tone as a first priority, and you take some ballsy experimental risks that often turn out great, or lead to reflection on how to do it better next time, either way your skills are evolving.
I can be thrown into that category sometimes. I tend to look at them as compositions and art pieces a lot of times. I'll pick out the theme and overall plan, then let it take me where it wants to go. Sometimes it works out OK, sometimes not. If it doesn't work out, I dismantle it and re-use the parts. Most of the time, the wood is the least expensive component, and the most fun!.
Right on, it is fun to walk along the edge, I love art that polarizes.


It's tight, but it fits.

-
Nice Job! Keep it up man, it's looking great so far.
Thanks, I am looking forward to doing the cutout for the controls next, just got to work out what I am doing there
Thought I would chuck out a few more thoughts on fretboard clamping, and hope more people realise not to put clamps directly on the fretboard when they are gluing and use a clamping board to evenly distribute the pressure, so they do not make hills and valleys in their fretboard causing lumps that then have to get ground off their frets.If you glue your fretboard without radiusing it first you don't have this problem and it saves the time of having to grind so much off the frets and having to make a jig like you did. Plus you ussually don't have to level your frets at all if you do it this way or you just barely have to take a little off of one or two frets. Works perfectly for me.
Plus I agree you don't need tons of clamps to glue a fretboard.
Yep, so when I get the urge to show off my clamp collection, I am just going to put them on the fence and post a picture of that
I think next project I do, I might have a go at cutting my own board, and gluing that on the neck wood before radiusing, it's good to try out different ways of doing stuff I'm gonna have to take a trip to Australia pretty soon...It's a great place, hey did you end up buying that guitar?
hey man, does it make you as crazy that I just wing it as it makes me that you make everything perfect ?Love where you're taking this one. even the PG it classy . Love it.
If I ever run across any more carvings - you get first dibs. Pay the shipping and purchase price - I'll get it to you. I'd love to see some more barn siding / pallet / flea market type builds. Reduce , Re~use , Recycle.
Not at all, I dig seeing your builds on the interweb, I think you and I both put playability, solidity and tone as a first priority, and you take some ballsy experimental risks that often turn out great, or lead to reflection on how to do it better next time, either way your skills are evolving.
Lining up the centre lines on the humbucker template and the ash body

Routing out with a 12mm deep bit

as far as it will go, then checking the depth. Would it matter if you routed into the spring cavity? For some reason I am going to leave 8mm of ash between the top and bottom routes.

Finishing off with a 'Daddo clean out' bit (that's what it says on the pack the bit came in)


 you need to get a new 'happy place' to go to
  I have taken an experimental approach at various stages and tried to do things using some different techniques than you might usually see on this forum, but I never want to get stuck in my own rut or get imprinted with the first technique that works for me, so I am putting a belt sander on my Christmas list
Pointy Stick
in In Progress and Finished Work
Posted
Cool, it's coming along OK
Marked out the route
Transferred the template to a bigger sheet, at this point it's 15 mm deep, time to switch to a longer bit for the last 3 mm
I used a spade bit to cut out the jack hole, I don't think I would use a spade again, it was a bit juddery and not real clean around the top, I'll try a forstner bit next time.
Channel route finished.