


ScottR
-
Posts
12,086 -
Joined
-
Last visited
-
Days Won
608
Content Type
Profiles
News and Information
Tutorials
Product Reviews
Supplier Listings
Articles
Guitar Of The Month
Links and Resources
Forums
Gallery
Downloads
Posts posted by ScottR
-
-
That's a great top, where'd you get it, if you don't mind my asking?
Local steak house was being refitted & I asked the foreman on the job if I could go thru the junked furniature. All of their old tables were just big hunks of Maple & Beech with all sorts of funky figuring on some of them. I managed to get 3 sets like this from just one table. I got 3 tables that made 7 good matched tops altogether.

as to the rest (30 tables all 75mm thick & a 15 foot long bar top 200mm thick) the whole lot was put into a shredder. Awfull shame they would not let me take more as there was easily another 40 tops like this in there & the rest would probobly make some half decent drop tops.
Great save on that table top Paulie. It is amazing how much highly figured wood gets used up in restaurant table tops.
Excellent carve. When you dye the top are you planning to hit it with a very heavy black, then sand back and then hit it again with a very transparent black? I actually like tops done that way quite a lot.
Very nice carve as well. Goes nicely with the one on the back.
SR
-
Shoooooot. There's no reason whatsoever that you couldn't do that.
SR
-
Yeaaaa.
So I can see that CA as a pore filler is an absolute fookin nightmare
I consider it almost childsplay easy, very effective, and almost indespensible for great pore filling on all kinds of woods...and I've been using it for over 7-8 years now.
...but if you want to look at it like that, ...totally up to you.
OK, maby I will still give it a go then. I have another single cut just starting I was gonna try it on, Sapele back. Do you rekon the thin CA/600 grit sanding dust approach would work ? I was gonna spread it with a leather pad.
Ithink it would work....it's working for me on this African (khaya) mahogany. The leather pad should do a good job too, but you have to remember that it will be a one use pad. Once the CA cures on it it's done as it will start making ridges. I used to or three small squares of folded up rag per application on the back of mine. And I would say 3 or 4 apllications is what I can expect for complete filling. Maybe that will get down to two one day
And yeah, that green JS is taking a very long time....it probably thinks you don't love it anymore.
SR
-
Very nice to see this again!
SR
-
Yeaaaa. So I can see that CA as a pore filler is an absolute fookin nightmare
Which is a bit of a pain as I was thinking of giving it a try. Maby ill just stick to the LMI stuff. Or no filler - just let the grain creep thru (my own personal preferance).
Still cant wait to get a look at this thing finished. HURRY UUUUUUUUUP !!!!!!!!

BTW Scott, Did I hear that you make decals ? or am I just out of it on paint fumes again.
Hurry up he says. You're getting back at me for the grief I gave you in some of your past threads aren't you. Like the time you got us all hot and bothered with a sexy build only to finish it off and sell it before taking pics of the thing finished, huh?
As far as the CA for pores, I'm not ready to say it's a nightmare. I haven't used anything I like better so far. I can't say it's as easy for me as it is for Drak, but I will say it's gotten easier or I've gotten better the more I do it. It has a learning curve. Maybe when I've built as many guitars as he has (which ain't bloody likely ever going to happen)I'll find it as easy. I'll probably use it agian. You should test some on some scrap and see what you think.
And yeah, my company (it's not really mine, it's just where I go to work every day) makes vinyl decals.
Scott
-
That's a great piece of Walnut Paulie. Are you able to get any neck angle, or do you do you run them flat so you can use the full thickness of the billet for the headstock angle?
The back contouring is very nice....like Chad says, it looks nice and cuddly. What are the two holes for in that area where the control cavity will likely be?
What color is the top going to be?
Man your shop looks like one I'd be at home in....well used.
Looking forward to more.
SR
-
Like I said, I like the cap. Wait till you get it on the body before you condemn it. The bookmatched figure and black accent will really look nice when viewed with the matching top.
SR
-
Excellent fretboard and headstock cap. The trussrod access is a little disconcerting being to the side of the bookmatch seam in the cap. Of course the center of the neck and the center line of a 6 in line headstock are not the same, but I think this is the first time that I've seen that point be so obvious.
I'm really looking forward to seeing another shot of that top....
SR
-
Of course every clamp in the shop (I bought more recently).
Adhering to the "purchase two every single time you're in the hardware store" rule I see.
It almost looks like the truss rod adjustment end extends above the surface of the headstock. I assume that's an optical illusion?
SR
-
The initials inlay is really quite sexy.
It fits and blends in perfectly, like it belonged there the whole time.
Spectacular.
:DThank you kind sir. I like it too.
Wow Scott !!! What a sexy guitar you've made there.
The contouring/carving flows very well, I love what you did with the neck joint. Every thing integrates very well.
I thought many times about a control cover that would follow the carve. Your implementation is very tasteful. Not too sure about the deep screw holes, but I guess you need to hold the cover solidly in place for the carving, right ??
The initials on the back are a nice idea. Looks very elegant, and the fact that you used wood keeps up with the visual theme of the build very well. You should definitely adopt it.
It's a very beautiful instrument, congratulations !!
Thanks Blackdog. You are correct about the deep screw holes but the main reason is even more basic than that. I have to hold it firmly in place to even begin the carve. I know in general what the carve will look like....but I do not know the exact amount of material that will be removed. The carve itself tells me when I'm done, if you know what I mean. So I have to set the lip of the cavity pretty deep and set the screws as deep as I can to insure they clear the carve when it's done.
I only hope it comes close to looking as nice as yours when I'm done.
At least you confirmed why I don't really like CA as a filler. The patience will be rewarded. Excellent update.
I have always used Rustins pore filler for my builds so far. Messy stuff, but somewhat controllable. I have the impression that CA can be a real pain to use as pore filler... How is it supposed to be applied ??
I don't know if there is a preferred way to apply this stuff. Some say to use old credit cards. Drak likes to use foam brushes. Everything you use is very temperary as the glue builds on the edge and leaves ridges...which are what make it difficult. I think I'm actually getting the hang of it. I went from small squares of folded cloth to foam brushes back to the folded sqares of cloth. What ended up working best for me was filling the pores with fine sanding dust as described and working quickly with cloth pads. Be sure to wear disposable gloves on both hands. The thinnest CA worked best no matter how big the pores. I found if you work quickly you can get quite a bit spread before the cloth hardens. If you are quick enough to add glue ahead of your wiping stroke (two handed attack) the cloth will stay wet till it runs out. It's sort of like French polishing only faster. For areas that are very run prone you can pour glue right onto the cloth and wipe. Do not go over any area twice. You leave leave ridges at best and part of the cloth at worst. If you miss a spot get it next time after leveling. The trick is to leave as smooth of a layer as possible and level it with the finest paper you can--I was using 600 grit. I tried not to get back to bare wood as this tended to open some pores back up. On flat surfaces, this is actually pretty painless and yields quite good results. It's the contoured areas that want to accumulate varying thicknesses and take more effort to level. Keeping the layers thin, suppressing the desire to rehit areas I missed and leveling with fine enough paper to not cut all the way through made it pretty successful in the end.
SR
-
As I've gotten into the habit of weekly updates, I'll continue the trend, at least for another week or two. I got some much appreciated advice recently. It wasn't really earth shattering....and yet it sort of was. In a nutshell it was a reminder to to pay attention to the details. Well executed details are what separate the men from the boys, so to speak...no offense firefly. So for the past week, I've been doing just that at least in regards to pore filling. RAD remarked that leveling CA is difficult. It is. I've noticed that if you have a little extra here or there, it creates a slightly darker area on the surface of the wood. It nearly disappears with clear finish but gives a slight blotchy look, if you know it's there.So I've been filling and leveling and filling and leveling all week and weekend. It's just about done. I got really tired of it and went out to play with my dog...instead of rushing through the last stages. I've just got to clean up some CA that found it's way to the front. There's no pictures of this because they really don't look different from the ones already posted. The next week will see me going over the frets one last time just to verify their level and dress the ends since so far they have only been beveled. Then a couple of very light thin wash coats of shellac...and we should be spraying before the weekend is done.
SR
-
Blackdog, you make absolutely gorgeous guitars. Your last two posts have also shown that you have beyond any doubt gotten your polishing questions answered and the technique mastered.
Just absolutely awesome....as usual.
SR
-
This keeps getting better and better.
Now, what about that resawed top and bottom? Illusion or real?
SR
-
It's hard to tell, but is the top bound?
It also looks like you resawed the top and bottom off of the core blank. If so, that is very, very cool! Love the accents you are putting in too.
Like Chris said, this is a very impressive build.
SR
-
I very much like the wood in this one. I like the way the build is going as well.
Please show us more.
SR
-
tbh i quite like the mix of hardware colour & condition
That's what's important.
Carry on.
SR
-
Looks like you're taking a page from Not You's book. You should probably booger up the control cover a bit to carry the theme.
SR
-
Very nice; I love the carve especially the way the horns are blended into it. I normally go for a more gradual slope on the lower bout, but this works well too. Do you normally set the top before glueing up the fret boards? It seems like that will make dressing the highest frets more difficult that it needs to be.
SR
-
You have to upload them to a storage site like photobucket. Then copy the IMG code and paste into your post. It will just look like an address until you click on add reply...but it will show the pic in the thread.
SR
-
Thanks Chad and Dean....that has a nice ring to it--Chad and Dean-Chad and Dean--must be the similarity to Jan and Dean that I'm hearing.
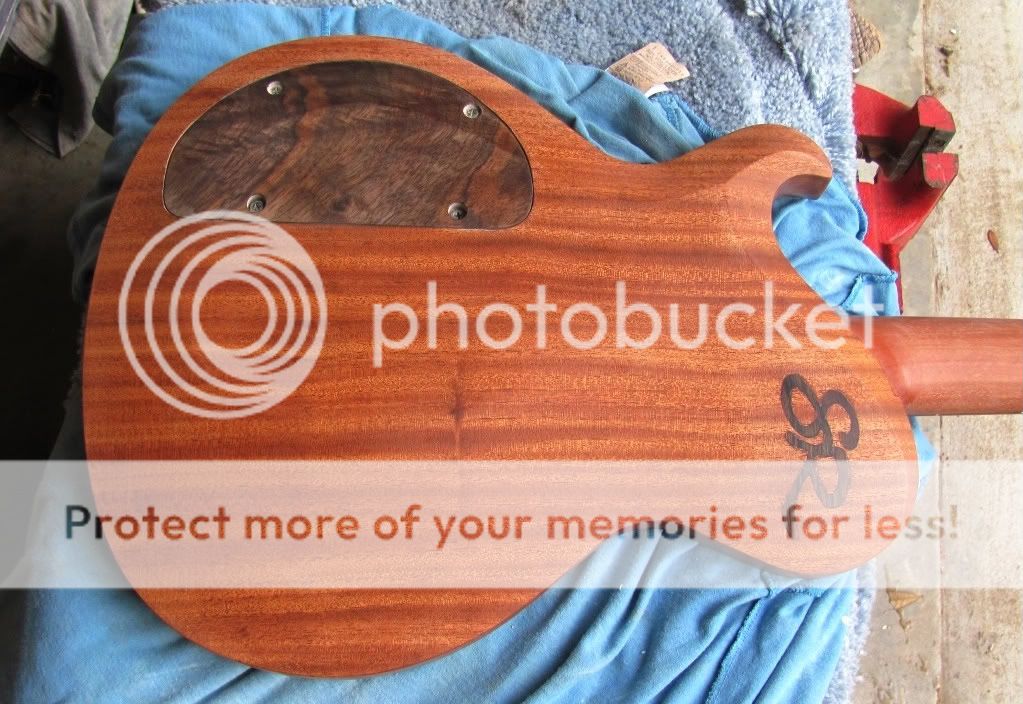
I'm always being asked why I don't sign my wood projects....and the answer is I forgot. When I remember I usually carve my initials and fill it with CA polished flush. That leaves a very subtle sig that you can only see in the right angle. This time I remembered from the beginnig and always planned to inlay it on the back. On the back because it's my first attempt and because there really isn't much open real estate on the headstock. The cocobolo initials looked pretty cool just about anywhere I moved them on the back. But I wasn't real keen on cutting into my pristeen back.
Right about then was when my wife walked up, having just returned from spreading money around town. (She calls it shopping). "That looks awesome" she gushes. "I don't know why you haven't done that on everything".
Well, I guess I'm going through with it on this one. I'm much more comfortable with carving tools than I am with free hand routing. With the carving tools you only mess up one little chip at a time. I think what got me was bracing the tool on one edge of the cut while working on the other side. That rounded and spread the edges a little here and there, and when I cleaned them all out, I squared up some rounded edges which had the effect of widening the channel. Lesson learned. And it really looks fine in person.Deano, you been hangin' with Snoop or sumthin'?
SR
-
What did pre-heating the T-88 do for you?
Your neat rows of clamps reminds me of the marching hammers in "The Wall" movie.
SR
Basically when I came out Sunday morning the temp outside was great (65) but my shop was still really cold. The epoxy bottles were too cold to mix and get good results. I never use Titebond or Epoxy when the pieces or the glue is below 55. Some epoxies work when it is colder than 55 but the cure times ramp up significantly.
All Epoxies are based on chemical reactions. You can speed the reactions up by heating them (get the cure times closer to the documented cure time -- 24 hours for T-88). Also heating Epoxies changes the viscosity of them. This also makes them easier to mix, I noticed that T-88 is really thick...and is a real pain to mix. As the epoxy becomes thinner the penetration is better (funny that Drak and I were discussing this very point this weekend).
The caveat to heating epoxy is that as you lower the viscosity the more it runs. One of the nice things about T-88 is that it is thick and it stays were you put it. Clean up is easy when it is thicker.
Huh, go figure. One of the things I like about it is its thickness and how easily it mixes.
It's quite possible that I've only used it when it's been quite warm. That's kind of a regular event here in Houston. The runs and odd drips I got are more evidence of that I suppose.
SR
-
What did pre-heating the T-88 do for you?
Your neat rows of clamps reminds me of the marching hammers in "The Wall" movie.
SR
-
Continuing on with pore filling.

Leveled.
Partially wiped with mineral spirits.

SR
-
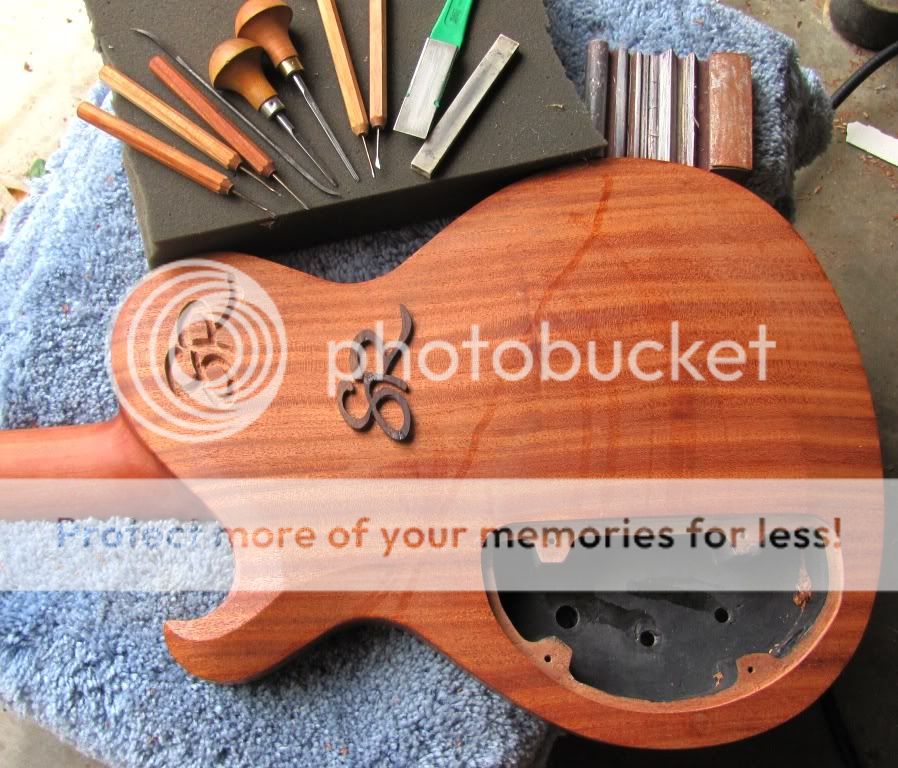
I'm doing an inlay of my initials as I sign most everything on the back of this. I have not done inlays ever before. I cut my initials with my scroll saw out of cocobolo scraps left over from the head stock cap. I located where I wanted it and scribed/traced the image on the back. Then I carved it out. I was going to clean it up with my dremel on a router base....but test cuts scared me to death. So I cleaned up it by hand.
My carving was tight in some areas and not so tight in others. I wasn't especially pleased with this effort....but the cuts were already in the guitar body, so I better make the best of it. I collected some savings of mahogany and glued them into the gaps in the inlay. My thinking was I knew sanding dust gets dark with glue so wood chips would sand like normal and be the same color as the back.
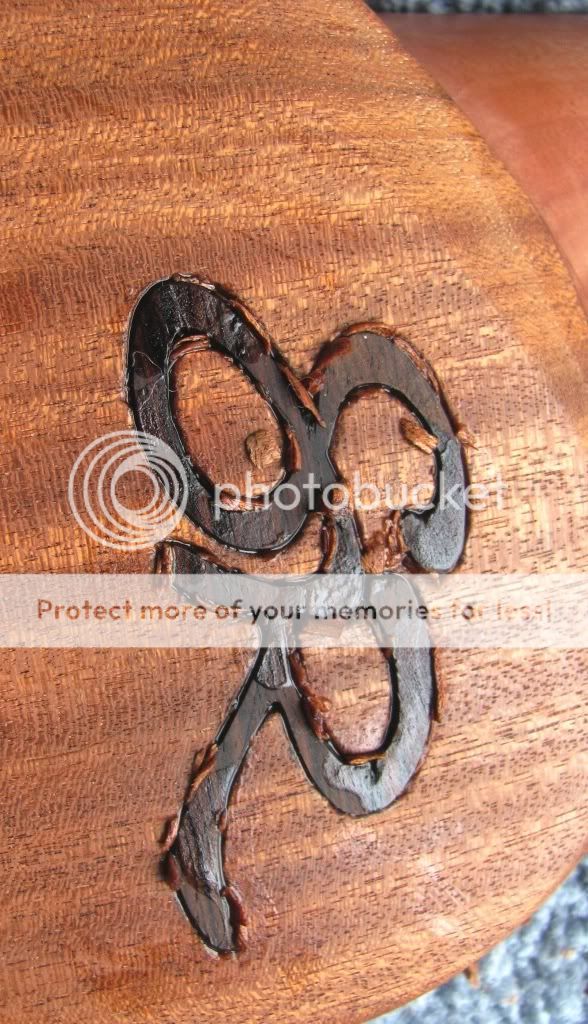
After gluing and sanding back the difference in grain direction was noticeable. so I made small cuts simulating the grain of the surrounding wood. The grain filling step would fill those with CA the same as the actual grain and serve to disguise the fill.
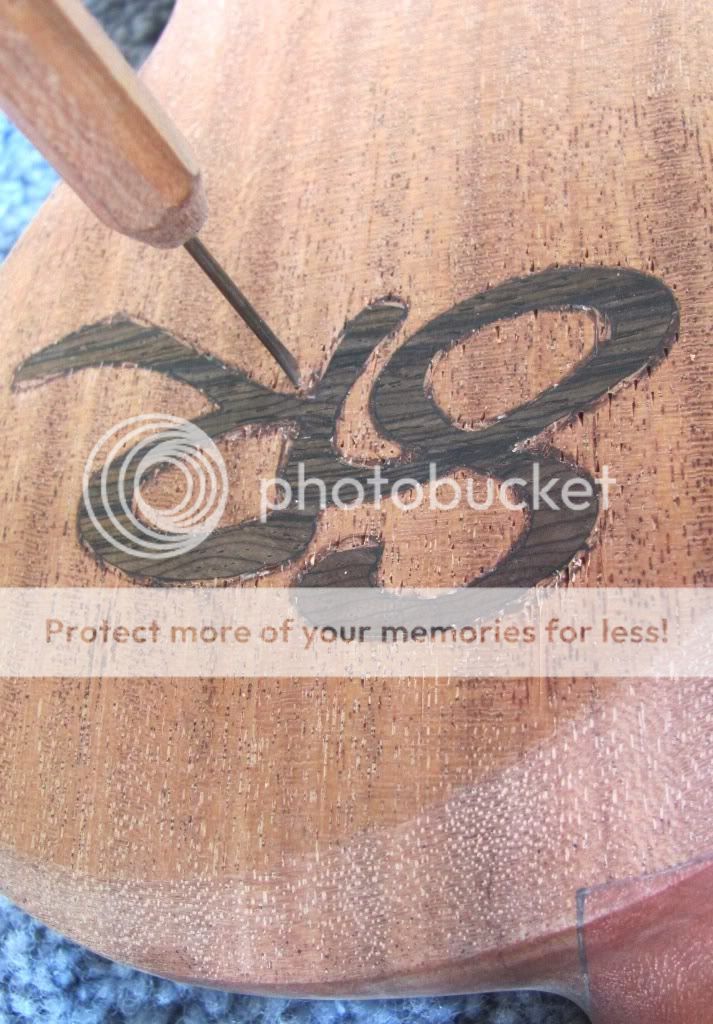
A pore filling step shows that I may have gotten away with it.

SR


#3 Is A Single Cut
in In Progress and Finished Work
Posted
I seem to be making a habit of under estimating the number of details I want to clean up before spraying lacquer on this thing.I got the pore filling leveled and wiped on a couple of thin wash coats of shellac. And I dressed the ends of my frets and went back over them double checking to see if they are still level. I ended up tightening up the level and re-crowned them again. My plan was to get all that completed and take a couple of shots prior to spraying.....I didn't quite get to that completed part. I compounded the issued by smoking up some of my world famous (in my house anyway) Guamanian chicken, which required me to get out of the garage every half hour or so and wander back to the back yard to baste and taste my culinary masterpiece. While I was reworking the frets I found some small dings in the fretboard to repair so, I'm polishing the fretboard while I'm polishing the frets...again.
And when my dinner was done, I stopped and ate it. After all the guitar will wait, the chicken will not. So....my frets are in the middle of being polished, as is the fretboard. The shellac is not quite leveled enough to spray lacquer over. I've found that if I go looking for details to make sure I get right, I find them. it's not quite ready for a picture. I would say I'll get one up tomorrow or the next day, but I've been missing those predictions lately.
Soon.
SR