


Andyjr1515
-
Posts
3,202 -
Joined
-
Last visited
-
Days Won
208
Content Type
Profiles
News and Information
Tutorials
Product Reviews
Supplier Listings
Articles
Guitar Of The Month
Links and Resources
Forums
Gallery
Downloads
Posts posted by Andyjr1515
-
-

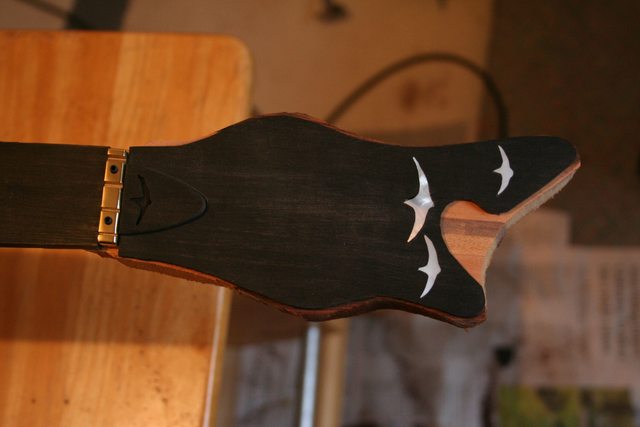
Actually, I normally do the headstock's a little more conventionally.
I've done it this way round for the simply reason that my coping saw is rubbish and the MoP swifts are so close to the sides of the cutaway and machine heads, I was less likely to screw something up this way round by getting the faceplate accurate, using a jewellers saw and then filing the mahogany up to it.
On a bigger headstock where the inlays were not so close to the edge, and a better blade choice on my coping saw I would normally glue the plate, coping-saw the whole assembly to shape, file to finish and the cutaway then do the inlay. Bit unadventurous, though

-
Rough-cut the headstock shape with a coping saw (back indoors because of the returning rain):
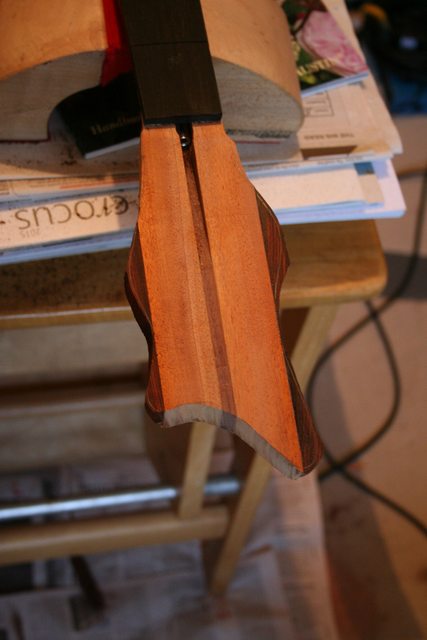
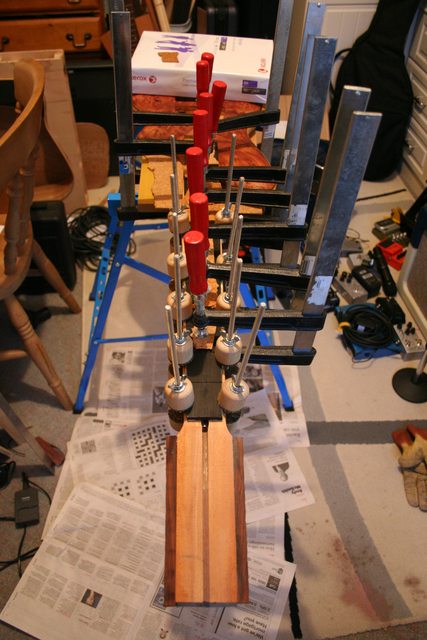
Then did a trial fit of the plate, including confirming enough space for the truss rod allen key:
Then back to the 'you can never have have too many clamps....'
-
1 hour ago, Prostheta said:
Yes, WOD.
Search is your friend....I just hope you have a strong stomach for the things Drak trashed out of perfectionism....
I've already seen some of them...stunning!
-
1 hour ago, Prostheta said:
Bloody hell. You're truly a PG wet dream working out on the patio. This will just make us miss @Drak so much more, except you don't have a WOD.
Mind you, there's a bit of a difference in temperature of a patio in UK in a most unseasonably mild December, to one in Finland, I suspect!
WOD?
-
That one's looking positively angelic....and I bet the other one is wicked! Lovely job...
-
It was a bit drier outside this afternoon so I did the first carve on the neck profile. I had got the guy I'm building the bass for to take the profiles and depths of his favourite bass using a carpenters profile gauge. From these drawings, I cut some plasticard templates of the 1st, 7th and 12th fret positions:

I then used a microplane rasp to file down to those shapes:
Ditto for the 7th fret position:

Then spoke-shaved between the two:

The same again from the heel to the 7th position and a bit of sanding to get rid of the facets and I now have the rough shape:

I will now take my time with cabinet scrapers to get it feeling 'just right' and finish the heel before a finish sand.
Thanks for looking, folks
")
-
It's looking great, Norris
That's a LOT of sanding, but the results show how worthwhile that is.
One of my weaknesses - I tend to get impatient no matter how much coffee or wine I drink

I'm fascinated by your colour-fastness test - it would be nice to do the same test with the same nitro on top of a 'commercial' stain. I haven't done my samples yet, but this has given me a thought that it my own test probably will be unvarnished. Thinking about it all my final finishes have yellowed up to some degree...
-
21 minutes ago, Prostheta said:
Nice set of violin clamps. Reminds me that I need to write up a quick tutorial on them. Did you make them yourself? If not, why not?
I think you can probably tell by their evenness that the answer is 'no'
If I ever need any more, I promise I'll make them myself 
-
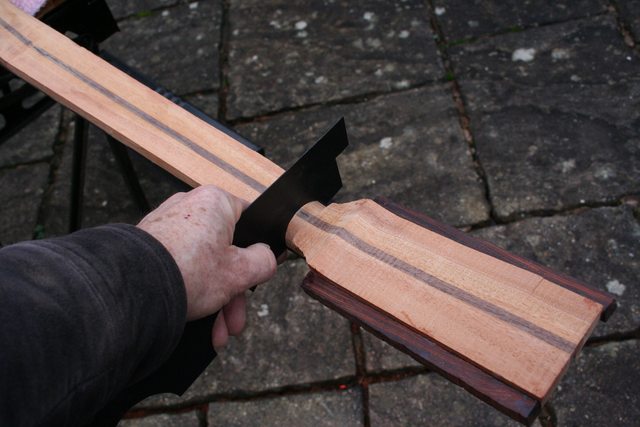
So what to do with the over-wide neck pocket.
As there was a distinct cocobolo theme to the incidentals of the build, I shaped the pocket sides and rough carved a fillet to pop in:

I chose a square-ended fretboard, to take out as much of the visuals of the crack as I could, but wanted to take away the squareness. I did this with a curved scallop from fretboard height to body level. You can see the curved pencilled in on the fretboard.
By now I physically had the EMG pickup. There would be no room whatsover for electrics - almost all suitable pots were deeper than the body, so the pickup would be direct wired to the jack.
Now I had the fretboard in place, I could workout the very highest the pickup could go, and therefore workout just how thin the bottom of the pickup chamber was going to be. From memory, I think it was 3-4 mm!
Here is the rout and the finished curve feature at the fretboard end:

Next challenge was the jack socket...and an interesting discussion of options with Tom
-
 1
1
-
-
On 12/12/2015 at 3:35 PM, Prostheta said:
Good decision-making there. At least you had the option tabled rather than it being one of those unfortunate things you can't foresee and simply have to suck up. Too much good-looking wood ends up falling under a bridge or in a necessary rout whether you like it or not!
A bit of judgement and a bit of luck. When I positioned the wood, I was hoping that I could keep this one and I have a customer who is broadly on the same wavelength as me which helps things along enormously
Today, got the fretboard slimmed to final width and glued and clamped. The incessant rain has meant bringing everything indoors (plus the gig stuff from last night still not put away
)
Note the pack of printing paper preventing the cheapo indoor 'workmate' from tipping over and ruining everybody's day. Note also the stain from dropping a full bottle of threadlock on the rug that pleased MrsAndyjr1515 enormously at the time. The little Vox practice amp is hiding an even bigger and much brighter stain from dropping permanent red ink on it also, that actually didn't spoil MrsAndyjr1515's day, mainly because I haven't told her...
-
I had a discussion with Kert, the future owner of this, in terms of figuring vs number of frets. Based on a 'normal' PJ being 20 frets, the fretboard would actually have allowed 24!
Trouble is, one of the nicer figurings would then be fully covered up. As Kert wasn't needing many more frets, we have gone for 20 on the bass side and 21 on the treble:

This bit of figuring will look lovely once the final finishing is on:

I've got a bit more planing to do to narrow down to the nut, but the fretboard and headstock plate should be on in the next few days which means I can get on with the neck carving
:

As always - thanks for the feedback and encouraging comments
-
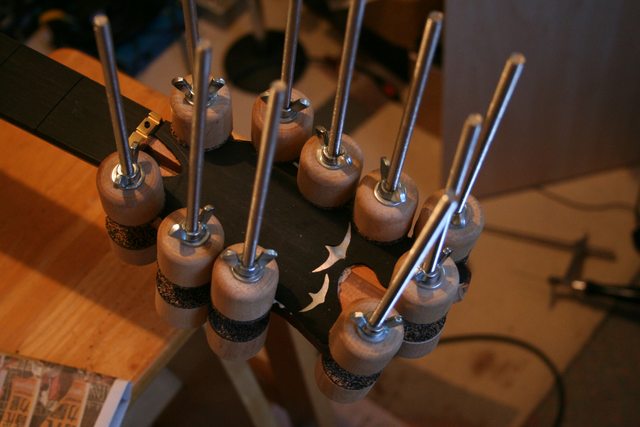
I cut out my moniker 'swifts' and routed the ebony headstock plate, then fitted them with epoxy mixed with ebony dust. Couple of small gaps to retro-fill but it's come out OK:

I also like to pop in just the routing of a swift into the truss rod cover:

Last thing I did today was to finish sand, then tru-oil slurry the rest of the body...not only does it help seal it, I find it easier to spot the odd sandpaper marks and bobbles. It's also a good way of seeing what the final colour will be (haven't decided on the finish yet). I'm really liking the colour the alder has turned and how it contrasts / compliments with the camphor:


-
Hi, Norris
Yes - to my relief, I think I had envisaged it OK

The bend isn't quite as steep as I had at first feared, although, depending on the maple, it might still be a challenge. I still think it would be a lot easier to glue the plate on, scrape clean / sand fine-fit the rebate then glue the binding on...
-
2 hours ago, Buter said:
Does anyone ever get tired of putting two freshly planed chunks of wood together and trying your darnedest to find a bit of light poking through, even though you know you won't?
I don't ever tire of it because I always find bits of light poking through which I know will amuse me for hours
-
Love the finish you are achieving, KnightroExpress
It's going to look top-drawer when the finishing's been applied...
-
Ref Scott's experience with shrinking z-poxy (or maybe it's the flexing of the wood around it?), I've plumped for the slurry method of tru-oil for filling - particularly for the camphor that has the quite severe end-grain in places. I'm quite a way from the finishing process, so have started early on the camphor to allow the slurry plenty of time to fill and harden.
I did the first slurry coat this morning...couldn't resist posting this. It is one very special piece of wood and I'm delighted it's going on this project...


-
1
-
-
Ah....instructors....good luck
just a thought - if it won't bend the 90 degrees, could you reduce the angle and just lose a little bit of the fretboard overhang?
-
Hi, Norris
I think I have what you are planning now. A few thoughts:
- Are you sure the veneer is going to bend to that degree? The curve from the plane of the top of the headstock to the face where the truss-rod hole is, looks to be tight radius and almost 90 degrees. I'm not at all sure maple will bend that tightly.
- I would strongly recommend that you apply your binding after putting the veneer on. The chances of it staying on while you are steaming and bending are slim and, even if you can achieve that, the 'wiggle room' when you are fitting it to the headstock is pretty much zero.
- Pre-test the binding with stain to see if it scrapes off easily. If so, sand everything down so there is no surface glue, check with a damp cloth (the glue will show up white as the veneer darkens with the dampness). Then stain, then carefully scrape the stain off the binding.
Normal protocol - that is, completely ignore all of the above if I've got the wrong end of the stick
-
...so, yes - the neck has been curved the same shape as the top ( in the shot above, I was just starting to 'floss' fit the two using some abrasive cloth to even up the join before gluing.
There was, of course, no need to actually fit it - the top could have been cut straight except at the two sides -because the rest of it would be under the fretboard, but this is easy enough...and nicer
-
8 minutes ago, ScottR said:
FWIW, I did a finishing experiment several years back, finishing one side of a spalted pecan board with Zpoxy and the other with Tru oil. I wanted to see how each pore filled and then polished up. (Very nicely). Then a couple of years later one of the guys here, Demonx- stated that he had done some filling with Zpoxy and it ended up sinking in the pores. So I dug out my experimental board and sure enough, mine had too. Granted it was two or three years later that I checked and it was not so much that it couldn't be re-leveled safely, but it did indeed shrink......eventually.
SR
Oooh - that's interesting, Scott. If that's the case, I may stick with the tru-oil or varnish slurry approach - even though that sinks, at least you're expecting it!
Ref the top - yes, it's an optical illusion. The neck is notched by around o.4 inch, the thickness of the top & wenge, so when joined the top of the neck is flush with the top of the top This shot from when I was trial-fitting the joint probably illustrates better:

-
6 minutes ago, Prostheta said:
Filling it? I guess it's more levelling than void management?
Yes - the camphor is very 'open end grain' in places. I'm probably going for z-poxy this time because I don't want the fills to sink, as they tend to do with other clear 'grain fillers' I've used in the past. The method I usually use, is to create a sanding slurry with the oil or varnish - but this still has the tendency to sink. This is fine when it's a defined lengthways grain, but the camphor is patchy with this end-grain
I'm doing some samples with each method to check before I commit.
This is one of the samples before any filling or finishing:

This is the same sample after z-poxy, scraped off while 'wet' to just leave the epoxy in the grain itself , then light sanding after curing and single coat of tru-oil:

Going to do a slurry-fill tomorrow to see how that compares.
What is your preferred clear fill?
-
A couple of small but important jobs done today.
First, I capped the truss-rod. I wrapped it in plumbers PTFE tape and then capped it with a spare strip of rosewood binding I had left over from one of my other builds.
Next, I finished the main shape sanding for the body. Still got to do some filling and final sanding, but this is basically how the body will be front and back:
 :
:

I'll be filling the camphor with z-poxy and then flattening it back down ready for the finishing. After the z-poxy has been sanded back down, I will be attaching the fretboard and starting the neck and heel carve.
-
On 12/7/2015 at 0:53 PM, Norris said:
Now then, a question for the PG collective. I'm intending to bind the veneer before steaming it into shape. The fretboard will then extend to just cover the top edge of it - which will not be bound. But what to do about the heel that will be left, not covered by the fretboard? Ideally I'd like to take it down to the level of the head to take off that sharp heel
Hi, again, Norris
I haven't got my head around what you are planning...
What are you binding where? And where are you bending the veneer for?
Pleased to see the top going on, by the way. As they say 'you can never have too many clamps!!!
-
Hi, Norris
Sorry - I'm a bit out of date with this one!
I'll have a really good read this evening but, in the meantime, 'naptha' is lighter-fluid! (ie for Zippo lighters, etc). You should still be able to get hold of a small can of it at supermarkets, although you will probably be classed as a smoker and therefore taken to the cabin-of-shame far away from the normal tills to peddle your filthy trade
Andy


Camphor and Alder Single Cut Bass
in In Progress and Finished Work
Posted
Talking of unconventional - anyone notice that the volute isn't actually anywhere near the neck angle break? Been racking my brains for some credible sounding reason for doing that but I think it's a bit simpler than that...just plain got it in the wrong place