


mistermikev
-
Posts
4,764 -
Joined
-
Last visited
-
Days Won
133
Content Type
Profiles
News and Information
Tutorials
Product Reviews
Supplier Listings
Articles
Guitar Of The Month
Links and Resources
Forums
Gallery
Downloads
Posts posted by mistermikev
-
-
so a week w/o the wife has come to an end tonight and I look around at what I accomplished and yup... it was not at all what I figured. Thought because she would be gone I would get a lot of work done but then when you figure in how much more often I had to clean and feed the cats and clean after the cats and feed myself... just really appreciating her right now!
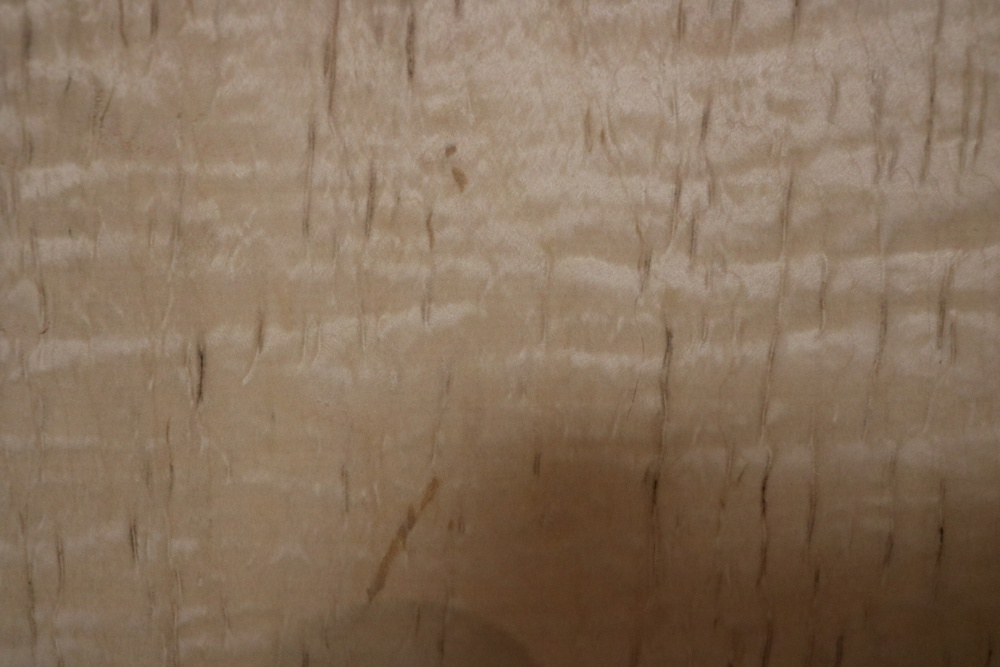
anywho... @scottr - sanded this up to 2k as you advised and indeed... w/o any finish I can def see figure a lot better. it will be interesting to see if there is any difference putting tru oil on after sanding up that high. really kind of want it to absorb less cause I want to bring out the figure... but don't want to turn this wood dark. it's so pretty and light.

got the neck all fretted...

body still needs some clean up but back is sanded up, neck heel carved.
if you don't look at my end grain... and just focus on the center of the back... pretty hard to find the join. endgrain gives it away as usual... but pretty pleased with that join.
my sanding... figured I'd everything that doesn't come into direct contact with that hands as sharp as possible. had to transition to a more 'soft' approach around the heel.

top is only sanded to 22o for now... going to raise the grain a few times and stay at 220 so it will soak in dye really deep.

-
 2
2
-
-
24 minutes ago, ADFinlayson said:
Those streaks you mentioned on your other post, I didn't comment on because I don't know what they are, but this top is rife with them. I'm going for something purpley so I doubt they will be particularly visible when it's all done

well no expert either... I see a few dark one's there that look similar. the majority i see there are lighter and appear to be fleck. i imagine there are many who avoid that sort of thing in a top but for me it just adds to it. lets you know it's not a photo-quilt!
-
1
-
-
looking good brutha!
-
1
-
-
that is some interesting stuff. i looked up some pics of the carelian, beautiful stuff. as a full tree it's strange. in wisconsin we have birch everywhere... entire forests of just straight trees. have never seen a crooked one!
-
1
-
-
6 minutes ago, Drak said:
I know you're on TDPRI. I was reading a thread there (probably in the finish section) Someone who had tried, like, a half-dozen pore fillers over the years. He mentioned his favorite (clear pore filler) and I YT'd it and it seems way better than even Timbermate. It has NO shrinkback at All, none. Must be some sort of soluble epoxy product or something. Even Timbermate, being water-based, has shrinkback as the water vapor evaporates out of it. I have my own way of dealing with that, but this product seemed better. The only drawback is that if you leave too much of it and its sitting ON the surface, it leaves a milky-white residue.
But for what we do, no one should be leaving that much pore filler on a body. I actually am going to switch and try it if and when I need to go down that road again. The other drawback is that I forgot the name of the stuff. And, Firefox just did an update (its a long story) and I just lost years worth of bookmarks, of which I had saved the stuff in a bookmark.
well my first q is... how does it react to nitro? I like nitro a lot. just makes things easier. if it works with that... I'm sold!!
I gave up on trying to keep bookmarks in firefox/chrome. just keep a word doc and make links in it. that way - I know where it is and it's cross browser. have dif pages for 'guitar parts', 'forums', etc.
-
1 hour ago, MiKro said:
Or use thick walled aluminum tubing. Brass would allow you solder to it if needed.
mk
well shielding shouldn't be an issue as I'm using push back wire to carry the signal from the jack into the ctrl cav which is shielded. so... yeah aluminum would work. good idea
-
5 minutes ago, MiKro said:
No the tap should have instructions as to what size drill bit to use. If not then look it up. there are plenty of Tap to drill bit size charts on the net. Some wil list if wood vs metal. another option would be to insert a thick walled brass tube glued in then tap that.
mk
well that's a nice idea (brass tube). Good option to know about, thanks for that. I think I'll try the simple approach first on my 'test' build and depending on how secure that sits...
-
1
-
-
Just now, curtisa said:
The tap size usually refers to the nominal outer diameter of the thread edges on the tap itself, so the hole you need to drill for a 9/16" tap has to be fractionally smaller. Googling 'tap drill diamter' is usually all I do in those situations as I can never remember what size drills are required for each tap without the help of some kind of table or chart. A drill bit of 31/64" diameter is apparently the correct size for a 9/16" tap.
thank you sir. exactly the answer I needed. wasn't really sure how to phrase it to get proper answer from google.
well, for better or worse... ima gonna gyv dis a shot.
-
2 hours ago, Bizman62 said:
Just for clarification I'm not saying it's birch. It just looks similar to the stressed carelian birch so there may be something in common in the reason for figuration.
ah... right on. makes sense. carelian birch is caused by stress?
-
Just now, Bizman62 said:
Funny, the word 'masur' can't be found in online Eng-Fin dictionaries, but it was in Meänkieli (ancient Finnish used in isolated parts of Scandinavian Lapland)- Finnish dictionary, meaning the same!
if you haven't looked at that site (where I heard masur) - pretty interesting. not exactly in depth but lot of good info there. they backed up what mikro told me - that indeed stress on a tree can cause little fleck pockets. had no idea.
i often wonder about the lengths lumberjacks/mills go to to identify the wood they are sawing. it is entirely possible that birch would get mixed in but then again... 31.25" - that'd be the biggest american birch tree I ever saw! idk if it grows bigger by you... but about the biggest it seems to get here is maybe 8 or 9 inches diameter. then again... it is at least possible in nature that two trees can graft into each other... so who knows.
it is some really interesting looking wood either way. don't think it'd be a good candidate for dye... but could def see some sort of 'rustic' looking build working well w it. someday! got a crap ton of wood - I often have anxiety that I just want to build with so many pieces i have and get them done!
-
haha... just reading about masur in birch now. does look a LOT like this.
-
22 minutes ago, Bizman62 said:
That looks a lot like mutated silver birch, Betula pendula var. carelica, where the brown stripes are actually bark captured inside the wood.
well was just looking at this: (bear claw specifically)
http://hobbithouseinc.com/personal/woodpics/_figureandgrainterms.htm
and top left maple example looks pretty close. that said... I love the idea of it being 'mutated'!!!! I haven't used birch other than birch plywood... but I was under the impression it was fairly soft by comparrison. altho this is soft maple... it is quite hard. i spose that's cause of the figure.
-
4 minutes ago, Bizman62 said:
I'd say the best option is to take your calipers and measure. There might be a consensus about how to tell the measurements but you never know...
is solid advice for sure. given that it's going to be mostly ash... should be pretty forgiving but I'd hate to find out I'm wrong!!
-
21 minutes ago, MiKro said:
That appears to be more of what I would guess as stress/flex induced with mineral deposits? It runs with the grain of the wood. It looks as though it came from a large limb that moved a lot in the wind. It is not ambrosia stain, otherwise you would find small bug holes and they would be at many different angles. to any surface. Also the color is wrong for ambrosia stains.
juts my 0.02cents worth.
mk
right on. I very much appreciate your expertise. interesting. there are some bug holes in the live edge part of it... but I suspect there will be some sort of bug holes in 'any' live edge part. I didn't necc think it was actual ambrosia... as in my experience those marks are not this small... but I thought perhaps/maybe some other bug. it does look sort of like mineral staining tho so I'm inclined to believe you. I didn't know that sort of thing could be caused by stress. very much appreciate the insite.
-
1
-
-
Just now, argytar said:
I liked it too... maybe on the next build!
your welcome for the reason to build another! (please return the favor some day - like I/you need any encouragment)
-
1
-
-
2 minutes ago, ScottR said:
You beat me to that!
SR
hehe, the chained link thingy... yeah in some spots this does look a lot like that but in others it looks dark like flek. def unusual and idk why but it is attractive to me.
-
1
-
-
does remind me a lot of the 'chain link' think we see in ash... perhaps it's the sm thing. still would love to know if anyone knows!
-
41 minutes ago, ScottR said:
Beats me.

SR
well... begining to think that it might be from beatlejuice wiping his arse on the wood? he was very small.
it reminds me a lot of the fad in the 70s/80s to distress furniture.
-
was just about to say how much I like the natural against that dark brown... doh!
-
for the record... found the tap size and ordered one, and ordered the jacks too. i have zero tap experience so q: when they say 9/16-12 tap... do you cut a 9/16" hole first and then tap? or do you have to cut a hole smaller than 9/16 to tap? anyone know?
-
thanks for the timbermate tip... might have to give that a try... after I get through the lifetime supply of filler I have. I don't recall the name, but i searched online and it came recommended from many sources. it is water based and very clear... but my gripe with it is that it recedes so much... I was literally gobbing it on my last build only to have it recede beyond the wood line! doesn't react to nitro... so there's that. really not font of the stuff. might leave the jar open because it is very soupy to begin with, and perhaps drying it out would make it work better. having to do 5 applications of it to get it level seems ridiculous!
-
1
-
-
so had to snag some baltic birch for some jigs I'll need for scarf and laminate tapers... and while I was there I fell in love... again.
so this is 13.25" wide soft maple 13/16" 9 foot long. has a really cool 'rustic' vibe that I think could be exploited. that said... I'd love to know what these marks are. at first I though it was fleck but looking at it closer it looks a lot like that ambrosia stuff. like some sort of path a bug created (whoa... heebie jeebies!)


-
39 minutes ago, curtisa said:
Interesting idea, hadn't considered it myself. It'd have a pretty tidy and unique look, certainly not something I've seen elsewhere.
'Chasing' the thread into the timber might pose some challenges if you're using the jack itself to do it. You'd also need to decide how best to handle the wiring on the jack before you install it. Assuming you pre-solder the wires to it before installation (no access through the f-holes?) the wiring is going to naturally twist up as you screw the jack into the body. Perhaps pre-anti-twist the wiring before insertion to allow it to naturally untwist back to equilibrium as it's screwed in? Are they meant to have a nut on the back as well, or are they designed to directly thread the timber like an oversized wood screw?
What about a small rectangular mounting plate with a standard open socket, like PRS or Gibson? The plate itself could really be any shape you like, including the football profile you mention.
thank you sir... very much appreciate the feedback.
so... have considered the wiring. Originally I planned an electro socket where I'd drill the outside holes and then use a long bit to break through the inner chamber wall. I planned to pre-wire the output using 2 conductor push back wire plus a seperate ground, and then stiffen it with shrink tube.
my path is illustrated below - note that the third ouline in is actual guitar.has approx 3/4" of inside material to go through, then a ~2" gap to the inner ctrl cavity wall. good call on the pre-twist. good idea. worste case I could get a tweasers through the f hole but I think if I just put enough length on the wire, hold the guitar upside down, thread wire, grab it from the control cav side, then thread in the jack I should be ok.
the bigger concern, is the threading. I don't know if my tap set would have anything for such coarse thread. I would have real concerns about splitting the wood right there w/o the proper sized hole. I'm thinking I can make the hole the size of the jack + half the thread, wax the threads, thread it, unscrew it out, then put ca glue on edge to fill in the thread gap and thread back in. wax should allow it to be removed later.
the football or square plate is def an less risky option. then again I'd want it countersunk and doing that at this point... would likely involve chisels or a jig... so more work... and I'm not sure it would look as nice as the threaded jack. further, if I traverse these uncharted waters - I could see using it a lot more. I don't like having to put a nut on the other side of a jack like that. have to factor in a flat spot on the inside... just seems more complicated than it should be.
just thinking out loud here. thank you for stirring the pot!

-
1
-
-
so... just finishing up my final run for my tele. going very well. i had originally planned an electro socket for the jack, but early on I realized that wasn't going to work. my first run - body is only 1.125" thick at edge.. this worked but wouldn't fit a push/pull in the ctrl cav... just not enough room so my second run I expanded that out to 1.325. electro sockets are just shy of 1" around at the widest... .87" thick at depth. doesn't leave a lot of wood on top/bottom esp when you consider the 1/2" roundover at the back!
so... could do a football jack... that would be the easiest solution.
I've seen these acoustic guitar jacks that are like the barrel jacks, but have coarse threads that look like they would hold in wood. that's an option. I'm kind of leaning this way because they are fairly discrete afa look. would be easy to recess... and there is approx 3/4 of wood so countersunk it'd prob have ~5/8" to grab.

normal barrel jack won't work as there is no way to get the nut on (would be inside the f hole cavity.
thought about trying to fit a strat jack plate on the back side... the positioning of it might be ltd as there is a lot going on inside the body... probably not worth the effort. if I was going this route I should have gone there in the design.
penny for your thoughts? which one do you think would 'look' the best? anyone use one of these coarse threaded jacks?
-
1
-


Blackish.........sort of.
in In Progress and Finished Work
Posted
it indeed does. I'm coining the common term to sell uber high priced "rainbow ebony"! I'll be the first customer please!!