


mistermikev
-
Posts
4,759 -
Joined
-
Last visited
-
Days Won
133
Content Type
Profiles
News and Information
Tutorials
Product Reviews
Supplier Listings
Articles
Guitar Of The Month
Links and Resources
Forums
Gallery
Downloads
Posts posted by mistermikev
-
-
55 minutes ago, henrim said:
I have welded ss a bit but never a sheet metal construction. So I'm aware I may have to back up a bit and change the material to regular black steel or solder the construction together. If I really want to make that instrument. But the dream is to have a stainless steel unibody.
i made a rule with myself a while back and am struggling sometimes to stick to it - "don't back down just because it's hard or unknown". it gets me into a LOT of trouble, but trouble is generally where I learn. That said you have to also know when you've gone too far beyond your own boundaries! Stainless... I get the sense you could pull it off.
-
 1
1
-
-
37 minutes ago, henrim said:
No, I never bother adding one to pedals I build for myself, because wrong polarity should not ever happen. I guess I should reconsider that, though.
I only know them by name. Something to put on the bucket list
")
i figured I'm building for "me in the future" who will, no doubt, find a way to hook up a battery backwards or use the wrong power supply!
-
1
-
-
10 minutes ago, henrim said:
Max1044 is there to provide -9V and +9V rails to power an opamp. It is essentially the same Craig Anderton design what you used. The original used two 9V batteries to provide the +/- rails.
I believe the reason the chip was toast was that for some reason I had made the power connector center positive. Which I had not marked in the case. And at some point I have connected it to my regular center negative pedal power supply. Anyway fixed the polarity as I was at it. I guess I had a separate PSU at the time I built the driver, which just happened to be center positive. It was at least 10 years ago when built it.so you didn't have diode reverse polarity protection... or the diode is now a white puff of smoke (hehe)? Ahh... on the max1044. I am aware of using it in that capacity and have used it for +-9, +18v, etc... my stage center was not powered via battery so... 2 + 2 = 13 - perhaps I did use that and just don't recall. Was a decent sounding reverb anyway. Idk if you are familiar with the belton reverb brick... but there are some pretty good circuit designs out there for it.
-
17 hours ago, henrim said:
I haven’t finished the cab yet but it has been hooked to an amp and I have played with it every now and then. It definitely needs side vents. Really boxy sounding as is, but I wanted to try before cutting the holes.
I found an old Accutronics spring tank while organizing my workshop. The driver I made years ago wasn’t working but apparently it was just a charge pump chip that had to be replaced. May not be the best ever reverb but way more spacious than the digital one on the DSL20. And that spongy spring sound is perfect fit with the spinning speaker. Too bad I didn’t think about that tank before I made the cabinet because now that tank doesn’t fit inside. Would have been a solid package.

a while back I had messed around with the 'stage center reverb' which was a tank driver that was in some magazine article and has been modified in the pedal world by ggg. I had mounted the tank under the pedalboard I had at the time.
that def did not use a charge pump (just ran at 9v)... what circuit were you using if you don't mind me asking?
-
3 minutes ago, henrim said:
Stainless steel body. Not necessarily a resonator, but that is an option. I just want to build a large(ish) sheet metal container. Could as well be a motorcycle gas tank but the idea of steel guitar body has been in my head for a long time. Maybe more of a welding exercise than a quest in guitar tone. And when I say welding I mean welding, not soldering or brazing.
interesting. as I understand welding ss is a much more rare skill. love the idea of a ss resonator.... have always loved those national guitars.
zero welding skills here but you just reminded me that one thing I think I should try at some point is unconventional materials like carbon fiber cloth over wood, perhaps a carbon fiber neck, perhaps fiberglass wrap on wood... perhaps an epoxy/wood mix body and maybe a richlite fretboard at some point.
-
1 hour ago, Professor Woozle said:
One non-guitar project I forgot to mention is recasing one of my amps, a Trace Elliot TA100R which currently has a rather tired looking plywood case. I want to redo it in solid timber (oak, mahogany or yew) but challenge myself and do hidden dovetail joints on the corners.
right on. dovetail is some challenging stuff... even with a jig! Everyone should do some dovetail at least once... adding it to my bucketlist!
-
1 hour ago, ADFinlayson said:
1). Firstly, thank you for noticing that it has a kill switch rather than noticing the demonstrator is clearly unqualified to show it off! secondly, it's not a push pull it's just a 500k with a momentary on the top of it, it's really cool. Here's a link to it.
https://www.thomann.de/gb/shadow_sh124500_kill_pot.htm?glp=1
If you want to try one, they have quite a thin shaft, I had to drill a hole only about 6.5mm for it, if you have regular holes already drilled for your pots then you might need to find bigger washers, also they're course nurled so you need alpha fitment knobs to go on them!
2). No that's fair cop, the amp is being turned down by about 90% with a cheap attenuator in the fx loop so it's humming like a stadium stack while outputting as much noise as a church mouse (it was 10pm when I recorded that and didn't want to makes the neighbours sad).
3). Thank you Mike, really appreciate it and I am very happy with how it turned out, and I've already had another order from the USA for the SAME GUITAR off the back of it, next one is going to North Carolina. Super happy!
my bad - push/push is prob more accurate... have never seen a momentary like that. pretty cool - I appreciate the link.
2) sorry for bringing it up! It just didn't seem normal for your recordings. neighbors/kids - got it!
3) congrats on your popularity!
-
1
-
-
so couple observations... #1 - love the kill button. you somehow have a momentary push pull? what part are you using there? love it. buckethead would be proud.
#2 can't help but notice, and forgive me for pointing out, that there is an awful lot of noise going on there in the background? tone sounds good and playing is very nice, just couldn't help but notice.
#3 Guitar looks amazing, that finish is my fav so far. Just a 10 - nice work.
-
1
-
-
you know... that little feature that accidentally manifested (the repair of the wood between neck cavity and pickup) - you really turned that into a net positive. the carpet matches the drapes as they say... nice work.
-
1
-
-
43 minutes ago, Professor Woozle said:
Sounds like that's the way for me to go when I get round the build. I was also considering using carbon fibre rather than steel for the neck reinforcement on my mandolin build, so I probably will.
well i dunno if you've sourced stuff yet... but I've found this place to be good quality and fair pricing: dragonplate.com
-
14 minutes ago, Professor Woozle said:
That's something I have been turning over in my mind. I watched a vid on Youtube of someone who owns a 4008 playing and talking about it and he said it tended to flex around the heel, which got me wondering if the standard Rick twin truss rods weren't giving enough stiffening. If so, maybe I should go for a single truss rod with two CF reinforcements either side going all the way to the neck pickup cavity.
my most recent builds - two 5 string basses... did carbin fiber reinforce on them. they are also multi-lams of really rigid wood. They most def are rigid. amazing the rigidity two 1/8 x 3/8 strips of carbon fiber will add. Other 5 strings I have seem like wet noodles compared.
-
1
-
-
31 minutes ago, ScottR said:
Thanks Mike!
We're coming around the final curve now I think.
SR
right on, well it looks great.
-
1
-
-
3 minutes ago, Crusader said:
Thinking about it, building an entire guitar out of one piece of wood would probably need a fretboard unless its Maple you're going to use. But putting that aside, my ambition is to actually get something finished!
finished - lol. There is a guy on facebook john tuzukanaka or something-like-that (not sure on last name)... he builds all the time from one piece with a skunk stripe down the back. I know he's built many out of maple but am not 100% sure if he's done any other woods. I have also seen a guy do it out of purpleheart but that ended up heavy... but not to say you couldn't build it thin and get reasonable weight relief.
I have also seen a brazillian who does these crazy hollow body guitars that are one piece. he uses a fine bandsaw blade to cut them apart, carve them out, then re-assemble. he does it somehow where the seam is invisible and that is something I'd like to try someday. I've spent a lot of time making invisible seams using solid surface and feel like maybe I could pull it off. It would def require a much better bandsaw than i have... and perhaps following the grain with the cut... and a very thin blade.
anywho, thanks for the response!
-
4 hours ago, Professor Woozle said:
I've got a whole load of things I'd like to build myself, when I've got some of the current pile of projects finished!
First up, I've got designs on building myself an 8-string Rickenbacker (already got a lot of the hardware for it) and a LP-style, but through-neck (again, got some of the hardware and wood). For the former, I'm probably going to have to machine myself a bridge but I do have a good MT2 pillar drill with cross-slide vice to do thisSwirling around in the list of other possibles are, in no particular order:
A strat - got an interesting figured bit of ash for a body and a nice birdseye maple fingerboard that would do for this
A 12-string baritone acoustic - I already have one of these but it has some issues I'm still trying to correct, and in the wood stash there's a back and sides of Amazon rosewood and a soundboard blank of red cedar set aside for this.
A tele with a stone body - yes, you heard that right, like any good mad professor I get the urge to do crazy experiments... I have a slab of the fine-grained limestone known as Ashford black marble in the garage and a set of diamond core-cutters, I expect some serious weight relief would be necessary on this one.
A twin-neck guitar/cittern - I got given a gnarly yew stump several years back and the bits I've cut off the outside have been very pretty. Taking a slab across the widest point would give a single-piece body, hopefully with some really great figure. Hoping to get round to cutting later this year and finding out!8 string... that's a good challenge. a lot of pressure on that neck. r u planning dual truss rod? some sort of carbin fiber reinforce? look fwd to seeing that thread.
12 string bari - another good challenge. I love cedar... one of my fav acoustics is a cedar top.
stone - I've seen a video of some guys at namm that do stone tops. crazy stuff. In my younger days I ran a lot of routers thru corian/solid surface and it's not quite as hard but many of the sm challenges. need a big powerful router for that - used to use a 3.5hp. Perhaps with stone/marble you need slower... I used to run that thing full bore to do a single pass roundover on sinks. good times.
some great goals there. appreciate you sharing.
-
very nicely done. really popped w some finish on it. that top is something else... love that you've left the edges like that. nice job.
-
1
-
-
4 hours ago, matador34 said:
Hi guys,
Thanks so much for all the helpful and kind comments. It think I will do what you guys have suggested and glue a piece of veneer into the neck pocket to get the right fit (I'll glue a piece on each side to get the neck well centred). I'm going to continue layering up the neck joint to get it to the right height. It might be at a slight angle so I'll see whether I need to do some sanding/planing to get the fretboard at 0° to the body.
In terms of the bridge I'm thinking of I was thinking of either a wraparound or a strat style bridge, for which I am under the impression there is no need for a neck angle? That's why I wanted to get the fretboard lower to have the bottom of the fretboard level with the surface of the body. Please do correct me if that is the wrong thing to do!
Cheers again for all your help guys, I'll keep you all updated when there's some progress (might not be for a few days!)
so... what I'm hearing is that you don't have a bridge in hand... which suggests to me that you may be headed in the wrong direction. A wraparound bridge WILL require an angle to the neck (typically 1.5-2deg) and you really want to have that in hand before you adjust the height of the heel... putting a neck w/o angle together with a wrap tail is going to mean your neck will likely be 1/2" tall sitting off the guitar... and then pickups would be too low... all sorts of potential issues. Unless you are going to 'recess' the bridge itself... you'll need an angled neck pocket. If you go with a strat bridge... no such requirement. hope something there is helpful.
-
so I will answer you best telling a story... back in 95ish i lived in L.A. and walked into the carvin store over on sunset (the rock walk yeah!) and bought a carvin neck thru body blank. Idk if it had issues when I bought it (I was pretty inexperienced back then) but after building it and investing in it... I realized that at the 3rd fret it had an incredible back bow. I took it to a reputable luthier in L.A. that had a "steam box". He was sure he could fix it. Gave it to him for a week... and at the end of that week he gave it back to me and said "no charge"... it couldn't be fixed. For years I just set some heavier strings on that guitar and dealt with sub-optimal action. Years later I moved to AZ and had my own "steam box" - that's just what I call my garage when it is 120 degrees out. Like a sauna in there in the summer... dry but easily hits 130... maybe 135 when it's that hot. I had bound the neck to something perfectly flat, set that guitar in my garage over a heat spell for about a week. Then took it inside and let it acclimate for a day or two. Unbound it and it was now perfectly straight. put some strings on and it played like a dream w 1/16" action. That lasted about 3 weeks and on it's own it slowly returned to exactly where it had started. The moral of this story is: the wood wants what the wood wants.
I am aware that people steam bend wood all the time... acoustic guitars for instance. I have steam bent it myself... but that is typically very thin wood. I think when you are dealing with something as thick as a neck... it is not possible to permanently bend it with precision w/o some other force holding it in place.
with this neck... if I HAD to try to fix it... I would try to bind it to something straight and apply heat/steam to it to get it where it needs to be... then immediately glue in carbin fiber strips to fix the truss rod channel and reinforce, then glue the fretboard to it and bind it to something flat. the fretboard/carbon fiber MIGHT hold it in place. That said... it is well established that musicman bakes in a fwd bow to their guitars by glueing them to a radius. this is typically not done with dual action truss rods, but the sm principle will apply. It doesn't HAVE to be straight... but you might want to ensure it is a perfectly straight arc that you are setting into it.
You can force it straight to do the fret leveling or use a 'katana' to get it leveled.
just know going in... all of this is not GUARANTEED to work. You may put a lot of effort into this to find it is twisted and too resistant to straightening. You may find that after all this the wood is just fighting too much. at that point: "kill it before it grow".
hope something there helps.
-
19 hours ago, matador34 said:
Good evening people,
I'm very new here so forgive if I break any forum rules, but I will try not to!
I've been working on my first guitar build, a PRS style guitar for which I've got the neck and the body that I bought online with the idea of playing around with the staining the body and finishing it. However... It turned out the part of the neck that fits into the neck pocket (please do enlighten me if it has a name) was too thick and the fretboard was too high above the surface of the body. I decided to try and make it thinner by sawing at it and unfortunately made it too thin. I then got some some thin shims and started to glued them onto the neck to bring the fretboard to the right height, which I'm still in the process of doing. However number 2.... It turns out the neck pocket on the body is too wide for the neck as well!!! I am thinking of getting some more shims to patch up the missing width but I wondered whether anyone had any advice on what to do with this and would be so grateful for any tips!
I also wondered about getting a piece of timber (I'm pretty sure the body is maple) and trying to carve it to the right shape to fill in the gap.As you can see it's not the best stuff that I bought, seeing as they don't fit together, but I'd really like to salvage something out of it!
I've attached some pictures for you guys to see the issue.
Cheers


I'm not sure if I've picked up on something no one else here did... or if I've misunderstood... but here goes...
when you say "the fretboard was too high above the surface of the body" that makes me wonder how you determined that? If you were putting a tom bridge on this guitar... it was supposed to have a neck angle... and if routing out for a strat style bridge... then not. Just wanted to point that out, and hopefully you determined this by laying a straight edge over your neck/frets and placing your bridge on the guitar at the intonnation line and ensuring that the straight edge is a little higher than the bridge(not including saddles)... and also keeping in mind that you typically would cut string grooves into the tom saddles.
the piece you are talking about is the tenon. typically it is cut a hair proud of the pickup cavity as the legs of the pickup need to extend further into the guitar anyway... and often times folks will router this piece flush after the neck has been glued on.
looking at your pic above... that neck is got a lot of space there. as many have mentioned a piece of veneer on either side might do it. Sometimes if it is closer than that, you can just spritz some water on both parts and let them swell... but in this case it's not close enough to get away with that.
I guess it's captain obvious over here but I thought it worth mentioning that you def don't want to 'fill' the neck channel on one side only... as the neck needs to be centered.
hope something there helps.
-
2
-
-
Just now, ScottR said:
Way to go Mike!
SR
Thank you Scott... very much appreciate it!
-
1 minute ago, ADFinlayson said:
Nice one Mike, well deserved!
very much appreciate it ash, thank you.
-
1
-
-
Just now, JAK said:
Grats on GOTM

Also that purple heart version is looking delectable! Does the heat treatment help the colour stay rich longer / age slower?
thank you! well... there is a lot of conflicting info in the world in regards to purpleheart. I've read that the sun turns it purple, and that the sun turns it brown. I've read that the only way to keep it purple is to use uv protection. I've also read that if you seal it well it will prevent browning. Then there is my intuition... I've seen at least a few old alembic guitars that are purpleheart and maple... and they most def did not have uv protectant on them... and yet they are still purple. I've seen lots more that have browned.
Having seen the "pen blank guys" take a torch to purpleheart and make it vivid purple, my thoughts were: #1 get it as purple as possible to start with and #2 use osmo polyx which is opaque white when you see it at the right angle... figured this would help keep the sun off a little since I'm not interested in doing a gloss..
I guess time will tell... but for now... I put some tru oil on first and it made it a hair 'magenta'... then the osmo. it is looking pretty good and I'm working out the electronics as well as a few issues with finish and setup. I hope to get to a video of that one in the next week or so. You'll have to check back a decade from now to know for sure if it's still vivid!! hehe.
-
1
-
-
couple other random ideas... just rule out issue with cable by trying a dif cable, or try another guitar just to rule in that it is def not an environment issue. I would check your input jack very carefully... ensure that the live prong isn't making minor contact with the body wood/shielding.
-
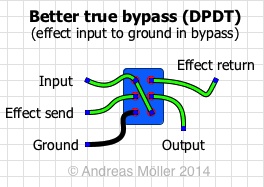
just go look at 'true bypass dpdt' and you'll see what you need. I do this for every preamp I make/install on all my guitars. Typically mount them on a push pull pot and use the dpdt part to send the signal straight thru if the knob is in down position.
from stinkfoot site:
-
57 minutes ago, curtisa said:
Well done, Mike. No use name dropping us in your entry - flattery will get you nowhere.
Now start sucking more to give others a chance

Just my way of acknowledging that I haven't done any of my builds alone. You hung in there with me on that bad driver board issue way longer than I could ever have asked and I deeply appreciate it. Plus you learned me something, and all my high school teachers collectively gasped at how you/Mikro succeeded where they failed lol!
-
2
-


1959 LP Burst build...
in In Progress and Finished Work
Posted
have been on a deep dive afa building my next project which is going to based on the 59 lp burst. I've been pouring over several docs that I've found, pictures, threads on historically accurate dimensions, etc. It has been a pretty enlightening experience.
I'm not interested in historically correct headstock shape... but intend to have the neck profile, body carve, scale length, headstock angle, and truss rod spot on to the original, Have purchased some historically accurate pickup rings, pickguard, cavity covers, inlays and binding that is "close". Using a gotoh abr-1, and have purchased some single piece body stock in genuine mahogany. Also have some qtr sawn genuine mahogany neck blanks.
Have not found anything better than the granadillo pictured below for fretboard but that may change if something comes along soon.
few things I've written down:
Headstock Angle...
1904-66: 17 degree
1966-73: 14 degree
73-present: 17 degree
Truss rod...
1959: straight channel 5/8 near bridge, 1/2 near nut
1960: curved truss rod channel
Scale length...
1954: 24 3/4
1959: 24 9/16
1969: 24 5/8
1992: 24 9/16
Pickups...
53-56: P-90s
57: seth lover humbuckers introduced
Bridge...
pre 54: wrap-a-round
54: TOM ABR-1 (custom)
55: TOM ABR-1 (gold top)
62: TOM ABR-1 w/ retainer added
1970-1980: schaller harmonica bridge
1975: Nashville bridge introduced
Models...
53: The custom aka black beauty and the goldtop
58: standard
61: standard discontinued and SG Custom introduced
68: lp re-introduced
1974: Norlin Era - volute introduced
Was surprised to learn the vintage pauls of that time actually had a straight channel that had an angled depth. Earlier versions just had a straight channel (no angle) and in 1960 they started doing the radius'd channel.
have finished my 'straight angled' channel version. Going to build my own truss rod for this one. (there is a great thread here about the process - thanks for that guys!)
I'm still working out the details on a 60s slim line version I will do with the radius channel and vallute... but have purchased a stew mac stainless modern rod I'll use for that.
there are a number of jigs I'll need for this build... one of them is a jig to do the rebate where the neck joins the body. I've done this by hand before using sandpaper strips and pulling them through the join... but figured it can be done more accurately with a little bit of thought so...
doh! momentary lapse of senility here... this is for a 4.5 degree lip on a neck/body join... essentially the idea is you slide the neck into it and then ride the router around 3 sides to make the perfect neck/body fit.
59LPNeck_v1.9.pdf