


Asdrael
-
Posts
156 -
Joined
-
Last visited
-
Days Won
10
Content Type
Profiles
News and Information
Tutorials
Product Reviews
Supplier Listings
Articles
Guitar Of The Month
Links and Resources
Forums
Gallery
Downloads
Everything posted by Asdrael
-
Sounds good, thanks a lot! And rock on with your build! Now I want to see the revolver pickup guitar tho.
-
How do you like it? Bought the "same" one (another color same device) and I'm still waiting for it to arrive...
-
Then what you can do (I suppose you have a template for the neck routing?) is wrap the heel of the neck template in a few layers of masking tape. Try to fit the modified template this way into your routed body. Once it's a perfect fit, just route your neck this way. Carefully placed masking tape doesn't interfere with template copier bits.
-
If it's a bolt on design, it might not even be a big deal really. You might even end up being happy you have a bit of room to realign the neck if something else goes wrong
-
My diagram is beautiful, thank you The thing is, since the on/on for the bypass only needs to be on in one condition of the on/off/on, you could use a 4PDT (I think) carefully chosing how you wire it. The on/off/on would use 2 rows, the on/on 1. Which is what I tried on my diagram. I might be missing some grounds somewhere, but I am not sure what grounding both QSW connections would do (will have to ask Graphtec on that one I guess. I found a guy that did the same mod (except he has mag/piezzo/mix on the switch) after some advanced google-fu and the diagram is basically same as mine. He just grounds everything that is not connected (which I would guess is better for the noise level). I think simply converting this to the switch positions I want should be good?

-

Yet another single cut build.
Asdrael replied to ADFinlayson's topic in In Progress and Finished Work
Looks great, I love how the stain turned out. Seeing more colors by simply moving the piece is always stunning. -
Thanks, that would work as a back solution. I am currently channeling my inner nerd and trying to understand how the preamp works and the provided wiring schemes. It seems they have info on how to do what I want but with 2 switches (one SPDT on/off/on for the selection between piezzo/mix/mag with apparently grounding one shutting it off, one SPDT on/on for rewiring the mag directly to the tip of the jack). I am trying to make it all work with a 4PDT. I think I got it. This: Ends up being this (fear the drawing skills): Whatever happens at the quickswitch stage doesn't seem to matter when bypassing the TIP connection as per their wiring. The added passive elements are here to keep the preamp active and not popping in and out when switching, which draws battery (I don't care). There is probably a more elegant solution to this since I know I will never use a stereo cable, but I guess having the option is not bad. (I don't have any push pulls to do this as extra left on my controls, and I don't want to add more switches as I am running out of real estate for my plan).


-
Thanks. I might channel my old electricity wizard self (I used to build lamps age 6 and never once took a schock so I guess there is something to be said there) and try to make a schematic that I will submit to online gurus. Or just sweet talk my way into Ghost customer support. Getting in touch with Schaller was... very German. And I say that as someone who's been living in Germany for close to 15 years
-
Well, I am still pondering what to build next so I did a jig. A fret slotting jig to be exact, based on a youtube video I found with a concept very similar to the high end 150€ systems: The only issue is that the video refers to ressources that have been taken offline. So I had to redraw the plan and fuck it up once before it got functional. But I managed. Here is the box with the result: And here is the upgraded version using stabilizers (left over from an Ikea wardrobe with fell glued on it): For the pin, I use a nail. I will laser cut the templates once I pinpoint the radius of the slot for the pin precisely. All in all, this costs around 20€ and 2hours. I know the template will cost me around 3€ per scale length including cutting since I have a laser available, but I could simply order templates online and use the right size pin. Is there any interest in the schematics? I could probably make them rather fast in .dxf if it helps people.


-
So, I managed to score a Schaller Hannes 7 string Piezo for an upcoming build. Happy, it's been out of production for years but there was one (1) of the exact model I wanted still new on a shelf in a EU shop. (Holy molly the piezo wires are thin. Good news tho - they included some heat shrink tube to wrap around the summing board ) Now the fun part is figuring out which guitar to build around it. The not so fun part is figuring out which preamp to get in and the wiring. And I suck at this. My requirements are not too bad: I need to be able to switch between Piezo only, Piezo + Mag, and raw Mag alone. That means, on the last position, the magnetic pickups shouldn't go through the preamp at all. Schaller does that with the Flagship but they use either a 5 way blade (just... why?) or a rotary switch (just... why?). Both options I am not a fan of. Ghost has the acousti-phonics which seems like the best option but the diagrams provided either force the mags to go through the preamp even when used alone, or remove the option to mix. Now I suppose someone smarter than me has already figured it out so I'm throwing it out there: I need help Any ressources or advice? I'll take everything at that point.

-
A possibly hairbrained thought on neck profile
Asdrael replied to ShatnersBassoon's topic in Solidbody Guitar and Bass Chat
For a 'less friction' approach, I think I saw somewhere some neck with a kind of alveolar structure at the back of the neck. Obviously, this lower the surface contact between hand and neck. Now to clean it, it must be fun. -
Interesting! Have you tried the Railhammer yet in another guitar?
-
Somewhat necroing this - I did a bit of work on my CAD software for facetting measurements. Since what I did there turned out to be exactly what I got when doing the actual neck shape of the guitar, I suppose it would be a good starting point. Here is what I got so far: Black is a C shape (what I currently have). Red is a D shape (what I don't want). Green and Magenta are 2 intermediates that seem to make sense to me. So... I went to the local DIY shop, bought a few meters of pine, and I'll get to shaping in the next few days to see how everything feels. The current neck is the final neck for this guitar due to thickness / truss rod channel consideration but... I might have some hardware on the way for the next ones

-
Thanks! Build two and three are at the brainstorming stage. Well, maybe more, I found a good deal on a brand new Schaller Hannes yesterday... So I have a bridge on the way already. Just have to decide if I build with it next or do another seven strings first waiting on a restock of certain woods at Espen and Maderasbarber to order too.
-
Guitar Of The Month October 2023
Asdrael replied to ProjectGuitar.com's topic in Guitar Of The Month entry/poll archive
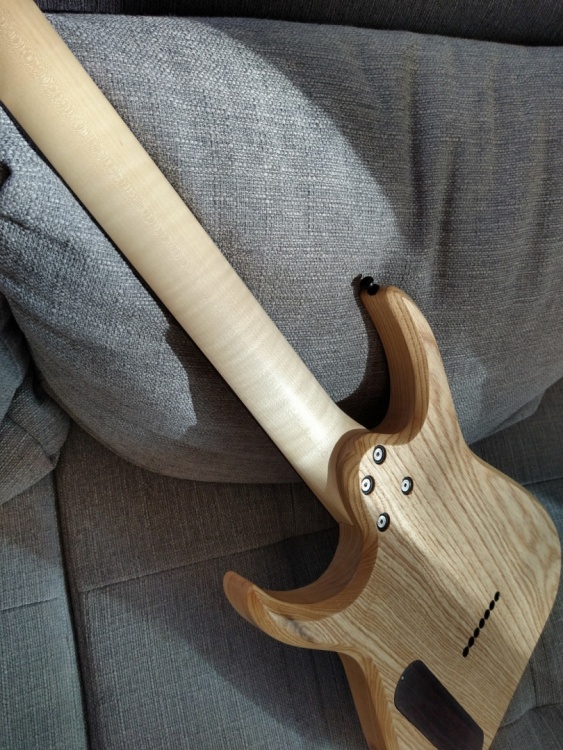
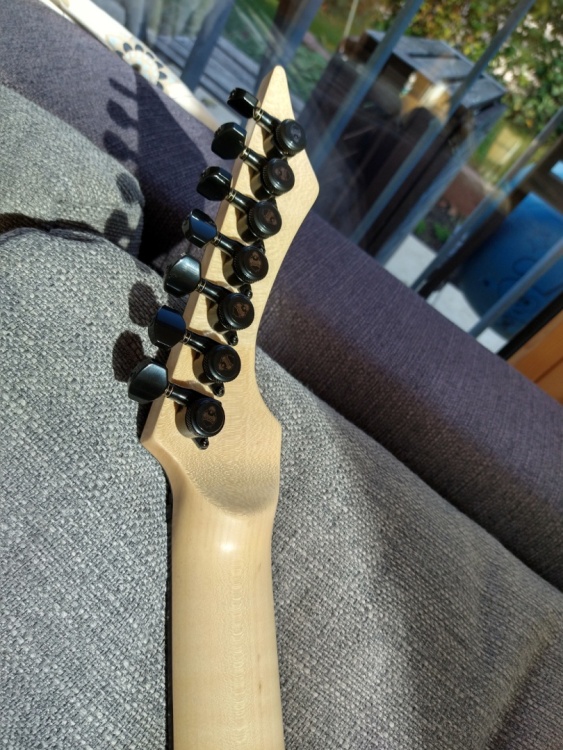
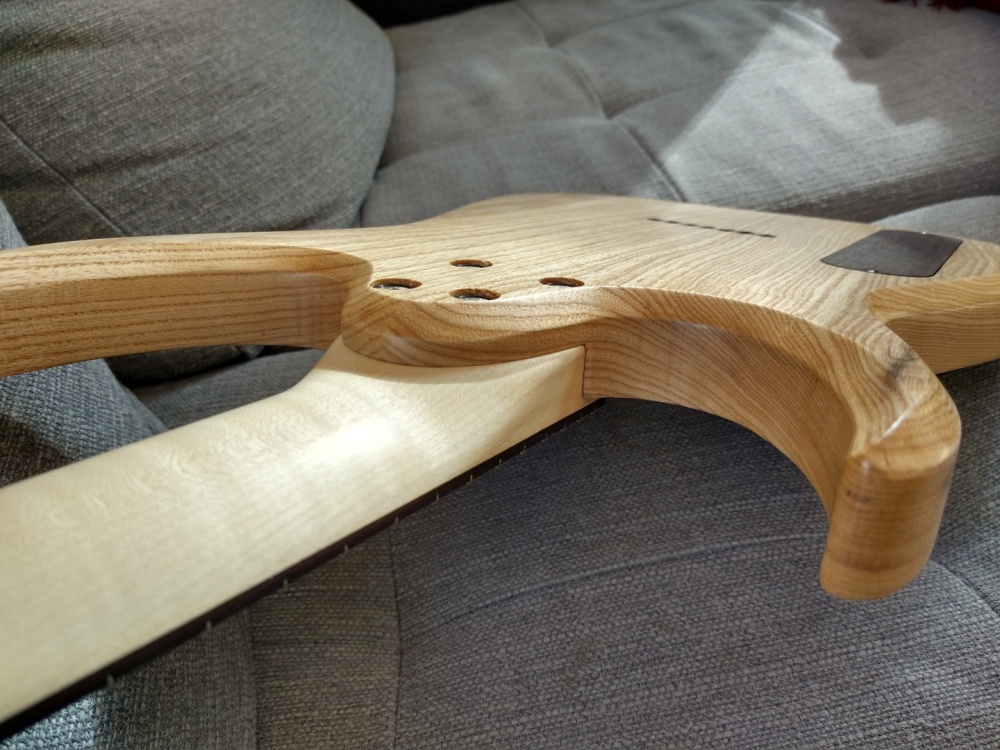
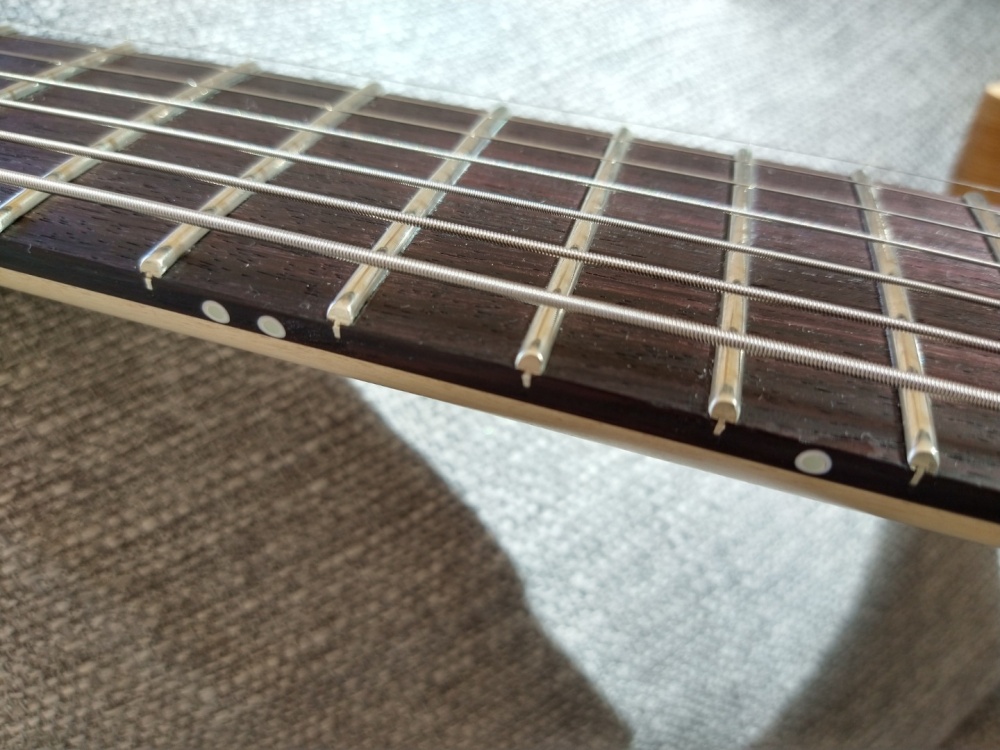
Hah well. I guess I'll give it a go! At least before the heavy hitters post their own stuff Meet Birthmark, my first ever build: This guitar is the happy result of me feeling good in life, reaching 40 with 2 kids, a bit of time and disposable income, a long standing desire to get into guitar building, finding a good open workshop, and a bit of a crisis too wanting to make something with actual material and not just be an office job-joe with nothing I can show to my kids when they grow up. Since I had zero experience with wood working, and even less guitar building experience (I can do a setup and understand on which basis the instrument works though), I started by binge watching build videos on Youtube and wrote a 30 page "how to build a guitar" reference booklet for me. The next step was to find something relatively simple, appealing to me, to copy, with 7 strings as a bonus as I play those almost exclusively. It was relatively easy to locate pdf for a 7 string Blackmachine type guitar, so I took them, and expanded them heavily in LibreCAD, adding some stuff that would make more sense to me. The idea was really to keep it simple but somewhat true to the original. I documented the whole build process and could get some cool feedback and advice here: Here are the final specs and some thoughts behind them: Swamp ash body, 2 piece. Density and looks were up my alley, and it has a good reputation for gainy music which is right up my alley. 26.5" scale, quarter sawn maple neck. Not really one piece as I did the "alternative" scarf joint in the middle of the headstock. It's reinforced by a truss rod obviously but also by two carbon fiber rods. Carved as a modernish C shape. Jescar 57110 onto a rosewood fretboard with 17" radius. Volume, 3 way, push pull tone. Guitar Monkey Locking Tuners Graphtec nut (precut "Schecter" model) Gotoh 7 string 510FX-7 . I wanted a Hannes, they went out of production. I have a Hipshot but imo it is not the best as it can cut the palm of your hand. DiMarzio Fusion Edge 7 Tru oil finish with a bit of steel wool rubbing everywhere. Currently in 10-46+60 tuned, low to high, G#,F,A#,D#,F,A#,D#. This is, and will be for a bit, my main guitar. And as it is my first build, it will stay with me - and may one day retire on a wall hanger. Or at one of my son's. Who knows. To critisize the instrument: it actually came out great and is fully functional (intonation is correct, it holds tune, and the fretwork allows low action and no buzzing at all. Currently 1.2 mm high e and 1.75 mm low E). It's loud as hell unplugged, and weights only 2.950 kg. I am not fully satisfied with the neck shape that may be a bit to C and not enough D but it's consistent throughout with no highs and low. So it's an actual neck! Overall, and especially for a first building experience, I am over the moon with the results. It took 7 or 8 months at an average of 4hours a week I would say. Lots learned! Fun fact: when I received the swamp ash, it had some heavy mineral streaks at some spots. They ended up mostly routed out, but you can see some on the backside on the lower horn still. I consider them "birthmarks" of the wood. Funnily enough my first born also has a birthmark. So it all made sense in my head to call this project Birthmark! Thanks for reading, I hope you enjoy the pictures! And as everyone told me... onto the next build!

-
I suppose (exaggerating) that my neck is more of the "blue"you're currently, whereas I should have shot more for the "green" one in your expert drawing. But with the same thickness. So... I spent a bit in my CAD and now have new facet measurements for my next build Side note: this one weights 2,950kg all stringed up (and now intonated). And it's not neck heavy at all, it sits nicely. But doesn't fit my wall hanger, the headstock is too thin...
-
Honestly looks great. I love the approach. Have you tried comparing the weight of your unit to the weight of commercial ones at that stage? I see that you want to remove some weight, which is always a good idea. Kinda want it to work out beyond your wildest expectations and have you patent it now
-
The weakest point would be at the corner of the truss rod cavity. The issue is, to go back to a shape I am more familiar with and keep the thickness I want, I would have to add material. Going thinner would require shaving down some in the middle and I am not confident it's a good idea with a 7 string eating 130 pounds from the strings. But for sure, going to get playtime and we'll see. I used to swear by Ibanez 7 neck but I grew out of them once I realized there is other stuff out there.
-
Thanks a lot guys! I think there are 3 main "issues" with the neck currently - I come from an Ibanez background but got fed up with the excessive D shape they use in their current builds. Having a much more round Skervesen, I went in that direction. I may actually have made it a bit too round (C). It's actually really thin already (20mm or so), and according to my calculations I only have 3mm of wood left at the weakest point (worse case scenario but still). So can't really correct it there. - It's my first tru-oil + steel wool neck. The feel is a bit off. - I played the guitar only a limited amount of time and we both need to get acquainted. Going for solution 3 for now. Might go for solution 2 in the near future with a bit of wax. Solution 1 will wait for next build
-
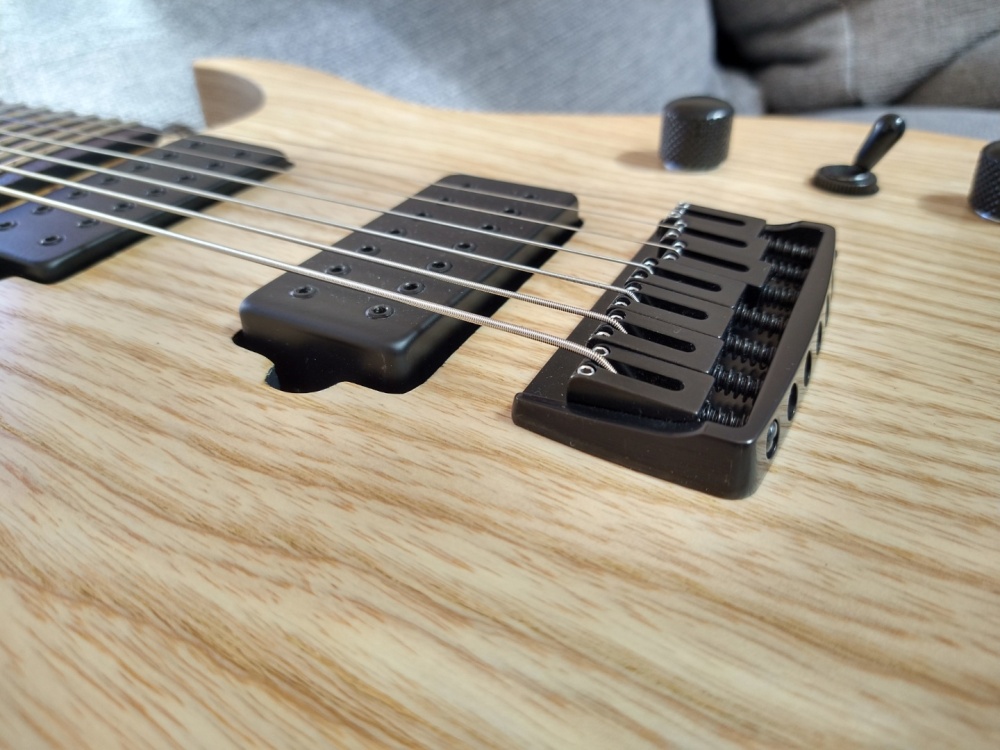
Well, this is it. Took quite a bit (the entire family managed to get stomach flu, right after our bout with Covid. Fun.). Last week rush and a finish line! I managed to get the body finish where I wanted it. It turned out that the steel wool rubbing I did left some marks I wasn't happy with, so I reapplied a layer and re-rubbed with 0000. The only scratches left are mistakes on my part from when the body was initially sanded. I couldn't go back to it and they belong in the realm of "unless you know you won't see them, and one week of use will put worse on it anyway". The body feels like satin with wood grain. Right on. Pre wool: Post wool: Next order of the day: shield the pickup cavities. I play with quite a bit of gain, and I hate hum. So in case I become something else than a bedroom guitarist (yeah right), I wanted to do it properly. Graphite paint is a bitch but I managed. Cleaned up: I might have a micro drop outside of the cavity but once again, if you don't know you won't see it. And what's a control cavity without proper shielding? I wasn't sure if copper tape or paint, but decided for the clean black of paint this time around. Also, to mount the cavity cover, I wanted inserts. Because I can. Just have to make sure you put them the right way around - tapered and cut in first! And plop. Perfect (shielded) fit. Once again, I wanted to make sure that in case I escape my bedroom one day and play standing up, it was possible. So I needed pins. Of course, I drilled pilot holes but I also added some lubricant for the screws. A friend of mine is a bee keeper, so I could get quite a bit of nice smelling wax. Local touch if you will. Further down the preparation and assembly line, the pickups needed to come in and be aligned. So I mounted the neck, aligned the outside pole pieces with a thread running from the tuners, and careful marked for the holes. Of course an insert had to come into play. Marked. Drilled (the black makes it seems like it's not center but I swear it's on point). Insert preparation: put a screw in: Screw in until it's flush: Remove the screw: Done! In preparation for the soldering session, I passed the quick connect cables (DiMarzio quick connect) and almost did forget to ground the bridge. Black cable time, secured with a bit of copper tape. Did I mention I hate soldering? In addition, the guy who sold me the pickups "with lots of lead left" forgot to mention he snipped the ground bare wire. Which made them not-so-long-lead-anymore-heh. (First solder job in actually 25 years, checked every step with a multimeter...). Bridge mounting... just 4 screws. Ferrules were less fun. Turns out 8.3mm diameter in a 8mm hole is tight. Not sure securing the ferrule depth to be constant (see a few posts above) was needed. But better safe than sorry! I used a dovel to hammer them in. A bit of force had to be used. All dropped in perfectly and ended up almost perfectly recessed. I can feel one with the finger. Damn. At least they are perfectly aligned and spaced. The neck also needed some love. First, with tuners. I got my son to help with those, he was really overjoyed to contribute. (Shoutout to Guitar Monkey Locking Tuners, in Germany. Great piece of gear, ultra responsive customer service, very customizable and in Europe it's rare to find locking tuners that you can configure. All for under 100€). I checked the neck and my fretjob again with a fret rocker, since it had almost 2 months to settle. The neck was straight as an arrow but the fretjob very slightly moved - I guess the rosewood had a fit. It's not 100% perfect as it was but very close, and only 1 fret was problematic. So I decided to spot level that one, and wait to see if a complete leveling job would be needed after putting the guitar together and letting it settle again. Fret 15, low strings, here I come. Level, crow, sand, polish, as need and perfect! Hoh yeah I need a truss rod cover installed too. (Dont worry, I countersunk the screw hole....) Only thing left to do? A nut job. I did it at home with my other guitars. I bought a precut nut, and I intended on sanding the bottom. Turns out my plan was great, but the high strings needed much more sanding than the bass side. Which led to a bit of tricky angled wierd pressure sanding, but I mostly managed - I would say the bass side is on point and the high side a bit high. Good reason for me to buy a set of files soon. I did it on e and E because my best setup guitar is a 6. One error with the nut area dates back from when I put the fretboard square to the centerline. I had to slightly file it to correct it, and the fretboard support for the nut apparently ended up not perfectly flat and square. So there is a very narrow space at some point between the but and fretboard. The nut rests well on the base though so not a big deal. I might -further down the road- revisit this area. Anyhow. It is done. "Birthmark" is complete. Strings on. Setup done (almost on point, neck still settling). Pictures time? (Phone pics for now, saving the good ones for a possible GOTM application ;p) The good news is: it is a fully functional instrument. Intonation is on point (I have room forward and backwards and my strings are intonated). There is no fret buzz whatsoever and I don't fret out / bend out notes anywhere with a reasonably low action (1.25 mm high e, 1.75 mm low E and I have a heavy picking hand). The electronics work (amazingly given my soldering job). It is LOUD. The loudest of my guitars unplugged by far. Louder even than my custom make Skervesen of the same shape - easily, and that my Ibanez Prestige(s) that I considered already way too loud acoustically. The neck shape isn't totally what I expected but very comfortable, and the fretwork on it is... dare I say, great? Really satisfied. There are obviously some flaws to the instrument - cosmetic, none functional - that make it an obvious "DIY project" but I am not ashamed of what I have done and will actively play it and not keep it on the wall. The bad news? It's spoiling my other guitars and now I am hooked and planning the next build(s). Damn you guys. Thanks a lot for reading, and all the advice all along. Especially thanks to @Bizman62 for the initial name idea and numerous good feedback!


-
Maple burl , roasted maple explorer
Asdrael replied to killemall8's topic in In Progress and Finished Work
Love that neck! Good luck with the build! -
Looks awesome! I really like how the shape came out, and the balance with the single pickup and chrome bridge.
-
And I hit it with 0000 steel wool for ten minutes. End result is much more to my liking - semi glossy, not sticky, and can feel the wood grain perfectly well. I still have to check under natural light but with all the bright directional lightd I have, it seems on point. Short gif with similar lighting to the previous one for comparison:

-
Just went to check up on the body. Seems dry and hard. Overall I think my finish process is good for ash, but not what I was going for. Going to need this steel wool!

-
8th coat applied 12 hours ago. I am starting to see some "ripples" or fingerprints (I always wore gloves though) which means there is already a buildup of finish thick enough to be noticed. In addition, some of the reflections now appear a bit plastic to my taste - which means that was one coat too many. In other words, perfect! since I want to scrub it with 0000 steel wool. I'm now giving the body a few days of rest to fully cure in the dry room of the building (25°C, 35% humidity) before I scrub. I am planning the assembly on Friday next week. wuwu. In the meanwhile, I couldn't help myself and did other stuff. One sexy cavity cover all oiled up. And taped down. Also, I can't get @Captain Obvious idea out of my head, so there might be a few knobs coming this way soon (damn you).


