


seb
-
Posts
35 -
Joined
-
Last visited
-
Days Won
2
About seb

seb's Achievements
")


-
Sounds convincing!
-
 I also had the expectation that such a grit is much to coarse and that it leaves ugly scratches ... however it seems i was wrong - it looks great so far! I'm curios about the next coats!
 -
Thanks everybody! :-) Fine tuning of the nut compensation and the electronics are still pending... as usual the last 0.5% to complete the job entirely are waiting weeks and weeks. Anyone familiar with that problem?
-
Guitar Of The Month vote - October 2017
seb replied to ProjectGuitar.com's topic in Guitar Of The Month entry/poll archive
Thanks! Congratulations to your excellent guitar builds, Argytar and Massimo! Thanks to all voters, regardless which one you've voted for. Great community by the way. Guess I won't leave that place that early. Sorry mister, no chance! Thanks for your words. Makes me really happy! -
seb changed their profile photo
-
I'm making me an 8 string.....electric mandolin
seb replied to ScottR's topic in In Progress and Finished Work
Thanks. MM is great stuff. Did you use it wet or dry? -
I'm making me an 8 string.....electric mandolin
seb replied to ScottR's topic in In Progress and Finished Work
Wow, that's a gloss! How did you polish it? -
Thanks! This was for sure a point I did not think about enough as I used the ROS... but next time, thanks very much! Why ever the sanding block method did not work very well for me this time. Had some issues with big ugly scratches although I've used quality wet sandpaper, soaked it in water (and a drip of detergent) several hours, and took care about not to fold the sandpaper on the sanding block edges. As I've once lacquered a guitar that was no issue... As you say: waterslide decal under 2K
-
Good point, I could also observe this, especially at the electronics cavity. I don't like that round over where I want to get sharp edges. Any tricks to mitigate this effect? Guess it should already be helpful to give these regions special attention , i.e. touching them only as little as possible (which probably means excluding the random orbital sander...) Assembly and setup...woohoo! By the way, I took the chance to exhibit more photos in the current GOTM. I'm grateful for any feedback or suggestions! However, there are still a few things to do: fine tuning the intonation compensation of the bone nut tuning of cap switch capacitance (switched via tone pot push/pull) changing the volume pot from linear to log (personal taste) I've also made a time-lapse video of the guitar assembly: ... and this is a proud builder with his new toy:


-
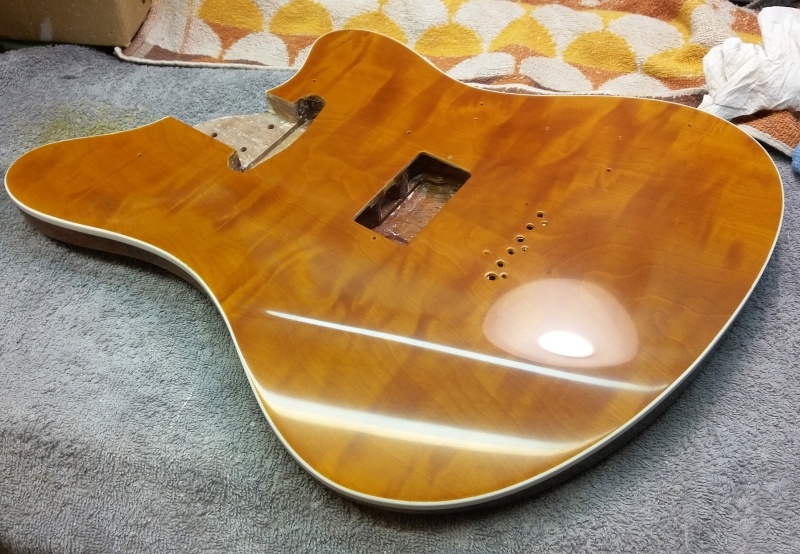
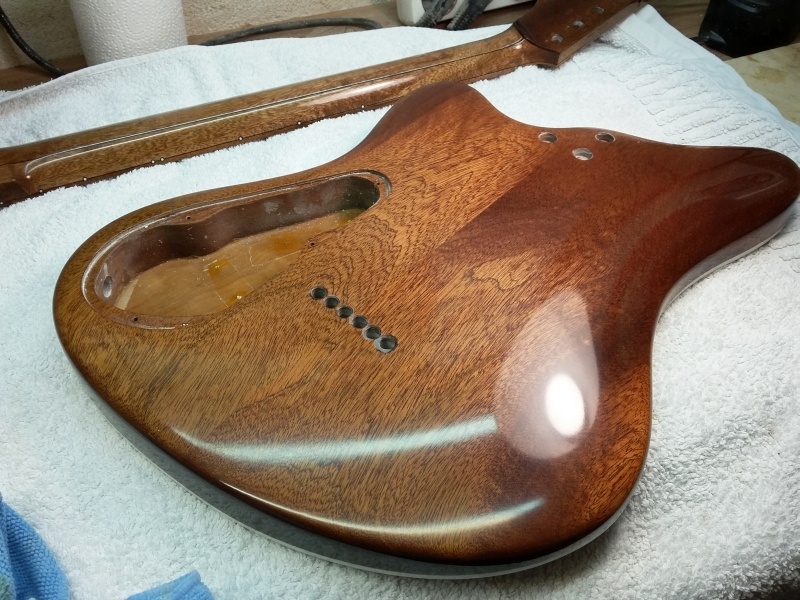
Hi, I´m Sebastian, 31 years old, living in germany near cologne. I have started building electric basses 2 years ago. This one shown here is my first electric guitar. As most of us, I'm already completely obsessed with the topic. Currently I'm building in a small 4qm cellar room at home. My past and actual build projects are shown on my facebook page. Do not hesitate to have a look and to tell me what you think: https://www.facebook.com/KaemmerGuitars/ 'Model 222' is a special guitar dedicated to a special person. On February 22nd my first son was born and my grandfather died. With that in mind I've designed and built this guitar with great passion and dedication. The idea of the design was to combine the following aspects: classical, but not a thoughtless carry over of old habits elegant appearance, but not overloaded ergonomic playability and lightweight, without a "freaked out" ergonomic shape expressive and flexible tonerange Building time: 02/17 to 08/17 Project Guitar thread of the building process 'Model 222' specifications in short: Scale length: 25.5" Body: mahagoni, chambered Neck: mahagoni, 3 pieces, scarf joint headstock Fretboard: mahagoni, 12" radius, hardened, porefilled and lacquered Top: "flamed" pear wood Pickups handwound Tuner: Schaller M6 Bridge: Hipshot hardtail, string through Nut: bone, compensated Pickguard: aluminium Finish: 2K PUR high gloss Total weight: 2.9kg / 6.4lbs Flamed pear wood top Mahagoni fretboard Custom '222' inlay at the 12th fret, aluminium fret dots Aluminium pickguard Drop top at the armrest: Thickest part of the body is 37mm Custom control knobs recessed in the aluminium pickguard Volume pot with push-pull for SC split Tone pot with push-pull as cap switch (gives a warmer, mellower mid range tone) Contour shaped backside for a pleasent feeling Matched electronics cavity cover Three piece mahagoni neck, the middle strip is turned over for a improved neck robustness towards weather changes Asymmetric medium v-shaped neck profile Scarf jointed headstock with volute and veneer on the backside Compensated bone nut Matched headstock veneer Aluminium trussrod cover Photographs made by Martin Christ I've filmed myself assemblying the guitar and made a short time lapse video of it - enjoy: Let me know if you like the guitar. Best regards! Sebastian


-
Polishing with "Rotweiss 1100" paste applied with a polishing pad attached to the random orbital sander for the larger surfaces again. The remaining parts were polished by hand with a microfiber cloth, which worked out much easier and faster I had expected:

-
Yes, that was also my presumption. I guess it predominantely came from the waterbased stain. The wood above the channels just got too thin, such that each drip of water or which solvent ever lead to a swelling of the wood. However, there were a few days between spraying and sanding the primer coat (this documentary is lagging...). And by now it seems that I've won this battle. A long story short... in total 3 further coats of 2K lacquer have been applied... and, lacquering means in truth: the fun part of spraying takes about seconds and the most time you are cleaning your spray gun or you are sanding. To make the labourious part of sanding faster and easier I've found out what works pretty well for me: dry sanding starting with 3M soft pads (medium), Mirka Abranet 400 & 600, and Mirka Abralon 800, 1000, 2000, 3000, 4000. For the large surfaces like the front and the back I use the Mirka pads with my random orbital sander, the rest is done by hand. This stuff is absolutely worth its money and i can recommend them unconditionally (no, I'm not sponsored ). I think these photos were take at a stage of 3000 or 4000: For sanding in between the frets I've made these wedges laminated with the 3m soft pads: d


-
Yes, mistakes happen ... and they even have advantages as long we learn from doing them. Heard from several professional builders that mistakes happen even after years. But they know exactely how to fix them or to find elegant work arounds. Here you can see my open air spray booth... extraction, heating, and lighting provided by 100% renewable energies. I'm using 2K polyurethane for this guitar.... started with a primer filler: Intermediate sanding after the base coat.... wah, what the heck? As I've started sanding the stripes came up again ... ... however, after a few minutes of sanding the stripes became history: Then I've sprayed the top with highly diluted and yellow tinted clear lacquer:


-
Thank you guys. I'm happy that you like it. It means a lot to me! No sorry, but there will follow a few pics of the finished guitar. The pg design started with a rough hand drawing, then I've refined it in detail on my computer with inkscape. I've printed out this drawing and glued it to the aluminium sheet. Then roughly cut out the pickguard with a fretsaw, filed and sanded it to the final shape. The recess for the neck pickup was done by drilling two holes of 14mm diameter with a step drill. Then again sawing, filing and sanding to bring the recess into final shape. Then the sanding marks were done as shown above with 180 grid. Finally the pickguard was lacquered with a thin coat of 2K PUR. Let's do the finish.... ...started with porefilling the mahagoni parts. This time I tried it with 2K epoxi: Sanding back the epoxi was a terrible job. Especially sanding at the end grain felt like a never ending story. Next time I would use pumice & shellac or wood paste again. A next I gave the top and headstock veneer an amberish colore tone mixing different waterbased stains (Clou "yellow R" and "oak medium"). In fact I wanted to achieve just an enhancement of the natural color of the pear wood. I was happy with that ... however, I've played around too long with the stain and probably used to much water. As you can see at the armrest, the channels routed at the backside of the top became visible Damn, close to tears... have i just destroyed my guitar? Decided that the only solution is to sand off the stain as good as possible and to renew it in a quick manner, using water just as little as possible. The luck was on my side again...


-
Then I've designed and made a pickguard and trussrod cover out of a aluminium sheet (1.5mm). Brought it into shape with a fretsaw, files and sandpaper. Lastly I've created longitudinal sanding marks on it: Time to bring together all the parts and to verify if everything fits together as required (it did ): Ready to go!


-
Turn, turn, turn... it was time to do some pickup winding. For that job I use an old sewing machine housed in plywood box. The rotations are counted with a bicycle speedometer (setup such that 1 turn equals 1 meter). Potted the single coil in front simply with CA glue. Potting of the humbucker coils outstanding on this photo: Potted, mounted and secured with tape: ... and chrome covered: T-Style Neck single coil: - AWG42 - AlNiCo5 - 9000 windings ~ 6.3kOhm Bridge humbucker: - AWG42 -AlNiCo5 - 5700/4300 windings ~ 4.5/3.4kOhm - the stronger coil is used for the SC split


