


a2k
-
Posts
266 -
Joined
-
Last visited
-
Days Won
9
Content Type
Profiles
News and Information
Tutorials
Product Reviews
Supplier Listings
Articles
Guitar Of The Month
Links and Resources
Forums
Gallery
Downloads
Posts posted by a2k
-
-
I saw this a few weeks ago. I'm totally fine with the fact that the bassist is a dude dressed up like a Japanese school girl but cannot get over the instrument. Weeks later I'm still getting woken up in the middle of the night by nightmares of this bass.


-
After a month off to play the new koi bass, I'm ready to dive into the next project. The plan is to do a P Bass with a few twists. While the Koi is a "swiss army knife" do-it-all bass, this next one is going to be purpose-built. I'm going for a more aggressive, biting sound and a feel that inspires you to rock out. I'd also like to keep the build a little simpler and use it as a chance to focus on improving my skills and striving for really dialing in the quality of my work.
Here are the details of the project (as they currently exist in my head):
- P Bass body and neck shape (final headstock shape still TBD)
- Ash body dyed blue and varnished
- Wood pick guard made of quilted maple
- Flame maple neck (hopefully one piece - more on that in a minute)
- Birds-eye maple fingerboard
- Clover style Hipshot tuners
- Vintage style Gotoh bridge
- EMG Geezer Butler P passive pickups
- Stainless steel frets
My thinking is that the pickups, steel frets, and maple neck are all going to give it a brighter, cutting sound. The P shape and the translucent Ash body will keep it grounded in rock-n-roll tradition, and the three different maple figures will give it a little visual pop to keep it from looking like "just another P bass".
Most of the hardware has been ordered (and arrived). I've got the fingerboard (I decided to get a pre-slotted one - that was my least favorite part of the last build and now that I can say I've done it, I feel okay not cutting the slots). Now I just need to get the neck and body wood.
Last week I headed back to Shinkiba for some wood shopping. I stopped off at the exotic wood shop to check out the selection but they didn't have anything the right size so I headed down the street to talk with the same guys I got the wood from last time. Here they are literally calling around for me to see about what they had that might work.
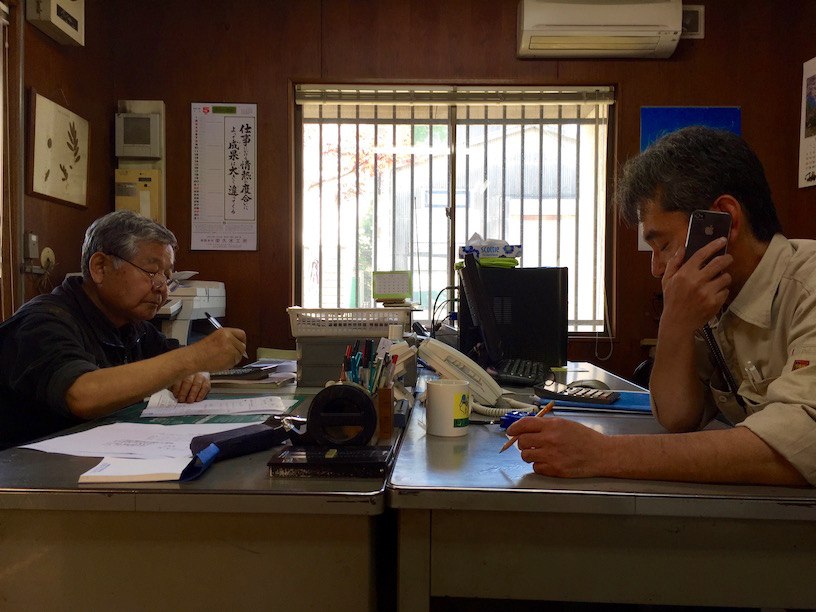
They had a few big pieces of ash for me to choose from but had to call around for maple. They emailed me a couple options. They are wide enough to make the entire neck (including headstock) out of one piece, but are flat sawn and I'm a little worried about stability.

Here's the other side:

You can see from the first picture that the piece is pretty symmetrical and from the middle of the cut - my gut tells me it'll be okay, but I'm not sure. I've heard some people will rip a piece like this into three sections and flip the middle one, but I'm really hoping to keep this one piece. Admittedly, my reasoning for this is purely aesthetic, so I'll give if I have to. Any thoughts?
I ordered a template to work from - my plan for this week is to make a copy of it on thicker 20mm MDF. I'll be back in the shop tomorrow!
-
- Popular Post
- Popular Post
The instruments we make tell a story. The materials we use, the designs we come up with, the music we imagine our new instrument playing, and even the reason we decided to make the instrument are all elements of the story. I think this is one of the big differences between mass-produced instruments and hand-crafted custom instruments. The first are made for a market, the second are made to tell a story.
Reading each of the different build threads going on here with so many different ideas coming to life tells us something about the builder. Even if we aren’t aware of it, the decisions we make in our build are driven by who we are and the story we are trying to tell. I think @mattharris75’s beautiful April 2016 GOTM winner illustrates this well – it’s a fantastic instrument on it’s own, but when you know the story behind, you understand the instrument in a whole new way.
When I started making this bass, I didn’t know what story I was telling. I just knew I wanted to build a 5 string bass for myself. I wanted a versatile bass that could produce many different sounds for many different styles of music. I wanted to feature some nice natural materials – pretty, but not precious. And I wanted to pull in some elements of the world I’m seeing here in Japan (without, hopefully, being cheezy).
The story of this bass is my story – it’s a snapshot of me right now. It’s autobiographical. Some things are completely obvious – made in Japan by an American, the koi inlay, etc. But the core is a subtler view driven by both the kind of player I want to be and where I’m at in my life. This bass is diverse, flexible, adaptable – all things I strive to be. It’s not that I don’t know who I am, but who I am is someone who wants to be many things.
I played my first gig with the new bass last weekend. The gig was with a blues band literally on the banks of Mt. Fuji. I think that first gig – rocking out to one of the great American music forms while the sun set behind Japan’s most recognized icon - is a fitting end to this build thread. My wife reminded me during some of the more challenging parts of this build that “it’s not done until I say it’s done”. Finishing a build isn’t just checking off the last item in a checklist. It’s not even playing the first gig with an instrument. An instrument is finished when story the instrument tells is complete. And I’m happy to say that this build is complete.
Here's a photo I snapped a few minute before we started playing:

Now with that out of the way, there are a few other loose ends to wrap up about this build.
First, I’m really happy with how the bass plays and am having a ton of fun making music with it. My G&L feels like a dog compared to it. That said, there are a few rough spots that I continually see. I don’t think anybody else will ever notice them, but they I can’t help but see them. Oh well…
Those of you that followed closely may remember that I talked some talk about a mystery solution to resolve tear out. The plan was to create and inlay a traditional landscape scene (silhouette of Fuji and Torii gate) over the area of the tear out. I started it but never put it in place. It both ended up feeling too “precious” and amateur for what I wanted. But it did inspire the koi, which has ended up being the most distinctive and eye catching feature of the bass. So we can give the tear-out credit for leading me to the koi inlay. I saw a PRS Dragon for sale in Tokyo yesterday for $29,000 – it was certainly beautiful and clearly the dragon inlay (and not some playability or tone) is what makes it ‘special’.
I was surprised to find leveling and finishing the frets to be one of the most rewarding steps in the process. It was certainly tedious, but there was something magic about seeing it all come together with just some very tiny adjustments. I sprung for a nice leveling beam and there’s definitely something inherently satisfying about using a quality purpose-built tool to complete a task.
Finally, thank you all who have followed along, liked a post, made a comment, and answered a question in this thread. And a special thanks to @Prostheta, @curtisa and @ScottR for the continual feedback, insight, and support. This website is awesome.
Now, on to build #2!
Here's a blurry shot of the bass's debut performance at the Fuji Roadhouse, and once of it resting after the gig.


-
 10
10
-
Wow is right.
-
As an aside... You'd think Japan would be loaded with places to find all of these fancy or unique Japanese tools, but in fact I haven't had much luck (with the exception of Japanese saws which are everywhere). The few tools I've found have been very expensive - it's much cheaper to get Japanese tools shipped over from Amazon.com. There is supposed to be a carpenter's tool district in Osaka but I haven't been.
Also, those liogier rasps sound fantastic.
-
12 hours ago, steve1556 said:
...if I ever get to a point where I would like to design my own body, using the 4 sheet method as you';ve described is definitely a good option.
It was way more than 4 sheets!
")

-
I know it wasn't the original plan, but the stealth black top with the wood grain back looks great.
-
1
-
-
Welcome! I think it's worth investing in a good rasp if you don't already have one. Not too expensive and you can use it through the the project, from smoothing out template to comfort cuts to neck shaping.
I made my template by printing out a bunch of 8.5x11 sheets, taping them together, gluing it onto mdf, cutting out with a jig saw, and then rasping and sanding from there. Worked pretty well and definitely 5 minutes work on a template can save you hours of work on wood
A few ideas on getting the tools you need without breaking the bank: Some communities have tool libraries - depending on where you live that might be an option. And there's always the retired dudes with garages packed full of tools and heads packed full of knowledge itching to help. And then there are professional shops who are happy to do a few simple cuts or other tasks for a few bucks.
-
I love getting to watch a build at fast-forward speed like this. Looking great. Very gutsy move dremeling out the headstock logo. How'd you keep the dremel from jumping around?
-
11 minutes ago, SIMpleONe89 said:
Wow I wish I could be as organised as you! Looking forward to your next project!
I'm going to print out your comment and send it to my mom with a note that says "See, you had nothing to worry about!"
-
1
-
-
I kept a notebook in Evernote with a checklist I worked through. I would move items from the big checklist into a smaller "this week" checklist, and then make sure I had all of the measurements/drawings/plans written down before I walked into the shop. Still, I can't tell you how many nights over the past 6 months that I've lain in bed turning over ideas and overthinking little details.
Parts are starting to arrive for project #2. I'm excited for the project and to get back in the shop. Build thread still to come...
-
Looks like a great project. I'm curious about the zebrano top (beautiful wood, by the way) - are you planing on bending it down around the forearm cut or cutting into it? And how heavy is that QLD rosewood?
-
7 minutes ago, SIMpleONe89 said:
Wow this is an amazing bass for your first project. Definitely very inspirational! I intend to build a neck through bass in the near future and this really helped!
Thanks! I think I documented almost every step (and almost every mistake) so hopefully it shows a good picture of the process. Let me know if you have any questions (because, you know, after doing this once I'm totally an expert
 ). I look forward to seeing your build!
-
1
-
-
2 hours ago, curtisa said:
A shovel?:
This is definitely a good contender for the "multi-scale one string shovel of the month" build contest.
-
1
-
-
This is quite a show you are putting on here!
-
13 hours ago, Norris said:
Unfinished project of the month? That's all I'm likely to enter!

Fabulous bass btw - I don't think I've commented on your build thread yet, but it's providing lots of inspiration for my next build (if I ever get there!) ... which will be a bass, being a bass player and all that
Thanks! I enjoy following along with your project - it's amazing how much seeing others work through this speeds up learning. I look forward to seeing your bass. I plan on building a guitar at some point soon (because I want a guitar - ideally something PRS inspired so i gotta get my build chops up), but the next project is going to be another bass.
-
10 hours ago, KnightroExpress said:
Nice! This is going to be another good month.
Yes it is. I'd suggest we split out a "bass of the month" contest, but the competition there would still be pretty steep.
")
-
20 hours ago, Prostheta said:
I presume you'll be GOTMing the build?
It has been GOTM-ified.
-
1
-
-
Presenting the Koi Bass.
This is my first build. Those that have followed along in my build thread (thank you!) know that I'm an American living in Japan. I got the bug for a new 5 string bass while exploring Ochanomizu, the "guitar district" of Tokyo. I tiny voice somewhere in the back of my head suggested I build the bass instead of buy it and I was off. This build brought me all over the Tokyo region exploring many parts of the city where few foreigners ever tread in search of supplies. It has been a lot of fun and a tremendous learning experience. And while I cured my bug for a new bass, I've developed a new and stronger bug in building them.
Here's the build thread:
http://www.projectguitar.com/forums/topic/48283-5-string-bass-build-its-gonna-be-huge-in-japan/
Anyway, on to the bass. It's a 34" 5 string with neck through construction. I started with a drawing on my computer inspired by the work of some of the modern Japanese builders I'd seen in Ochanomizu, made a template out of of MDF, and worked from there.
- The body is mahogany with quilted maple front and back
- Headstock has matching quilted maple top
- I cut the cavity cover out of the back wood so it matches the grain.
- The neck is made of 7 pieces sandwiched together - 3 maple and 4 walnut.
- The bass is finished with 5 coats of Watco Danish Oil - the neck feels soooo smooth!
- The fret board is rosewood with 24 frets
- Electronics are EMG J5 pickups with the BQS preamp (volume/blend/high/stacked parametric mid/low)
- Tuners are hipshot ultralight
- Bridge is a hipshot A style
- Side markers are glow-in-the dark
And bass's namesake, the koi... it's a 13 piece mother of pearl and abalone inlay I hand cut out to swim over the 12th fret. Obviously this is where the bass's name comes from, but the word "koi" has a few meanings besides "carp" - it also translates into "intention" or "purpose", and can mean "the feelings of the ancients".


Here's a little video I shot of myself goofing around this afternoon with the bass.
Finally, I want all of the lurkers and dreamers here to know that YOU CAN DO THIS!
Thanks!
Aaron
-
3
-
A final recap is coming - gotta get down my thoughts and wrap up some loose ends in the story of this build. In the meantime, I've been having a blast playing the new bass.
The parts for the next build are ordered. I hope to go visit my friends in Shinkiba next week for some wood shopping. The HUGE in Japan v2 build thread is coming soon.
-
13 hours ago, Prostheta said:
I'm going to purchase a YUGE neodymium magnet and put it in a ziploc to pick stray metal up. Not just fret grit but bits of wire wheel from my feet.....
Maybe you can use it to quickly pull all the frets out of a neck too.
-
8 hours ago, ScottR said:
It looks mighty fine too!
Your shot of fret leveling shows a bunch of metal dust on unprotected fretboard wood. As you probably know by now, that stuff is nearly impossible to completely clean out of pores, and can leave your fretboard looking dirty. It's a good idea to mask off your board before leveling and crowning the frets.
When my truss rod access is as neat and tidy as yours......which is always my goal, I don't bother making a cover. What with the strings passing over and the glint of the tuning machines, it is pretty much background noise anyway.
SR
Thanks!
I learned the hard way about metal dust on unprotected wood. I was able to get it out, but it wasn't easy. I will never make that mistake again.
Maybe no truss rod cover isn't so bad...
-
So so so close to calling this "done". I got my fancy-pants leveling beam and crowning tools this week so yesterday I went in and leveled the frets. Had to take quite a bit of material off a few of the frets (especially around the inlay, where I was too scared about cracking the inlay to knock'm in properly). I got some 2x magnifying goggles to use for the crowning - I felt like I had a super power. Anyway, after sanding, crowning, and polishing, I brought the nut slots down a little more and dropped the saddles.
This is an awesome bass! Plays great, feels great, sounds great. I'm really happy with it.
Action shots!

Here's the worst offender:

I was hoping to use some of the wood to make a matching truss rod cover, but the strings are pretty close and there isn't much space to fit it - I'd guess it'd need to be about as thick as two credit cards and I worry that it won't be very durable. I need to play around with this.
And I'm not sure about the logo. Now that I have thought about it, what I was planning for is too thin to work well as a cutout. If I can get a truss rod cover into the space, I could get it etched onto it. But I'm also thinking about skipping it and letting the inlay be the sole marking on the bass. Here's the logo for reference (it's a play on the double-A from my name and mountains because I like'm).

So that's where things stand right now. In the meantime, I'm having a blast playing this thing and starting to dream up my next project. Too many ideas...
-
On March 30, 2016 at 0:25 PM, curtisa said:
Acoustically or plugged in? Nut should only affect the open string tone. Maybe check the bridge-end for any problems - poorly coupled components that need tightening, saddle breakpoint is pinching or rubbing the string. bridge plate not making solid contact with the body under the B-string
Bingo! After dreaming up who-knows-what kind of crazy potential problems that could be causing this, the simplest solution prevailed. The b string was in fact not seated right in the bridge. The ball at the end was wedged in the slot on the top of where the string drops in instead of being pulled all the way in. The result was instead of breaking at the saddle, the string just went across it. This is what was causing all of those false harmonics. Literally a 5-second solution. Thanks!


 ). I look forward to seeing your build!


Nicaraguan Custom Built Dreadnought / Introduction
in Acoustic and Hollowbody Guitar Chat
Posted
Looks like a great guitar. My wife and I spent some time in Nicaragua in 2010 - it's a beautiful country, but also very poor. I'm sure you know all about that. We did notice some amazing local crafts - pottery, furniture, leather goods (this place was amazing). Very high quality craftsmanship for the price. I was looking for guitars but didn't do any research beforehand and only found low quality "souvenir" guitars. I hope Nicaragua is able to establish some of these trades as exports.
I hope the adoption comes quickly and goes smoothly! Make sure you build lots of guitars before the kid arrives - they are horrible on both time and money.