


mistermikev
-
Posts
4,759 -
Joined
-
Last visited
-
Days Won
133
Content Type
Profiles
News and Information
Tutorials
Product Reviews
Supplier Listings
Articles
Guitar Of The Month
Links and Resources
Forums
Gallery
Downloads
Posts posted by mistermikev
-
-
14 hours ago, sethgali said:
I ordered the Whiteside 2" bit, 1/2" shank. I thought the larger diameter would help get the job done more efficiently, even though we aren't talking about very much surface area to begin with. Thanks for the tips on necks. I'll check those out.
right on... can't go wrong with whiteside. I hope that's not 2" diameter and more 2" cutting length. I don't think you want to run a 2" diameter bit in a hand held. Either way... you'll find you really are best off overlapping your cuts when planing as you'll get mill mark/lines either way and this helps minimise them.
afa leveling... I can tell you the musikraft neck I bought was either leveled or the straightest neck known to man w/o leveling because my action on it is probably less than 1/16 on a 10" radius neck and zero buzz. That said... bizman is right to be suspicious of them... warmoth def admits they don't level. I have bought a neck from them as well and it isn't perfect enough to get minimum action but it is so good that I've never bothered to level it. IOW you'll be fine with most decent necks for now and can always level them later. esp if you don't need super low action.
-
I would agree w @Bizman62 that it's nothing to worry about. seen lots of strange things in wood over the years... think it was scottr here that had some sort of 'chain link fence' pattern in ash... I've since had a piece with that myself (man that was one looong fence and one biiiig tree!). This actually looks like some sort of fleck or grain... but could just as easily be the edge of a split. I have a split like this in my current ash tele build but it probably only goes in 1/4". clearly doesn't go thru the piece as theirs a ctrl cavity right on the other side of it and it doesn't go thru. wood must have dried and split... and this was just the edge of it. Just filled it with dust and ca and one we go.
-
On 1/9/2020 at 7:57 PM, curtisa said:
A slightly more detailed description of the technique here.
that is a clever tip. when you first said locating pin I thought "there's no locating pin on my drill press" then I saw the picture. mind blown. I've always done the top first halfway, then flip and do the back to meet... but the locating pin thing... have not seen that. Will use that next time.
funny, first thing I look at when I see a guitar with ferrules is if one of them is slightly in front/back of the others. Can never unsee that now!
what I used on my most recent is top down drill halfway then flip over, and I have an mdf template I made with the largest bit for countersinking the ferules. I have a crosshairs on the template to line up with center and approx location measured back from the end of the guitar. Just sticky taped the tamplate down on the lines... now insert the bit into the template hole and make sure you can rotate it. This got me a nice straight line... but admittedly the locating pin idea is way better.
-
 1
1
-
-
1 hour ago, curtisa said:
I take it you mean the reglued pieces on the top left and top right corners?
I assume the router was above the workpiece and you were moving the bit in an anticlockwise direction around the perimeter:

If that were the case, I'm kinda not surprised you lost the top right corner. There's not an awful lot of timber there to keep it all together, and the bit would want to shear the endgrain away as you got closer to the edge quite easily, particularly if the depth of cut was a bit too ambitious and/or you were moving quickly.
The second section I've marked with the '?', could be similar, but again depends on my assumption of the arrow indicating which way you were moving the router at the time; a small section of unsupported timber and the router bit wanting to shear the piece away from the larger mass of timber - poof!
The fact that both pieces you're regluing are in a near straight line could indicate that there was some kind of pre-exisitng weakness along that section of grain. Maybe you just got unlucky?
Were you routing with a template? How thick is the piece you were cutting?
thank you for the response curtisa. yes, blew out both those pieces. I had it upside down from this pic and was taking the full 1/8" off and it is held to the mdf template below via two pieces of tape so... yes... a bit unsupported in that area. Also was using a 1/4" bit. Thing is I just cut a well figured piece for my other headstock with sm bit and paying no attention to grain w/o issue... but not so lucky this time.
I think I blew out the leftmost piece by routing the opposite direction on the opposite side. Not confident I didn't do the same thing on the top piece. I'm thinking had I been using a bigger bit I would have been able to do it without issue.
so... appreciate the input. what are your thoughts on router speed? do you use a variable speed router at all?
-
18 hours ago, mattharris75 said:
Well guys, it's been quite a while. Plenty of house renovation projects, real life responsibilities, and maybe another combat robot project, have occurred since I last pulled the mandola out of storage. Took a couple of weeks of vacation over the holidays and finally got back to it.
I managed to finish gluing and scraping the binding. The scroll was tricky, but I think it turned out about as well as I could have hoped. I was planning to stack the binding around the scroll because of the height of the carving, but I ended up deciding to carve down the scroll area to match the single layer of binding, which is basically matching the shape of the carving on the back anyway. I think it looks quite good.
I also set the neck. What was supposed to be a simple mortise and tenon bolt on ended up becoming a M&T bolt on/doweled M&T hybrid. I somehow managed to screw up the alignment on the second insert for the bolt on, so I just used the one that worked and secured the neck with a dowel on each side of the tenon.
Next up I'll close the box, get that back glued on and sanded flush. Then start finish sanding and doing some other small miscellaneous tasks like drilling for the end pin, mounting the tailpiece, fitting the bridge to the top, etc, etc.
Glad to be back at it!

that is crazy beautiful. nice work!
-
1
-
-
I'll temper my response by saying "there are more experienced builders here who you want to read their response and place it above mine". that said, I'm guessing most of them would tell you what I'm about to: lay it out. With tremolos you can have it float and do a neck angle or have it flush and perhaps not do an angle. I don't know how readily available the ibanez edge III docs are... but I would start there - finding them and setting up a sideview to see how low it needs to sit for a no neck angle install. I know on my jem the base cavity is 1/2" but how that relates to the edge III is not something I know.
typical fretboard thickness is 1/4".
hope in some small way that helps.
-
so got a new router today. it's a porter cable 8902 with variable speed. Brand new condition w all the goodies for $70 couldn't pass it up.

subsequently did this:

and have some theories as to why but wanted to post and get some feedback.
1) could just be this is hard wood - it's granadillo and is very dense/heavy.
2) could be the bit I'm using (brand new) which has a very small cutting edge... it worked fine on the other side but could have been enough up/down drift that I was off the cutting edge on the top.
3) could be the speed of this router - I'm not sure if you should run at 23k rpm in general? I am well aware that for bigger bits you want to slow the router down as the speed at the outer edge of a large bit will be much greater than a small bit... that's the reason I got this one. Haven't looked to see what my other pc router spins at but wondered anyway - what are your guidelines for variable speed routers for those who use a variable speed router and have used it on figured woods etc. does more speed help?
-
afa necks... mighty mite used to be decent stuff back when they were out of korea... but I think they moved production to china and the wood just hasn't been great. long ago I had a korean mm neck that was solid as a rock... about 5 years ago I bought a p bass neck from them and that thing needed constant adjustment. other recommendations musikraft is very good. warmoth - if you look at their 'available now' selection you can find some good deals and they are solid ime. allparts, wd. search for those brands on evilbay. I would avoid the super cheap stuff as you are going to find that the fretwork is crap and the wood is not great so at that point - given the work you might put in, might as well build it yourself. just my o.
afa flatening bit - what did you go with? I like the bowl bits myself and use a whiteside bit. I wouldn't bother getting a big bit because you'll find that you really only want to remove 1/16 depth and about 1/4 bite each pass. I initially thought I'd get a bit 1 1/4 bowl bit but you aren't going to want to take big bites so there is really no point.
-
5 hours ago, Andyjr1515 said:
All looking good, @mistermikev
I also use vero board for similar stuff and also as a common junction for multiple earths, etc. Useful stuff.
Love the binding jig
")
thank you sir! I have a pcb design with wire labels in the copper that I intended to start using, but too lazy to etch something right now... and vero works just fine!
-
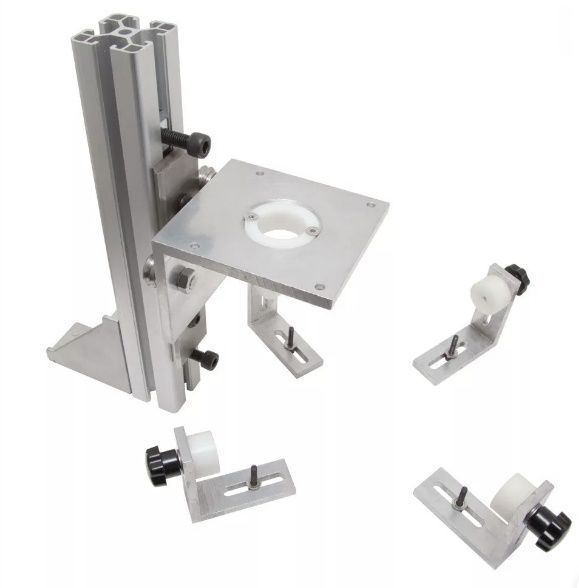
did some relicing to the hardware...


control plate was the first thing I did and started out with fine steel wool to remove protective coating but it didn't do enough damage so switched to coarse... that was clearly too much! Not crazy about how it turned out so will redo that... and didn't realize the knobs are a hair small for my pot shafts so will have to order some replacements. All in all it went ok.
wired up my broadcaster controls. again no tone control here. have a middle hot rail hidden under the pickguard that will be used for hum cancelling. mode 1 will be std tele operation. 2 will be the tele pickups operating as parallel humbuckers with each one paired with a single rail. mode 3 will be the same but in series. the vero board there is just a common place for all my pickups to be wired to. In case I've got something wrong I just swap the positions and don't (in theory) have to screw with my heatshrinked wires.


-
1
-
-
16 minutes ago, ADFinlayson said:
Thanks Mike that's really helpful. I'll see about building one so I can attempt a bound build
glad to be of help.
-
Just now, willliam_q said:
Hey Mike, I really like your adjustable planer sled. It’s seems really great for putting the angles in. I’m sure the mild steel box means the sled slides a bit easier than if it was all wood/mdf?
the binding jig is cool too, a simpler (and cheaper) version of the Elmers binding jig
right on and thank you for the reply!
the sled rails are steel and the main reason I chose that is that it is rigid. Orig I used aluminum but they had too much flex in the middle over 36". W steel they only flex if you push down hard in the middle. I'm going to be building a new version of it someday and I'll use 1/8" steel square tube so I can extend to 4' for bass necks.. these are 1/16".
I wasn't familiar with elmers but it looks a lot like stew mac. def didn't cost much to build this and that is nice, but I actually think it might be better:
1 - more room under it means less struggle maneuvering the piece. you wouldn't think you'd need it but trust me - I almost want more of it... specifically when doing the horns you can take a more natural approach going straight into it.
2 - the clear plexi allows you to 'see' the work and I find this handy. prevents me from doing something dangerous like getting eye level with the bit.
3 - the drawer slides I use have a counter spring that pulls back down... this makes the thing float very nicely. there is a little tension and I like that. I don't know if some of the other designs would have that. also prevents a 'violent' drop if you pull the piece out.
not trying to be a 'mine is better' guy, that jig looks very nice and I'm sure it runs smooth and is clearly more heavy duty... but I'm very happy with this jig and def recommend giving it a shot if you need something like this. It was very simple to build.
-
35 minutes ago, ScottR said:
Nice.
When I saw that in your thread, I thought you had built a pin router setup for the same purpose.
SR
no, not quite. just something simple. it's not 100% perfect as the escutcheon caused about 1/32-1/16 drift in the depth but it's not really even perceptible because it drifts in and out of the slop. good 'nuf fer me!
anywho, thanks for the response.
-
@ADFinlayson here you go. the part that holds the router is 5" x 9" x 11.5". If I had to do over again I'd make the 9" a 6.5" as when going around there are a few spots where I would make contact with the corners unless I pivot the body a certain way. Put some female velcro to protect the surface of the guitar.
Drilled the hole in the back for cable relief but that didn't work out quite the way I hoped... could have made the 5" dimension 7" but it works fine, just a hair hard to get the router out. the lexan bridge in the front there is just to help stiffen up the lexan... again probably would have been less flexible if I had gone 6.5" across instead.
had to play with the springs and distances they were attached to get the thing to float right. not particularly fancy but it works very well.
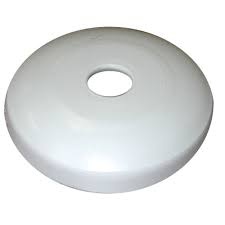
see here... the white part there is called an escutcheon . you can find in hardware stores - for dressing up where a pipe disappears into a wall. there are other methods of things that follow the body but this is cheap and easy. Just glued it to the lexan with super glue.

here's a shot showing the springs attatched to the eyelet screws on one side. on the other side they are just attached to the other piece via some woodscrews. crimped the hook on the spring and screwed it in to fasten.

the back side where I usually use two clamps to clamp it to my table.


-
3
-
 1
1
-
-
1 hour ago, ADFinlayson said:
Have you got plans, more photos etc of that binding channel jig? I could do with making something like that.
I didn't use a plan... just looked at a number of builds online, but I'll tell you all you wanna know and take all sorts of pics if you like.
one key element is a light router. you don't want to fight a lot of counter weight so... the rigid is good, has some good torque, and is very light. there are other candidates that would be fine but I wouldn't use a 'full' router - just a laminate router.
basically, I just build a simple 3 sided box. put a piece of plexi on the bottom with a little spot for the router to place the bit at the edge of the two 'legs' of the box. this is important so that you have enough room underneath that your body doesn't hit the other part. (I can take measurements if you want)
on the back of that I used some drawer slides. you can find one's that have a spring that 'pulls the drawer closed' - this is a nice feature as it acts against the springs pulling upward and lets it sort of 'hover' - but is not required. any drawer slide will work.
I built another box at the back with just some simple triangle sides, a face and a bottom. this allows you to clamp the jig to your bench at the back.
bought a couple of furniture springs (hardware store) and bent the hooks such that they'd hold on to a screw. on the other side I put eyelet screws so they could be detatched for taking it apart later.
I'll try to take some more shots when I get home but I'm old and could forget so don't be shy to remind me.
-
2
-
-
2 minutes ago, ScottR said:
Your finishing schedules are getting pretty sophisticated, MIke. Obviously you have a short learning curve.
The ash body is looking sublime, and I'm looking forward to seeing where the les flaws goes.
SR
thank you sir... probably more luck than anything but it's coming out the color I was shooting for (pardon the pun). Sort of on the 'banana' side of butterscotch blonde. hoping to get some clear on this weekend.
Have sort of focused in on the broadchaser as I'm figuring on some cure time and then relic time, but hope to get back to the les flaws next weekend and do a template for the neck channel.
thanks again for the reply and support (as always)!
-
==============update 12/04/2020==============
started work on the broadcaster finish. wanted to document my steps here as who knows... might turn out good.
grain fill: finish sanded to 320, made up some grain fill using some rit camel die... sort of a chocolate milk color.
generally with ash, and with this grain filler, it's going to take a few passes of grain fill as the filler recedes. In this case... I don't want to totally fill the grain, so I'm going to do one pass.
sanded back the grain filler and prepared for first coats of laquer.
two light coats of mohawk whitewash laquer. since the grain is not fully filled... the whitewash sort of 'dissapears' into the heavier grain. works to my benefit here as it's keeping the grain more visible which I like, however it's still so open that I decided to do another grain fill but this time clear.

my plan is to let the grain fill sit overnight and sand it back. have a couple spots that got a little too much white so will feather those out as well.
did my binding channel on my les flaws. Piece of binding seen here sitting just a hair proud in the neck join area.


and worked on my broadchaser neck... used a chamfer bit to get my first facets done...

then completed those facets with my rasp:

completed a secondary facet... hard to see here but I have drawn lines down the center of the neck to show me where the facet ends... from there I approximate a 67.5 degree chamfer.

this neck will have a vintage spec soft v... have owned a hard v but it was a bit much... thought this might be a nice pairing with the 9.5" radius fretboard. Here's a shot of her all sanded up...

=================update 1/10/20=========================
slapped some frets on the neck...

amber dye here is looking pretty orange but a lot of that is my camera... 186.24 kB · 0 downloads

sneak preview of my butterscotch body in the corner...

-
4
-
-
16 minutes ago, ScottR said:
It seems to be called North Indian Rosewood as opposed to the East Indian Rosewood that we all know and love.. I read that it is not normally imported the states as lumber, but is highly valued as such in India. Janka hardness of 1660, so it will definitely get harder as it dries.
You may be onto something there Mike.
SR
right on well... not sure how that varies from east indian... but the pics I've seen of it look quite similar and it's sm family so.... good 'nuff fer me! hope I can find something bigger that would be unique like a top or neck. I spose it'd be heavy as all get out but could always do a 'semi hollow neck'! I hear they are all the rage.
-
 1
1
-
-
28 minutes ago, ScottR said:
I had not heard if Sisso before and ran across this..
https://arizonareport.com/sissoo-tree-arizona-desert/
Probably something you found already. It looks like rosewood does grow in Arizona.....at least now it does.
SR
I did see that it meant indian rosewood, and wondered where all these mills where getting ahold of it... now I know! I'd love to get a nice sized chunk of it for a top, body or neck so will be on the lookout. thanks for the article!
-
for years I thought about building guitars from scratch but was held back by two things: didn't have a garage/place to do it and didn't think I'd be happy with the precision I'd get sawing fret slots myself. If I'm honest the thing that got me to start building was the fact that you can readily buy cnc slotted fretboards.
built lots of partscasters for the reasons you describe - specific combo of features.
good question - fun to answer.
-
I've learned a lot from this thread and thanks to all for your input. there are a number of places I've found looking on craigslist and facebook that apparently have 'sisso' and 'ironwood' for $5-10bdft. it's far more common than I thought. Most of them say they work with local tree services and get their wood from trees that have fallen or are otherwise removed. No idea how 'sisso' can be from local trees but I'm intrigued. I think given how common it seems to be around here, I'm in no hurry, but sooner or later I'm going to hit a few of these places and snag something. One of them is actually a small mill so, in case they offer shipping (will ask about uk), I'll report back on what I find.
-
1
-
-
I'm thinking a guy who has cut a tree before should know if a wood is relatively soft/hard compared to other trees he's cut... but who knows. seemed more like he was telling me whatever he thought I wanted to hear to get me to drive all the way there figuring I'd just take whatever was there. Rubbed me the wrong way.
there is a lumber supply a block away from my work where I can get teak, bubinga, zebra, purpleheart that is 4fs for $5-9 bdft... think I'm better off spending my money there.
-
5 hours ago, curtisa said:
The lack of customer relations would be enough to put me off...
tru that!
46 minutes ago, ADFinlayson said:My guess is he knows nothing about wood other than how to cut it down and isn't much of a seller.. Probably soft because it's not dry? I've got some spalted and flamed maple in my wood pile that is fresh cut (it was half the price of dry stuff) and it's quite soft.
Still though, if you can sticker it for a year or two, you might get a bargain, I'd say it's worth a punt for an hours drive and $45.
well... the fact that he won't tell me anything about dimensions, can't tell me anything about what it is... could be a waste of $45 and/or an hour drive so... rather spend that money at my local lumber mill where I know I can get something useable and dry.
-
1
-
-
yeah, the soft part... I'm out.


variable speed router questions...
in Tools and Shop Chat
Posted
I appreciate that. I guess I won't worry about it for the most part... but I do have a 1.5" bowl bit that is either unbalanced or just too big to run at full speed because it vibrates more than I am comfortable using it at. This will be nice for that and perhaps my chamfer bit and 1/2" radius. Guess we'll see. thanks for the response.
thank you AD. for a symmetrical design like this I don't think I could get uniformity on a sander. also, unfortunately for this headstock - if you look at the shape and consider it's being bound. Have to bind it off the neck because of the tight curves - can't get in there to cut binding channel and not willing to do them with a chisel. I think I can make this work tho... going to probably take it and sand it such that there is almost nothing to remove with the router... then try again removing the majority with a bigger bit... and paying a bit closer attention to direction. wish me luck! Might have been a better idea to make a sister template to sandwich it between. Next time!