


CC1
-
Posts
50 -
Joined
-
Last visited
-
Days Won
2
Content Type
Profiles
News and Information
Tutorials
Product Reviews
Supplier Listings
Articles
Guitar Of The Month
Links and Resources
Forums
Gallery
Downloads
Posts posted by CC1
-
-
- Popular Post
Bonjour, I'm back.
Meet HEPHAESTUS

Type: Telecaster
Body Materials: Solid Ash (Live Edge), Steel, Bismuth, Epoxy Resin
Neck: Maple + Rosewood (pre-fab)
SL: 25"
Weight: A lot (haven't checked, but it's heavier than a Gretsch
Parts: Rejected Korean Factory Bigsby, Wilkinson Roller TuneOMatic Bridge, Wilkinson Locking Machine Heads, CTS 500k Pots, 3-way Switch, Irongear 'Blues Engine' Twin-Humbuckers (series), Treble Bleed Mod (Bridge only)
Hephaestus, the Greek God of fire and blacksmithing, was the inspiration and namesake for an idea I had about 6 months ago.
I actually started a thread here for the build, but got distracted as I have entered this guitar into the 'Kit Build' of the "Great Guitar Build Off 2021"! (and updating both journals was really hard!


The full progress was documented on my new YouTube channel here:
-
 5
5
-
My final allowed resubmission, since December and January's were both outstanding worthy winners
Name: Yeti

Type: Custom Precision-Bass
Body: Live edge English Ash, Epoxy
Neck: Canadian Maple (scorched, engraved), Rosewood Fretboard
Scale: 32"
Components
Pickups: Fender Vintage P-Bass Pickups (Passive)
Bridge: Hipshot 'Kickass' 4-String
Machine Heads: Gotoh GB707's
Pots: CTS 250k Log and Linear
Other
Snaplock Strap locks
Custom CnC Pickup Ring
Custom Black Anodised Aluminium Truss Cover
Custom Black Anodised Aluminium Neck Plate
Build#: First ever build
Experience: Floating shelves, basic DIY joinery
Cost: Don't-Tell-The-Wife territory.
Made at home in the garden and the spare room (thanks Covid...), as a 'thank you for being you' gift for a close friend and bandmate (nickname 'The Yeti') who has had a challenging year.
Story/Process
I began with a lot of research (how I found this site!) and watching things like Crimson Guitars on YouTube. I had been playing around with the idea of doing a River Table, but thought a similar effect on a guitar would be cool. Most other 'River Guitars' I saw were true 'River' style - with the Epoxy through the middle.
Doing an epoxy edge instead of river-core had the bonus effect of looking cool and unique, whilst maintaining the structure and sound quality of the tonewood Ash.
I found a waney-edge lumber yard about an hour's drive away. I walked out with 5m of rare English Ash (his words, not mine, something about a disease wiping the species out?) and some sequoia I'll use at a later date.
Sourced the Epoxy (deep pour variety) from a company in Stoke-on-Trent.
Components were a mixture of Guitar shops around Europe/UK + eBay. Custom Aluminium parts were made by a guy in his workshop in Pennsylvania (he was really hard to find). I didn't want to make him a Bass that looked great but had bog-standard cheap parts in it, so wherever possible or relevant, I forked out the extra cash and got something middle to top-of-the-range.
This all began in September, juggling WFH with a toddler and typical British weather. The 'Indian-Summer' helped with all the hand-planing and sanding I had to do, as I obviously couldn't do all that indoors.
Being my first build, I wasn't brave enough to tackle the neck (lot of specialist tools required for that as well), so I sourced a quality one and customised it by burning it with a torch and making a logo I then engraved into the head (as well as into the Truss Rod Cover and Neck Plate)
The rough timber was hand planed, then a piece selected and a rough shape cut out. I did a 1st epoxy pour (blood red), and drilled in some secret long holes for the epoxy to go into the body of the guitar to give it a strong mechanical hold rather than just gripping the edge/bark. After this I cut it to rough shape, leaving space for the 2nd (Clear) pour for the top horn (again, secret 'foundation columns' drilled in). Then the final outline was cut out, and a 3rd Pour done to fill some natural splits and knot holes in the wood.


I could then begin planing the edges into a gentle sloped profile (I don't like guitar that are too 'blocky', whilst keeping a 1-3/4" thickness through the middle. One thing I learned, is that before doing this, you should definitely cut out your cavities and pot holes first. It was fine, but made a simple job later on much more difficult. Once this was all done and the pickup and jack holes routed as well as the neck pocket, the whole thing was sanded to 5000 grit to keep consistency between the epoxy and the wood.

I then followed Andy's guide on wipe-on-poly process for those who don't have a workshop, here: https://www.projectguitar.com/tutorials/finishingrefinishing/bedroom-builders-wipe-on-varnishing-r67/ . I finished with some Automotive fine polish applied by hand (as per the guide). The fully shielded cavity's cover was cut by hand from a piece of perspex I got off Amazon.
The action and everything about it came out perfectly, to the 10th of a degree - so absolutely stoked about that. Two minor problems persisted: One of the knobs doesn't sit perfectly centrally in its pocket (pot alignment issue) by about 1mm. This will wear itself a smooth hole with very little use so I'm not worried. The other slight issue is that one of the pickup guard screws' heads snapped off when screwing in (from hand torque, which I find odd for a screw). He's a purist for finger-style bass playing, so no pickguard to get in the way of the beautiful wood grain.
I am absolutely thrilled with how it all came out. It plays and sounds brilliant, and I cannot wait to give it to my friend.
I also can't wait to start my next one - which will be a burnt-husk + epoxy + led + Raspberry Pi build for myself from the same Ash wood.


Lastly, a huge thanks to the owners and workers of this site, for making a great place for people to come together and share this stuff - but most importantly to users @Bizman62, @Andyjr1515, and @mistermikev for their help and guidance when a few things got a little tough for a total newbie. You guys helped make this.
-
4
-
-
11 hours ago, mistermikev said:
round here... we got rebar at home depot for $3 each!! I've never really been into the 'articulated' guitar but have always thought they looked interesting.
if they were my bodies... rather than char them I'd probably do the charred grain thing... that looks really cool imo. (you know... take a blow torch and follow the grain).
here's some other ideas... do the 'steel wool' in a cup of vinegar thing and ebonize the wood. then char the grain. might look like something that came out of a mine shaft fire.
anywho, fun stuff!!
I will do a Subodu char at some stage, but these I'm going for the "log pulled out of a fire" style dessication
-
Yep - Clear epoxy, and re-cut to shape.
-
Time for an update.
The weather hasn't been too kind recently, but I did soldier through a 1-C-degree afternoon to plane down the 2.5" thick slabs of sequoia, and cut out the basic shapes with the Jigsaw. There was a LOT of pink snow from this. A lot

It's funny, the slabs were so heavy, but once cut down to shape and thickness (standard 1-3/4"/45mm), they are so light! I suppose they are a softwood pine, after all.
Having offcuts allowed me to test how sequoia would hold up to the charring

...pretty well. And it was easier than I thought to deliberately gradient the burn at the edges.
So I now have 4 bodies ready to go.

(Clockwise from Topleft: Sequoia Jaguar, English Ash Yeti (Guitar version of the Bass model I did first), Ash Tele, Sequoia Tele)
So next clear day and I'll tidy up the edges and the neck scoops to get it ready for cutting, burning and epoxy casting.
I also played around in Powerpoint and came up with a Signature for the headstocks. I decided the only thing 'original' (original to me, others have/may have done it) about my Yeti series, is the double-scoop cut horns. Thus, I incorporated it into my own headstock design.

I see and appreciate the craftsmanship in some of the wackier headstocks and bodies out there - but I do believe that 90 years of guitar making - people have tried a lot of different shapes and styles - and the ones that look best, stuck. So, I wasn't going to try "reinventing the wheel" (and when I tried, they came out looking like garbage 80's synth keytars...). It occurred to me that 80% of my guitars bought have been Ibanez - so the left side takes some inspiration from there. I then set about playing with scoops and sharp edges/reticulating splines in different areas - and this just 'clicked' in front of me while fiddling, and I love it.
As per @Bizman62, I had started to investigate cheaper options of pickups. My sound/my band's sound is somewhere on the spectrum from bitey mild distortion (Muse's Absolution style) through to the myriad of heavy rock blues bands that have come out in the last 20 years. So, tonally, I just need something with good mids that doesn't lose too much clarity.
Exhaustive research led me to [Irongear pickups](https://www.axetec.co.uk/guitar_parts_uk_074.htm) . I haven't had a chance to play with them yet, but picked these up for £30 each (neck and bridge position). A marked improvement on cost from the £90 spent on the Fender Original P-Bass and a lot less than the DiMarzios et al of this world wanting £120-£200 per pickup. I had started entertaining buying a machine and spinning my own, as I was reading that hand wound ones have an interesting characterful tone that's one of a kind, and are dirt cheap to make. The issue is, a winding machine is £500-£1000. So yeah-nah.

I also picked up some generic machine heads that looks reasonable. I appreciate the Gotoh GB707s I got for the Yeti, but they're expensive for what they do. These will do fine.
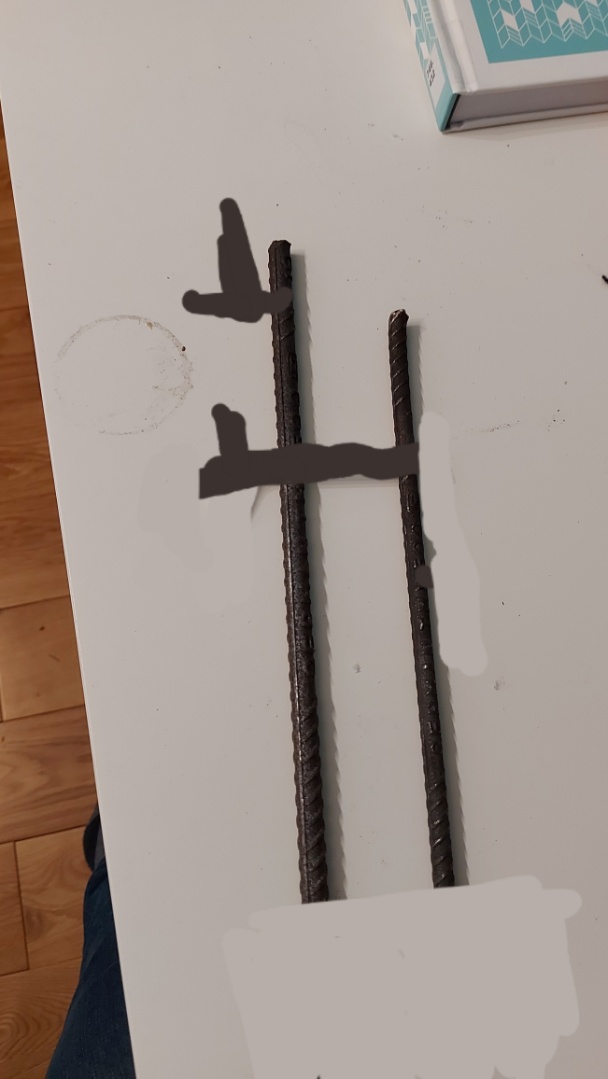
I had also sourced some metal rebar from Amazon, just 2 rods ~40cm in length.

.. the idea being that I would cut them in half, to make the 'exposed wire frames' for two of the guitars.
However, what was in my head, was something more like this:

...which stylistically I feel like I've been influenced by the Vex in Destiny 2, mixed with a little Sci-Fi Starship Antennae feel to it.
Randomly in a chat wall, one of my best mates reminded us that his brother had taken up metallurgy/welding for art as a sellable hobby, and had started to get quite good.
Now, my rebar was £8 for the pair + £7 delivery, and would make two. But out of interest, I enquired. He very quickly (like, 30 minutes) knocked up a demo version, based on some refined measurements I sent


I love the rough weld style. Now, it's not rebar, but, I can scuff it up, and leave it out in the rain, and it should go a lovely dark grey+rusty look, which should be outstanding.
He also said he'd do those for £13 a pop + postage. Win! Much better than a couple stick of rebar. Not only that, but he has a plasma cutter and can do really clean cuts - so he's checking how much brushed nickel sheets are for me, and would be able to start making me brushed nickel scratch plates! Score.
I am starting now to nail down suppliers I'll use should people want to commission one of these from me. (The chinese built Canadian Maple necks are fine for now - I'm building a workshop in the Spring when I can start making my own necks/doing neck-throughs. Boltons for now it is though!
Also, regarding the first image I styled out in my head, I've gone off the idea of Red/Yellow sunburst. I am now thinking a purple dye on the Sequoia bodies, really make them pop (and the purple should go nicely with the black and the steel. Add to this, that I'm going to get some large bismuth crystals and incorporate them into the 'exposed' wire frame parts. Really make it look like Nessus.
What do you guys think for the body colours? As for the Ash bodies, I think I'll leave them because the grain is beautiful and I like how the Yeti turned out.
Thoughts?
-
1
-
-
Grazi - Somewhat. I take inspiration through google search, and then sketch out the style in Powerpoint.
So... not really
 2 minutes ago, Bizman62 said:
Have you drawn the graphics by yourself? Pretty immersive!
-
So this was the logo on the neck plate of the Yeti:

So keeping with the same style, this will be the neck plate for Hephaestus (which from now on, I'm just going to call "Hefty")

It will be on Normal Steel/Aluminium rather than black anodized this time (better suits the aesthetic I'm going for this time - silver/chrome coloured parts)
-
Yeah, P90's were a strong consideration. Quite expensive but probably worth it
") 1 hour ago, Bizman62 said:
1 hour ago, Bizman62 said:That looks interesting!
Re pickups, have you considered the fatter single coils like P90?
-
To follow on from 'The Yeti' Series, I have begun work on the second line : 'Hephaestus' (Greek Blacksmith God/God of Fire)
I will begin with 1 Telecaster and 1 Jazzmaster in this mode.
Obviously, it looks better than this in my head, but as a general idea:

I'm still exploring which pickups to use. In my playing I am almost always on the humbucker (I play with a moderate amount of distortion - the lighter end of 'Heavy Rock'), so part of me wants to put in two humbuckers. The other part of me says "you have a strat and a gretsch for that, give yourself some variance - build it like an actual tele with two single coils and wire multiple tone and mix knobs".
That being said, I actually have 4 on the go now. The first, is a second 'Yeti' Guitar (first was a 4string P-bass), that's in the same Ash (with some lovely spalting on it). I am then making 3 Haephestus : 1 Tele in Ash, 1 Tele in Sequoia, and 1 Jazzmaster in Sequoia. The Ash Tele may yet be something else.
Will see how we go.
-
1
-
-
- Popular Post
I'll kick it off with a resubmission, being narrowly beaten by December's worthy winner
Name: Yeti
Type: Custom Precision-Bass
Body: Live edge English Ash, Epoxy
Neck: Canadian Maple (scorched, engraved), Rosewood Fretboard
Scale: 32"
Components
Pickups: Fender Vintage P-Bass Pickups (Passive)
Bridge: Hipshot 'Kickass' 4-String
Machine Heads: Gotoh GB707's
Pots: CTS 250k Log and Linear
Other
Snaplock Strap locks
Custom CnC Pickup Ring
Custom Black Anodised Aluminium Truss Cover
Custom Black Anodised Aluminium Neck Plate
Build#: First ever build
Experience: Floating shelves, basic DIY joinery
Cost: Don't-Tell-The-Wife territory.
Made at home in the garden and the spare room (thanks Covid...), as a 'thank you for being you' gift for a close friend and bandmate (nickname 'The Yeti') who has had a challenging year.
Story/Process
I began with a lot of research (how I found this site!) and watching things like Crimson Guitars on YouTube. I had been playing around with the idea of doing a River Table, but thought a similar effect on a guitar would be cool. Most other 'River Guitars' I saw were true 'River' style - with the Epoxy through the middle.
Doing an epoxy edge instead of river-core had the bonus effect of looking cool and unique, whilst maintaining the structure and sound quality of the tonewood Ash.
I found a waney-edge lumber yard about an hour's drive away. I walked out with 5m of rare English Ash (his words, not mine, something about a disease wiping the species out?) and some sequoia I'll use at a later date.
Sourced the Epoxy (deep pour variety) from a company in Stoke-on-Trent.
Components were a mixture of Guitar shops around Europe/UK + eBay. Custom Aluminium parts were made by a guy in his workshop in Pennsylvania (he was really hard to find). I didn't want to make him a Bass that looked great but had bog-standard cheap parts in it, so wherever possible or relevant, I forked out the extra cash and got something middle to top-of-the-range.
This all began in September, juggling WFH with a toddler and typical British weather. The 'Indian-Summer' helped with all the hand-planing and sanding I had to do, as I obviously couldn't do all that indoors.
Being my first build, I wasn't brave enough to tackle the neck (lot of specialist tools required for that as well), so I sourced a quality one and customised it by burning it with a torch and making a logo I then engraved into the head (as well as into the Truss Rod Cover and Neck Plate)
The rough timber was hand planed, then a piece selected and a rough shape cut out. I did a 1st epoxy pour (blood red), and drilled in some secret long holes for the epoxy to go into the body of the guitar to give it a strong mechanical hold rather than just gripping the edge/bark. After this I cut it to rough shape, leaving space for the 2nd (Clear) pour for the top horn (again, secret 'foundation columns' drilled in). Then the final outline was cut out, and a 3rd Pour done to fill some natural splits and knot holes in the wood.
I could then begin planing the edges into a gentle sloped profile (I don't like guitar that are too 'blocky', whilst keeping a 1-3/4" thickness through the middle. One thing I learned, is that before doing this, you should definitely cut out your cavities and pot holes first. It was fine, but made a simple job later on much more difficult. Once this was all done and the pickup and jack holes routed as well as the neck pocket, the whole thing was sanded to 5000 grit to keep consistency between the epoxy and the wood.
I then followed Andy's guide on wipe-on-poly process for those who don't have a workshop, here: https://www.projectguitar.com/tutorials/finishingrefinishing/bedroom-builders-wipe-on-varnishing-r67/ . I finished with some Automotive fine polish applied by hand (as per the guide). The fully shielded cavity's cover was cut by hand from a piece of perspex I got off Amazon.
The action and everything about it came out perfectly, to the 10th of a degree - so absolutely stoked about that. Two minor problems persisted: One of the knobs doesn't sit perfectly centrally in its pocket (pot alignment issue) by about 1mm. This will wear itself a smooth hole with very little use so I'm not worried. The other slight issue is that one of the pickup guard screws' heads snapped off when screwing in (from hand torque, which I find odd for a screw). He's a purist for finger-style bass playing, so no pickguard to get in the way of the beautiful wood grain.
I am absolutely thrilled with how it all came out. It plays and sounds brilliant, and I cannot wait to give it to my friend.
I also can't wait to start my next one - which will be a burnt-husk + epoxy + led + Raspberry Pi build for myself from the same Ash wood.
Lastly, a huge thanks to the owners and workers of this site, for making a great place for people to come together and share this stuff - but most importantly to users @Bizman62, @Andyjr1515, and @mistermikev for their help and guidance when a few things got a little tough for a total newbie. You guys helped make this.
-
6
-
I voted for myself (naturally...), But they're all great for different reasons. Carbon14 to me looks like it came off a factory (I mean that as a compliment) : it's so clean and precise!
-
1
-
-
@curtisa @mistermikev @Bizman62
well.
it was both
it was the wrong lug, even though it worked fine?
but wired up correctly, it still wiggles, and the cut out is arguably worse than before.
with the jack fully out, the hot lug actually giggles a mm itself, likely the cause (or contributing) .
so new jack on the way. Thanks peoples
cc
-
1
-
-
But are you saying, that's a possible cause for my symptoms?
Remember - it plays perfectly fine - until it's nudged, and then the ground continuity disappears between the cable and the rest of the internal system
-
11 minutes ago, CC1 said:
Sorry - also - I should say, I actually don't remember which is longer out of 1 and 2 - the solder might be playing a trick on the eye there. I do remember that they were quite close in size - but one was slightly longer. 2 might actually be shorter than 1
If [this](https://www.ebay.co.uk/itm/Long-Barrel-OUTPUT-JACK-COSMO-BLACK-Fits-Ibanez-guitar-bass-stereo-mono-NEW-/392264583162) is anything to go by, the Hot tip (shortest) is left of the Ground (longest), and the middle one (Ring) is to the right of the ground.
So If that's the same, then I've wired mine correctly (and the sketchy soldering is making it look longer)
-
11 minutes ago, CC1 said:
See, this confused the heck out of me
It's a three lug. There was no technical document for it (that I could find, anywhere) but the closest I found suggested it was either a Stereo capable jack, or, had a power switch on it. After wiring it up, it all seems to work fine as I said (no hum or anything) - so it's just the loose wiggle that seems to affect the signal

3 is the longest, and was taken to be the Ground
2 is the second longest, and everything I could find suggested it was the Hot
1 is the shortest and appeared to be something else (switch, power, stereo?)
Do you think I got this wrong? Would it explain why it works, until the slightest pressure is applied to the cable?
Sorry - also - I should say, I actually don't remember which is longer out of 1 and 2 - the solder might be playing a trick on the eye there. I do remember that they were quite close in size - but one was slightly longer. 2 might actually be shorter than 1
-
9 minutes ago, CC1 said:
See, this confused the heck out of me
It's a three lug. There was no technical document for it (that I could find, anywhere) but the closest I found suggested it was either a Stereo capable jack, or, had a power switch on it. After wiring it up, it all seems to work fine as I said (no hum or anything) - so it's just the loose wiggle that seems to affect the signal
3 is the longest, and was taken to be the Ground
2 is the second longest, and everything I could find suggested it was the Hot
1 is the shortest and appeared to be something else (switch, power, stereo?)
Do you think I got this wrong? Would it explain why it works, until the slightest pressure is applied to the cable?
I was finding diagrams like this I followed:
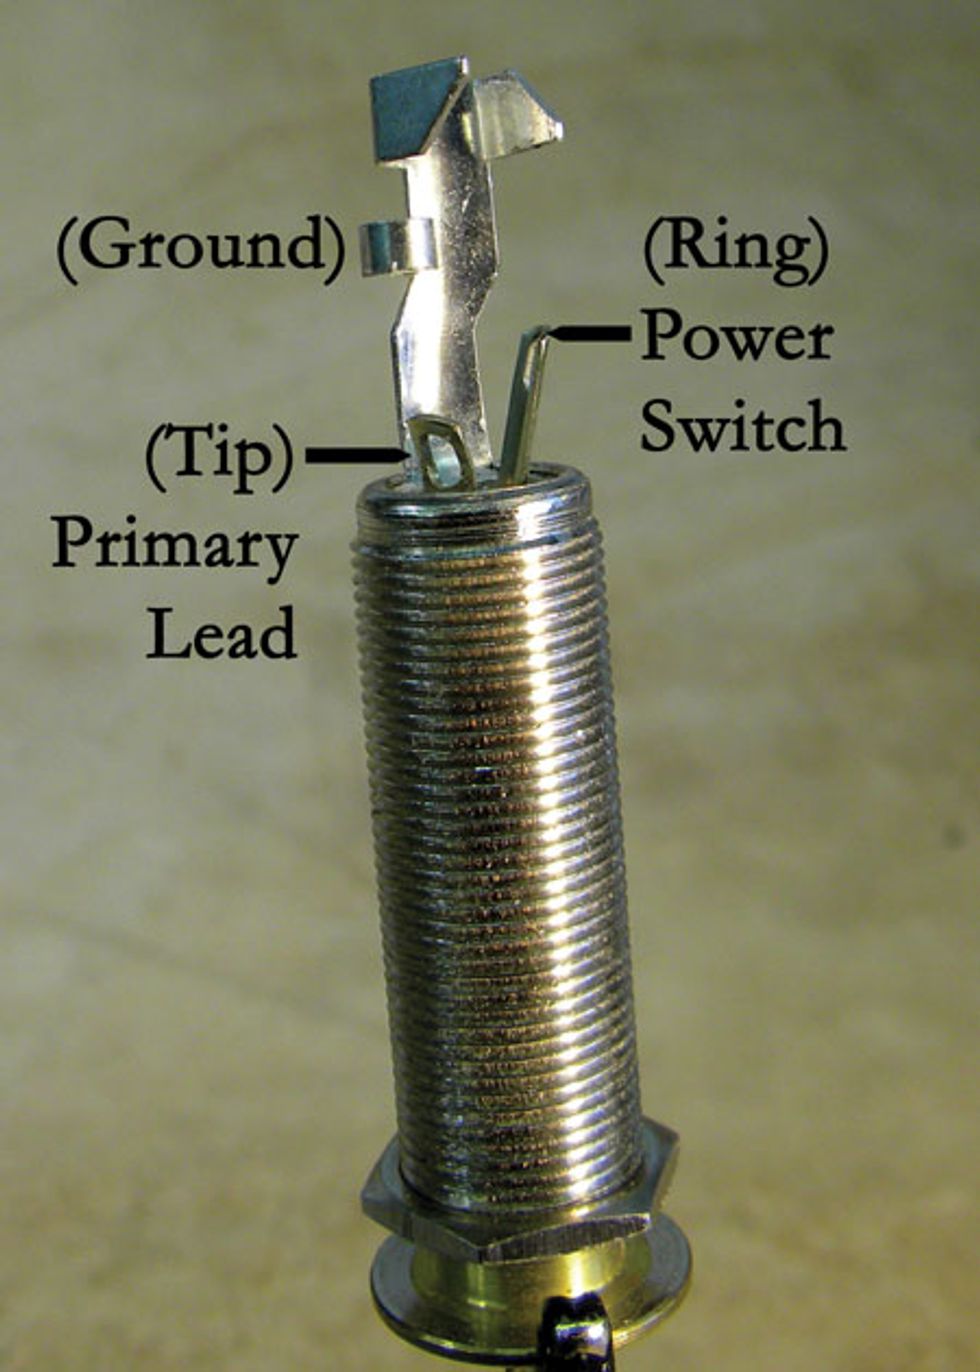
... and as I said, it all seemed to work - except for when the cable is disturbed
-
See, this confused the heck out of me
It's a three lug. There was no technical document for it (that I could find, anywhere) but the closest I found suggested it was either a Stereo capable jack, or, had a power switch on it. After wiring it up, it all seems to work fine as I said (no hum or anything) - so it's just the loose wiggle that seems to affect the signal
3 is the longest, and was taken to be the Ground
2 is the second longest, and everything I could find suggested it was the Hot
1 is the shortest and appeared to be something else (switch, power, stereo?)
Do you think I got this wrong? Would it explain why it works, until the slightest pressure is applied to the cable?
-
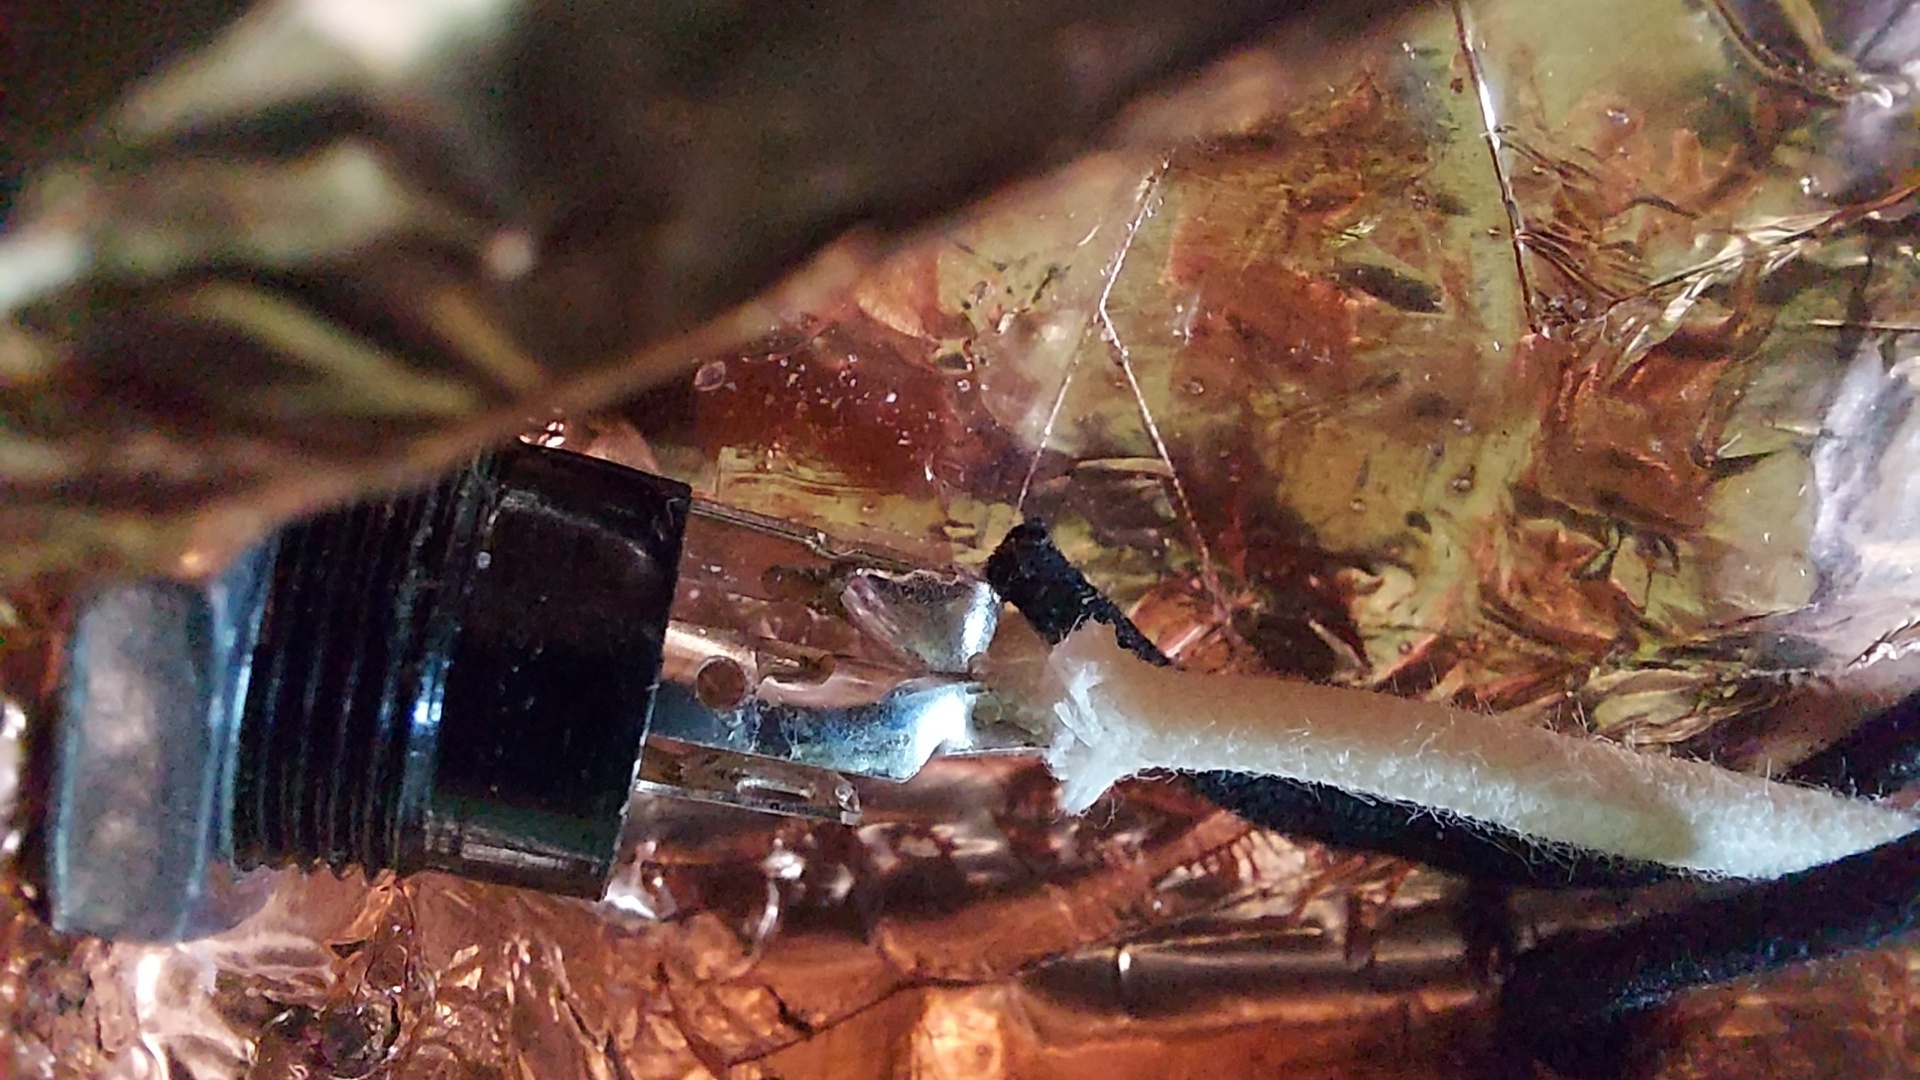
I noticed my new (and first) build actually has a slight issue when playing. The slightest pressure on the jack cuts the signal completely.
So I took it apart, and whipped out the multimeter

Set to 200O or just the signal beep, I got the following results (Key: Red: Hot / Black: Jack Ground / Orange: Nut / Dark Green: Jack Shell / Pink: Jack Ground Tip / Light Green: Tone Pot shell / Purple: Shielding / Blue: Val Pot shell )
Dark Green -> Purple/Blue/Light Green : Good
Pink (jack Ground tip) -> Purple/Blue/Light Green : Good
Black -> Pink/Dark Green/Light Green/Purple/Blue : Good - BUT, the slightest pressure on the jack and it cuts out
There is a very small amount of wiggle of the cable when inside the jack. The nut is quite firm but I think that mechanically it is mostly pulling the Jack tight in the body - I don't think it's compressing the Jack socket itself.
I've used a pedal connector here, but can confirm that same wiggle and the same issue with different cables, which all work fine in other instruments (where there is no wiggle at all) and have all been themselves tested.
There is no nut on the outside to tighten either:


Question: Is this just a bad jack (it was generic part, ordered from here: https://www.ebay.co.uk/itm/Output-Mono-1-4-Barrel-Jack-Plug-Brass-Socket-Long-Fits-Bass-Electric-Guitar/264737490450?ssPageName=STRK%3AMEBIDX%3AIT&var=564556512021&_trksid=p2057872.m2749.l2649 ), or have I not grounded this properly in some way ( I know virtually nothing about electronics )
If it is the Jack, is there anything I can do or try - or do I need to scrap it and try a new one?
Thanks
CC
-
- Popular Post
Name: Yeti
Type: Custom Precision-Bass
Body: Live edge English Ash, Epoxy
Neck: Canadian Maple (scorched, engraved), Rosewood Fretboard
Scale: 32"
Components
Pickups: Fender Vintage P-Bass Pickups (Passive)
Bridge: Hipshot 'Kickass' 4-String
Machine Heads: Gotoh GB707's
Pots: CTS 250k Log and Linear
Other
Snaplock Strap locks
Custom CnC Pickup Ring
Custom Black Anodised Aluminium Truss Cover
Custom Black Anodised Aluminium Neck Plate
Build#: First ever build
Experience: Floating shelves, basic DIY joinery
Cost: Don't-Tell-The-Wife territory.
Made at home in the garden and the spare room (thanks Covid...), as a 'thank you for being you' gift for a close friend and bandmate (nickname 'The Yeti') who has had a challenging year.
Story/Process
I began with a lot of research (how I found this site!) and watching things like Crimson Guitars on YouTube. I had been playing around with the idea of doing a River Table, but thought a similar effect on a guitar would be cool. Most other 'River Guitars' I saw were true 'River' style - with the Epoxy through the middle.
Doing an epoxy edge instead of river-core had the bonus effect of looking cool and unique, whilst maintaining the structure and sound quality of the tonewood Ash.
I found a waney-edge lumber yard about an hour's drive away. I walked out with 5m of rare English Ash (his words, not mine, something about a disease wiping the species out?) and some sequoia I'll use at a later date.
Sourced the Epoxy (deep pour variety) from a company in Stoke-on-Trent.
Components were a mixture of Guitar shops around Europe/UK + eBay. Custom Aluminium parts were made by a guy in his workshop in Pennsylvania (he was really hard to find). I didn't want to make him a Bass that looked great but had bog-standard cheap parts in it, so wherever possible or relevant, I forked out the extra cash and got something middle to top-of-the-range.
This all began in September, juggling WFH with a toddler and typical British weather. The 'Indian-Summer' helped with all the hand-planing and sanding I had to do, as I obviously couldn't do all that indoors.
Being my first build, I wasn't brave enough to tackle the neck (lot of specialist tools required for that as well), so I sourced a quality one and customised it by burning it with a torch and making a logo I then engraved into the head (as well as into the Truss Rod Cover and Neck Plate)
The rough timber was hand planed, then a piece selected and a rough shape cut out. I did a 1st epoxy pour (blood red), and drilled in some secret long holes for the epoxy to go into the body of the guitar to give it a strong mechanical hold rather than just gripping the edge/bark. After this I cut it to rough shape, leaving space for the 2nd (Clear) pour for the top horn (again, secret 'foundation columns' drilled in). Then the final outline was cut out, and a 3rd Pour done to fill some natural splits and knot holes in the wood.
I could then begin planing the edges into a gentle sloped profile (I don't like guitar that are too 'blocky', whilst keeping a 1-3/4" thickness through the middle. One thing I learned, is that before doing this, you should definitely cut out your cavities and pot holes first. It was fine, but made a simple job later on much more difficult. Once this was all done and the pickup and jack holes routed as well as the neck pocket, the whole thing was sanded to 5000 grit to keep consistency between the epoxy and the wood.
I then followed Andy's guide on wipe-on-poly process for those who don't have a workshop, here: https://www.projectguitar.com/tutorials/finishingrefinishing/bedroom-builders-wipe-on-varnishing-r67/ . I finished with some Automotive fine polish applied by hand (as per the guide). The fully shielded cavity's cover was cut by hand from a piece of perspex I got off Amazon.
The action and everything about it came out perfectly, to the 10th of a degree - so absolutely stoked about that. Two minor problems persisted: One of the knobs doesn't sit perfectly centrally in its pocket (pot alignment issue) by about 1mm. This will wear itself a smooth hole with very little use so I'm not worried. The other slight issue is that one of the pickup guard screws' heads snapped off when screwing in (from hand torque, which I find odd for a screw). He's a purist for finger-style bass playing, so no pickguard to get in the way of the beautiful wood grain.
I am absolutely thrilled with how it all came out. It plays and sounds brilliant, and I cannot wait to give it to my friend.
I also can't wait to start my next one - which will be a burnt-husk + epoxy + led + Raspberry Pi build for myself from the same Ash wood.
Lastly, a huge thanks to the owners and workers of this site, for making a great place for people to come together and share this stuff - but most importantly to users @Bizman62, @Andyjr1515, and @mistermikev for their help and guidance when a few things got a little tough for a total newbie. You guys helped make this.
-
6
-
13 hours ago, Andyjr1515 said:
On a completely different slant - the shots you show look pretty nice in terms of the gloss. For builds for myself, I generally like to see the grain like this - it emphasises that it is real wood. Is super smooth essential?
The whole thing feels rough and unpleasant, and I think it looks really scrappy. This is a gift for someone - and whilst I'm not chasing the perfect finish, just something that protects, is smooth and clear is all I'm after. It doesn't have to double as a mirror for the Hubble Telescope.
The degree of workmanship trying to put into this is "would you buy something like that?" - if the answer is no, I redo whatever it is that I just did, or make it right. Otherwise the whole project just becomes a bunch of "good-enough"'s and the overall impact is lessened.
I am learning, and it is my first guitar, but since I have time, I don't want to do a crap/almost good enough job and worry about the rest next time , I want to get it right, learn along the way, and be even better next time
-
If I do the slurry option - how fresh should the top layer of poly be - do I want it to be relatively fresh, barely dry, or completely cured? Will the slurry not be quite cloudy?
-
11 minutes ago, Andyjr1515 said:
Ah - OK. This is a slightly different issue. In the previous posts we were talking more of the epoxy and the micro-scratches.
This is about grain filling, which I had assumed (if required) had been done on the wood itself before your final sanding.
Let's start by saying this is fixable, even when you have started your gloss finishing. There are a couple of ways to tackle it.
Cause
Basically, the polyurethane is a very thin finish. Therefore to use the finish coats themselves to do the grain filling is a challenge. Each finish coat will follow the contours, the hills and hollows, of the grain and knot-holes each time and so those features are still going to show:

Possible Solutions
If you want to 'lose the grain' at this stage, there are a couple of ways that come to mind.
- you could build up enough thickness (this might be a LOT of coats) to the point where the hollows are above the tops of the hills of the grain and then sand down to just above the wood line. This can work OK for light grain but, to be honest it isn't going to fill a large void such as the knot hole. Here you would be best to fill the hole with thin cyano or similar first (although this might react to very recently applied polyurethane)
or
- you could 'slurry and wipe' the polyurethane. Have you seen the 'slurry and buff' method of applying Tru-oil? Well I've realised that this technique can be adapted to act as a clear grain fill and also used with a number of different finish types. I can't guarantee with your particular finish and wood, but I have used the technique with poly varnish.
- basically repeat a 'flattening' sand, maybe slightly coarser (1000grit or similar) but this time the 'wet' of the 'wet and dry' is polyurethane varnish. So you will create a slurry of wet varnish mixed with the 'sandings' of your previous dry polyurethane coats which, because it has already lost all the volatiles in the drying process, will contain much more bulk than fresh wet varnish. Sand with a block along the grain, then wipe the slurry gently off with a lint free cloth across the grain, with the slurry thus filling the hollows.
- when it is fully dry, flatten in the normal way. If the grain is still showing, repeat. Once all of the grain is filled, carry on towards your final gloss coats.
This is basically how I 'slurry and buff' stained woods that most folks say can't be done without losing the stain...
God f***n damnit...
I didn't think I'd need to do any sort of sealing/conditioning before putting on an oil based poly - I thought they were supposed to sit on the top of everything?
The whole thing was smoother than glass before I started finishing... I should have just waxed it and left it there (sob)
Building up that many coats over the entire body sounds like weeks of work - and my wife would rather like the guest room back soon (I originally said 6 coats/applicatons, I've now done 10...)
I mean, it felt smoother a few coats back. I guess I just couldn't see it.
I feel like the slurry method is going to be a pain - I can see small areas being missed/the slurry being wiped or falling out.
It also sounds like the slurry method is going to rely on several more coats before it's a viable option - as I have to basically sand it twice.
I guess I put on 3+ more 70/30 coats, then slurry (I'm guessing I need to wait for a proper cure before attempting to slurry?), then let it cure again, then sand it, then add more poly back on...
This is going to take months!
-
and the back:

-
... and majority of the grain looks like this:


Build : CCG - The 'Hephaestus' Series
in In Progress and Finished Work
Posted