


curtisa
-
Posts
3,730 -
Joined
-
Days Won
152
Content Type
Profiles
News and Information
Tutorials
Product Reviews
Supplier Listings
Articles
Guitar Of The Month
Links and Resources
Forums
Gallery
Downloads
Everything posted by curtisa
-
 ...or perhaps a more realistic analogy, stick a capo on the 12th fret and tune all your strings down an octave. The result will be pretty ugly sounding compared to all six strings open and tuned back to normal, even though the pitch is the same both ways.
 -
The falling 'trebly-ness' in sympathy with the shortening scale length pretty much follows what I was expecting. The string tension is reducing while the pitch and string gauge remains constant. If you followed it to an extreme situation, say making the scale length as short as a ukulele but kept the same string on it tuned to the same pitch, the note generated would sound pretty dull and it would feel like a rubber band. Try down-tuning a 46 low-E on a Strat to the same pitch as a bass low-E and you'll get the same effect.
-
Hmmm? You say something? No, the peak I'm hearing isn't anywhere near up that high. It's subtle, so it probably won't stand out if you're just listening on the laptop speakers or mobile phone. I suppose it may only come across as 'slightly more treble'/'slightly less treble'.
-
Interesting. I can hear a change in tone between the differing scale lengths. There's a high frequency peak that I can hear getting lower as the scale length reduces on the low-E string plucks. Kinda like those Tuvian throat singers who can excite harmonic overtones on top of their base drone vocal to sound like 'iiii', 'eeee' and 'oooo'. To my ears the high-E also gets less bright as the scale length gets shorter. That could be a contributing factor to the Strats-are-brighter, Les-Pauls-are-warmer philosophy, the two guitars having scale lengths that differ by around 3/4 of an inch. I really struggle to hear those differences as soon as I add the amp simulation though.
-
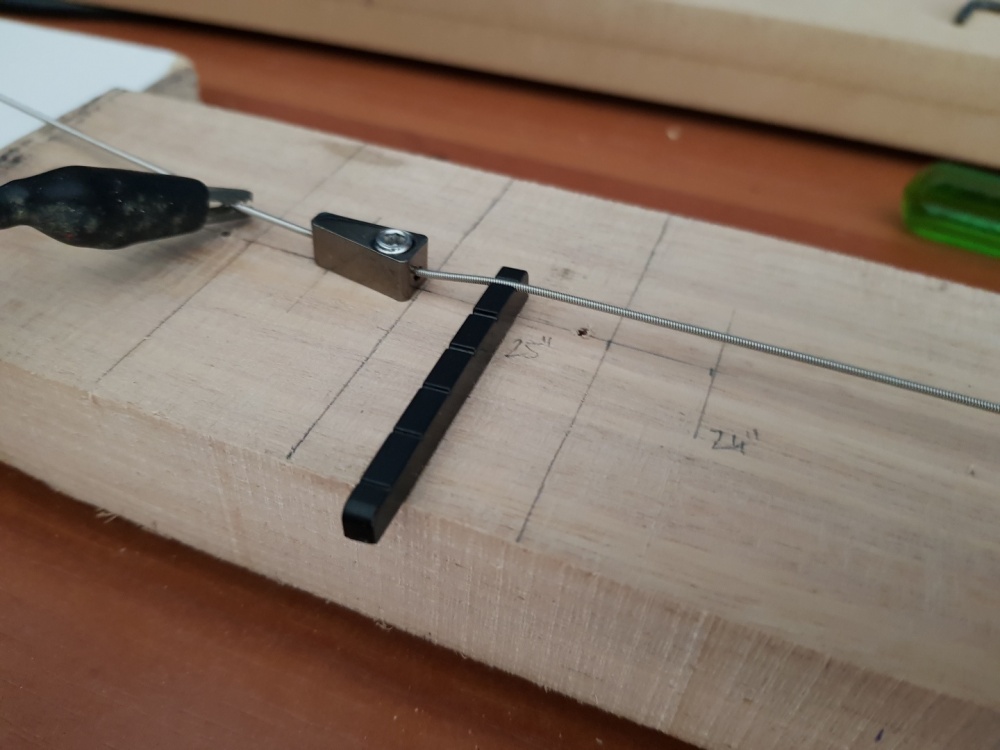
A slightly simpler, and perhaps more obvious one this time around. What difference does scale length make? Same test rig as before, except that the string lock and nut at the 'head' end of the oak plank are being shifted towards the bridge by an inch at a time, providing scale lengths of 26", 25" and 24": Just two strings played this time, a low-E (0.042 gauge) and a high-E (0.010). One pluck of each at 26", 25" and then 24" scale lengths. Also attached is the same recording through the moderately gainy amp sim. Interestingly I think the differences between the three variants get a bit harder to hear when played through the amp. Try them for yourself! 03 Scale Length Variations, 26-25-24 + Amp.wav 03 Scale Length Variations, 26-25-24.wav


-
Here's the same three files run through a medium gain Marshall-inspired amp simulation. 02a Pickup Mounting, Direct vs Floating + Amp.wav 02b Pickup Mounting, Direct vs Floating, Randomised Order + Amp.wav 02c Pickup Mounting, Direct vs Floating, ABX + Amp.wav
-
It's tricky, isn't it? I might try posting variants with added amp simulation and extra gain to see if it changes things. Good suggestion.
-
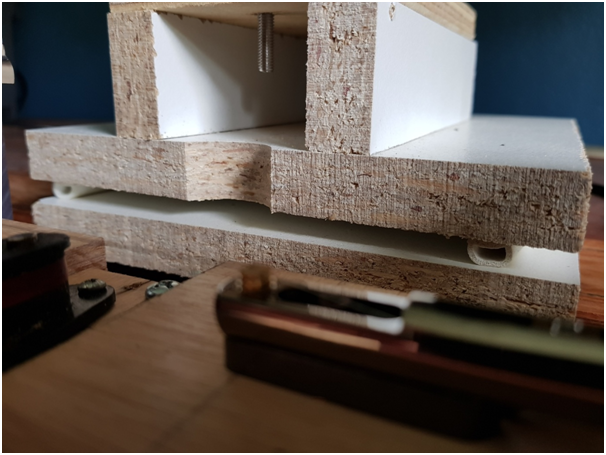
Something to compare for yourself - can you tell the difference in sound between a pickup that is direct-mounted on to the body, and one that is completely decoupled from the instrument? The theory is supposedly that if you have the same pickup directly attached to the body it will sound different compared to a pickup not in direct contact with the body via a scratchplate or pickup mounting ring; that the pickup may be able to respond to the material vibrating. I needed some way of taking the pickup out of the test rig and re-positioning it such that it was no longer touching the body, but still in the same location relative to the string. The 'white platform-y thing' I mentioned at the top of this thread finally gets a chance in the spotlight here. The pickup remains attached to the timber mounting plate, but the mounting plate itself is unscrewed from the test rig and re-attached to this new jig on the other side of the guitar. This holds the pickup in the same relative position as it would be if attached directly to the guitar, only this time it is above the string pointing down, rather than underneath pointing up: The height of the pickup when held in the inverted position is adjustable using M5 allen bolts. The cradle itself is also mounted on soft rubber strips to minimise any acoustic coupling from the test rig, through the desk and up into the pickup. To ensure the pickup polepiece is at the same distance from the string the same 2mm wooden spatula is used to fine tune it: So. Interactive time. Attached are three WAV files for your listening pleasure. A low-E, a D and a high-E have been recorded 10 times each using the 'pickup direct-mounted' rig. The same three strings have then been recorded a further 10 times with the 'pickup free-floating' rig for a total of 60 individual samples across three pitches. File 02a - Contains three pairs of samples of each string chosen at random from the two banks of 30 samples, giving 3x2 strikes of the low-E, 3x2 strikes of the D and 3x2 strikes of the high-E. The first sample in each played pair is always the direct-pickup version (A), the second sample in each pair is always the floating pickup version (B). The playing order of each pair is always A-B. Can you hear anything could differentiate one sample from the other within each pair? File 02b - Similar to file 02a except that this time the order of each pair of strikes is now randomised. The first sample in each pair may be either the direct-mounted pickup (A) or the free-floating pickup (B). The second sample is always the opposite version compared to the first. Based on what you could hear in file 02a, can you identify the playing order of each pair of samples, A-B or B-A? File 02c - A sample of each of the three strings is played three times. The first (A) sample is always the direct-mounted version , the second (B) sample is always the free-floating version. The third (X) sample could be a recording from either the pickup direct-mounted or free-floating. Can you identify the third (X) sample in each group of three based on what the previous two samples (A-B) sounded like? 02a Pickup Mounting, Direct vs Floating.wav 02b Pickup Mounting, Direct vs Floating, Randomised Order.wav 02c Pickup Mounting, Direct vs Floating, ABX.wav


-
Attached is the first recording worth sharing. All this WAV file is intended to demonstrate is if the 'robo-picker' can operate in such a way that each pluck of a string sounds consistent. A set of 10-46 strings was used, starting with the low E 46 first. This was tuned to pitch using a Peterson StroboPlus tuner set to normal equal temperament mode, and then a recording of 10 robo-plucks made. The string was then detuned and removed, the next string (A/36) installed and tuned, and a further recording of 10 plucks performed. The process repeated until all 6 strings had been recorded. Each recording of 10-plucks-per-string was then sliced up into 2 second soundbites and spaced equally apart. The resultant recording attached here only demonstrates 5 of the 10 samples of each string (to save yourself from going mad ), but there should sufficient examples to be able to make a sufficient judgement as to whether they sound uniform enough to continue using the robo-picker rig. Don't judge the tone too harshly at this stage - there is absoutely zero processing on these recordings, nor is there any attempt to make the 'guitar' sound like it would normally through an amp, whether simulated or real. Consequently the recording sounds extremely lifeless and uninspiring from a tone perspective. The string-to-string comparison is also not what should be focussed on at this point; rather focus on how consistent (or not) each of the 5 plucks of the same string sounds. 01 Test Rig Consistency Check.wav
-
I had something that looks almost identical to yours when I first started out, but it didn't have the 90-degree swivel arrangement for the two jaws. Served me well for many years. $14.75 for the pattern makers vice is outrageously good going, considering the Stewmac one I bought must have cost me almost $300 to ship down here. Lucky sod!
-
Everyone knows you can tune a guitar, but can you tuna fish?
-
There's lots of different things you could try with this kind of rig. I'll add some of your ideas to my 'to-do' list
-
I guess we'd have to draw the line somewhere in terms of practically mimicing a hand holding a pick vs picking the string. I suppose you could go to great lengths to design and build some kind of robotic hand with synthetic 'flesh' to hold the pick that accurately mimics someone's picking action. But you could also begin splitting hairs and say, 'well that's not the way *I* play guitar, your tests are all null and void!' This is more about getting the strings to move in a way that is repeatable and using a tool that a typical player would use to do so. Assessing tonal effects due to a player's picking hand technique is well beyond the scope of this test rig. I was explicitly trying to avoid the variations that might be encountered in trying to excite the strings in some of the Youtube tonewood comparison videos that seem to have received lots of attention over the years: This one by our old mate Ola Strandberg is interesting, but the method that was used to get the strings moving was to allow a ruler to swing down under gravity and 'hammer' the string, effectively turning the guitar into a piano or dulcimer, which is not how anyone plays an electric guitar. There's also inconsistency between some string strikes within the same wood samples that (to me at least) raises some doubt that it's possible to conclude each timber sample is actually sonically different. This old favourite is commonly cited, and while the claim is that the two guitars differ only by body material, the biggest difference I can see is that there's two different people playing the instruments. You'd also need to consider any differences in the electrical characteristics of the pickups and electronics and the proximity of one player to the amp vs the other (acoustic feedback?), amongst other things. Another one that seems to pop up occasionally also suffers from the human factor. It's clear that the same riffs are being played differently each time, which changes the validity of the comparison. Sometimes the samples sound the same between timbers, sometimes they sound noticably different.
-
You can pay me in Kempers The writeup at the top of this thread is actually a few days out of date. I do have recordings from at least one experiment, but I haven't had a chance to compile the files in any great detail yet. Drawing my own conclusions based on what I can hear or see is one thing, but my intentions are to provide some write-ups on what I'm doing here and release a bunch of comparative recordings so everyone can judge for themselves what they can or cannot hear. Based on the one (as yet unreleased) comparison I did with the above rig though, I'd say it's really hard to do this kind of work. A true scientific study, which this most certainly is not, is a huge undertaking to get right. The work involved to account for or eliminate as much of the unwanted data, and focus on the variables you want to look at must be extremely labour-intensive.
-
Thanks! I fully expect this to potentially open a can of worms, but I am genuinely curious about how some of this stuff could be measured and assessed, and I think as builders without ties to a larger company interest we should all be curious about it as well. I've been guilty in the past of saying that something is so because I think it should be, but with this experimental base I'm more interested now in finding out if there could be any basis to such claims, whether they point one way or the other. I'm trying to approach this with an open mind. I think it's also important that if anyone wants to add their own opinions and ideas to the matter they should feel free to do so, whether in this thread or elsewhere. As long things remain civil, of course
-
@mistermikev's thread a few weeks ago regarding an experiment he noted on a private Facebook group got me thinking about practical and meaningful methods of testing factors that may be important in a solid body guitar in terms of sonic impact. I'm sure everyone can point to numerous experiments and comparisons floating around the interwebs, but I'm also sure just as many people will highlight deficiencies in the testing methods that could void the conclusions presented. As with most of the tonewood tests I've personally seen, one of the single biggest hurdles to overcome is the lack of consistency in playing the instrument to demonstrate the effect some component of a guitar has on the resultant sound. It would be ideal if this could be eliminated, or at least reduced to a level where some confidence that the method used to excite the strings to vibrate is as consistent as possible. In this way isolating just one element of a guitar's construction may be possible. Below is my attempt to create such a test rig: Ignore the white platform-y thing on the other side of the pickup for the moment. I'll have more to say on that a bit later on. The 'guitar' is just a single plank of Tas Oak I've cut and rough dressed to arbitrary dimensions of 840mm x 65mm x 25mm. A single headless tuner and string lock have been mounted at each end, and a plastic nut placed near the string lock giving an effective scale length of 25". The single string can be quickly swapped out and replaced as required with another of different tuning or gauge. The decision to utilise a typical nut for the string to pass over, rather than simply allowing the string to vibrate all the way to the string lock, was taken as it was found during initial testing that any slight misalignment of the string leaving the string lock could potentially allow it to contact the sides of the hole on the face of the string lock. This caused issues such as curtailed sustain, sitar-like buzzing or unexpected changes in tonal response. By using a nut any interference caused by the threading hole is eliminated, and the strings vibration is allowed to occur relatively naturally and consistently. The downward pressure exerted on the nut as the string passes over it may also assist in any potential 'tonal transfer' of the string's vibrations into the timber that might be expected in a real guitar: The pickup is a single coil of an unknown vintage retrieved from an old Yamaha RGX electric guitar mounted to a wooden plate that in turn is screwed into a rebate cut into the oak plank. This allows the pickup to be quickly detached from the body, and to be re-mounted in the same position as accurately as possible. The end-most polepiece is aligned under the string. Other pickups could easily be substituted if required: The pickup is wired directly to a 1/4" jack mounted on a short section of angle aluminium at the far end of the rig. A single 240Kohm 1% tolerance resistor is soldered across the hot and ground leads of the pickup to approximate a typical 250Kohm volume pot wound up to maximum. A ground wire is also run between the output jack and underneath the headless tuner base plate, which grounds the string to help with noise suppression, just as in an actual guitar. The output is then connected to a Presonus FP10 8-channel Firewire audio interface and recorded direct to disk at 44.1kHz 24bit using Reaper digital audio workstation software, which can then be used to quickly compare recordings or run analysis on the waveforms if required: To excite the string into motion it would make sense to try and replicate the action of plucking the string in a manner as realistically as an actual player would, but with as little variability as possible. The method utilised here is to employ a plectrum attached to an axle that rotates around a full 360 degrees of motion, plucking the string as it passes overhead. A small block of wood has a shallow notch cut into one end, into which a 0.7mm 'medium' Dunlop nylon pick has been press-fitted into. The block has in turn been press-fitted onto an 8mm axle supported by a pair of pillow bearings to allow it to rotate freely: The other end of the shaft is coupled to a small stepper motor. The use of such a motor allows precise rotational speeds to be applied to the shaft, largely irrespective of the resistance that might occur as the pick begins to contact the string as it swings past. This allows for a method of controlling the relative strength and repeatability of each pick strike: To control the stepper motor's motion, an Arduino programmable microcontroller development board has been employed to issue a series of control pulses to a stepper motor driver. This particular driver has been selected primarily because it features a smooth motion option for lowest possible noise and vibration, which could otherwise acoustically and electrically couple back into the test rig and influence the measurements unnecessarily: Additional control of the motor is provided by use of a single push button to trigger the motor to begin rotating and execute a pluck of the string. A secondary limit switch attached to the plucking rig is actuated when the pick completes a full rotation and signals the Arduino to halt the motor's rotation. Pressing the start button again recommences a further pick strike. The picking mechanism takes approximately 5 seconds to complete one full revolution before stopping: The plucking rig may be freely positioned up and down along the length of the test rig and is attached using rubber pads to grip on to the sides of the rig. It may also be set at any height above the string, allowing as much or little of the pick to contact the string as desired. The use of rubber pads also helps to acoustically decouple the plucking rig from the test rig to minimise the possibility of mechanical noise from the motor or bearings influencing the produced signal. The test rig itself is also resting on soft rubber bumpers to minimise any possible acoustic coupling from the desk underneath that may have an effect on the resultant output signal: To ensure the pickup is set at a consistent distance from the string between tests, a 2mm thick wooden spatula is used as a makeshift feeler gauge. Wood is used as it will not be attracted to the pickup and interfering with the measurement, but other non-ferrous materials could also be employed: Some of the possible characteristics that could be tested with such a rig could be whether the output of the pickup is influenced by whether it is direct-mounted or decoupled via a pickguard or mounting ring, what differences there may be between top mounting and through-body stringing, differences in tone due to scale length variation, or (dare I say it) what differences may be audible in the output signal between materials used in a solid body electric guitar. More later...


-
It's worth noting that there isn't a magic position for any pickup based purely on resonant nodes and peaks of a string's vibration. Placing a pickup based on a mathematical optimum position of the various harmonics of a string only makes sense if each string only plays one note, as it would for a piano. As soon as you begin fretting notes the relative position of any harmonics and nodes on the string moves in sympathy, which moves them across the face of the pickup which in turn changes the position of the pickup relative to the supposed 'ideal' location. The only thing you really need to be concerned about is that positioning a pickup closer to the bridge = brighter, and closer to the neck = warmer. The amount of proximity at either end of the spectrum is entirely down to personal preference.
-
From-scratch amp build: 18-watt JCM-800
curtisa replied to Lumberjack's topic in In Progress and Finished Work
It won't aide anything by doing so, other than making it look similar to the other wiring within the amp. Although I would recommend being a bit careful if you do decide to twist the shielded cable, as being a bit more substantial than the single-core wire used elsewhere it may not like being twisted tightly. A couple of small wire ties to bunch them together would be all that I'd do. Twisting of the wiring to minimise noise only makes technical sense in a handful of situations in a tube amp, heater wiring being one of them, and even then only for a specific kind of heater supply (a 3.15-0-3.15 winding on the transformer, as you appear to have). In that situation you're attempting to minimise noise being radiated outwards to other parts of the circuit. On the other hand, the integral shielding in the cable used on the input jacks is providing some protection from the opposute side of the coin, against external noise getting in. It's certainly looking pretty neat and tidy. It'll be done before you know it at this rate -
Keep getting gaps when laminating necks
curtisa replied to thekt88killedjfk's topic in Solidbody Guitar and Bass Chat
Mating surfaces (one or both) on the left hand laminate could be slightly convex. Could be some foreign material contaminating the joint before clamping, stopping the two pieces from meeting flush. Maybe some wood shavings, dried glue from the bottle, dirt etc? Insufficient clamps or uneven clamping force distribution. -
From-scratch amp build: 18-watt JCM-800
curtisa replied to Lumberjack's topic in In Progress and Finished Work
I wouldn't change it unless you find you have noise issues once it's operational. I suspect as it currently stands such a small percentage of swapped twisting of the heater wires compared to the overall run will amount to no real loss in noise performance. A perfectly twisted heater pair all the way to the socket will not result in perfect cancellation of induced hum anyway. It's easy to fall down the rabbit hole of surgically-clean wiring and layout while making tube amps, but in many cases you end up splitting hairs to chase noise performance improvements that simply can't be obtained from the circuit. If you were building the same circuit using a PCB for example, you simply wouldn't be able to 'twist' the copper traces for the heaters to cancel induced hum, and there are plenty of examples of PCB-based tube amps out there that exhibit completely acceptable levels of heater hum. -
Wood dust is considered a carcinogen by several international cancer research bodies, irrespective of the species of timber being worked. On that advice it's probably best to err on the side of caution and employ appropriate PPE and dust extraction/collection when performing woodworking of any kind that generates dust.
-
Probably just a faulty pot. Can happen sometimes. I'd just replace it if it were me. They're not exactly the sort of component that you can overhaul and get working when they go bad, and for the few dollars a new one goes for it's generally not worth the effort. If you have a multimeter there are some rudimentary tests you can do to check it, but by and large all you're doing is just confirming the suspicion that it is faulty.
-
Guitar Of The Month - April 2021
curtisa replied to ProjectGuitar.com's topic in Guitar Of The Month entry/poll archive
Gents, Just a friendly reminder that this thread is purely for entries only. You will have a chance to comment on the entrants builds and ask questions in the voting thread that goes live in the next few days. Thanks. -
From-scratch amp build: 18-watt JCM-800
curtisa replied to Lumberjack's topic in In Progress and Finished Work
Back on the bad old days before I got into guitar making I was heavily into DIY tube amps and pro audio stuff. Great to see something like this popping up here for a change of pace, and to stoke fond memories of firing up something for the first time without letting the brown smoke out -
Need help grounding a 4-pole 5-way rotary switch
curtisa replied to chrisdebo's topic in Electronics Chat
Does it need to be grounded? I don't see any part of your switching arrangement that would necessarily require part of it grounded, unless you're doing something like coil-splitting the humbuckers. The only grounding you may want to add is for noise reduction, which would automatically occur when the switch is bolted to any shielding you may have inside the control cavity, but it's certainly not mandatory. The grounding in that case is done by the threaded shaft of the switch being in physical contact with the conductive shielding, which should already be grounded. Not sure I follow. All of your circuit requires grounds at various points otherwise parts of it won't work. Each pickup requires a ground, each volume pot requires a ground, each tone pot requires a ground etc


