


mistermikev
-
Posts
4,759 -
Joined
-
Last visited
-
Days Won
133
Content Type
Profiles
News and Information
Tutorials
Product Reviews
Supplier Listings
Articles
Guitar Of The Month
Links and Resources
Forums
Gallery
Downloads
Everything posted by mistermikev
-

Three teles... Tuxedo is close...
mistermikev replied to mistermikev's topic in In Progress and Finished Work
thank you William. I bumble through and somehow come up with pretty close to the color I was looking for. beginner's luck I 'spose! -
Three teles... Tuxedo is close...
mistermikev replied to mistermikev's topic in In Progress and Finished Work
secretly crossing my fingers that you won't as I'm pretty sure I wouldn't stand a chance. Your latest is outstanding. Honestly don't know how I have ever won with the amaz-balls guitars that folks around here post. I'm not worthy. -
Three teles... Tuxedo is close...
mistermikev replied to mistermikev's topic in In Progress and Finished Work
hehe... he said lubricant of life. side note I did some research on the origins of ladies being referred to as 'broads'. ranged from hardly offensive to incredibly offensive... on the less offensive side it was suggested it might have something to do with the term 'abroadwife' which was a term used to describe slave wifes. (yes, that's the less offensive side). -
Three teles... Tuxedo is close...
mistermikev replied to mistermikev's topic in In Progress and Finished Work
hehe, I'm glad you said that because lately I've been wondering if I'm a jerk for naming it that... I mean... I'm a jerk no doubt... but am I jerk for naming it that! so cramped in this head of mine! -
Three teles... Tuxedo is close...
mistermikev replied to mistermikev's topic in In Progress and Finished Work
thank you thank you thank you scott. on the one hand "it's just a tele" on the other "it's MY tele"! thank you for the response and support as always! -
Three teles... Tuxedo is close...
mistermikev replied to mistermikev's topic in In Progress and Finished Work
- 229 replies
-
- 3
-

-
- telecaster
- thinline
- (and 3 more)
-
Guitar Of The Month - January 2020
mistermikev replied to ProjectGuitar.com's topic in Guitar Of The Month entry/poll archive
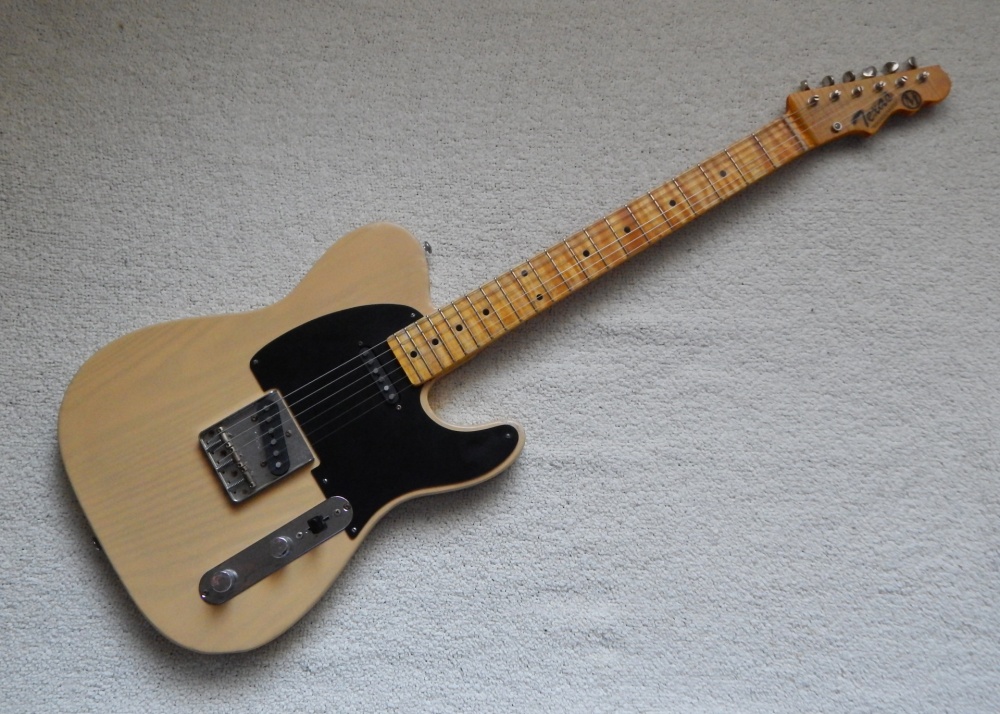
"THE BROADCHASER" WOODS: Two piece northern white ash body sourced locally from peterman lumber in phoenix Flamed maple fretboard (thanks to JB Land @ 6_strings_plus on evilbay!) Flamed maple neck sourced locally from peterman lumber in phoenix HARDWARE: Bridge - Gotoh BSTC1 compensated saddle Tuners - Gotoh SD91 Pickups - Rose Alba / Bourban + hidden rail humbucker Controls - CTS volume pot + Alpha 4 pole 3 throw rotary + Alpha 3 way selector Bone Nut PROFILE: a somewhat beefy 59 soft v with extremely rolled edges on the fretboard SCALE LENGTH: 25.5" RADIUS: 9.5" FRETS: 21 frets - jescar thin / tall WEIGHT: 7lbs 6.5oz MARKERS: Black dots FINISH: Body - mohawk blonde nitro + watco nitro clear - relic'd Neck - stew mac amber dye + watco nitro clear - relic'd As with all my builds... the motivation is to learn something, challenge myself a bit, and most importantly: have fun. This build was def not without it's struggles! I had never done a relic finish before and had my doubts of wether or not I'd ever get there as I was trying to get the lacquer to check! Had uncertanty of how I would get the color I wanted with my limited abilities/resources. As usual... thanks to a little help from my friends... I survived! Thanks again to all who offered advice/resources/links/comiseration/responses-to-my-threads! I Have always wanted a solid body tele in the classic 'butterscotch blonde' motif. The idea that came to mind was a relic that was impossibly well cared for. I have always loved the look of lacquer checking and wanted to use that more as a finish enhancement as opposed to implying that this was a really old guitar. I chose all flamed maple for the neck -knowing that you wouldn't really see that on a late 50's tele (nor a two piece neck - no rules here!). Electronics that allow for classic operation, but offer some modern hum-canceling features via the hidden pickup. A dual action truss rod but with traditional heel access. A solid tele body, but with a smuggler's route for weight reduction. All in all a mix that I had hoped would be a nod to the past with a few modern flares. Thanks again to the forum for empowering/encouragin/enabling! BUILD THREAD: Click here to see my build thread for this guitar DEMO VIDEO:


-
Three teles... Tuxedo is close...
mistermikev replied to mistermikev's topic in In Progress and Finished Work


- 229 replies
-
- 5
-
-
- telecaster
- thinline
- (and 3 more)
-
Adventures in industrial woodworking
mistermikev replied to Prostheta's topic in Non-Guitar Build Section
right - stamped plates. looks like some crazy cold war missile control (sorry, my imagination runs wild pretty easily). "projecta oy". no idea what that means... but sounds cool! -
Three teles... Tuxedo is close...
mistermikev replied to mistermikev's topic in In Progress and Finished Work
all of them! hehe. to be honest I'm not sure what worked for me but I'll try to tell you as best I can what I did. I put it in the fridge for 24hrs... then I pulled it out and used my heat gun on the lowest setting. seemed like the hair dryer wasn't hot enough... and the heat gun would bubble the paint if turned up any higher... so I kept it moving pretty good but tried to warm up one area at a time. tried this a few times and still wasn't seeing much. in rhetrospect the cracks were only visable from the right angle so they may have started earlier than I saw them. each time I'd pull it out of the freezer and warm it up... then I'd let it sit for an hour... then warm it with the heat gun and get the surface temp such that I could feel it was warm... then blast the shizzle out of it with the air can turned upside down. I've seen folks do this before and get big checks... and I was thinking I'd love to have lots of little checks everywhere but figured I'd see how far I got once I started getting a few big checks. big checks never happened... just started seeing light small checks... so then I took rit dye (moca) and wiped it all down... let it sit for until it just started getting dry then cleaned it with min spirits. I only had checks in one area (behind the bridge) so I put it back in the freezer and waited 24hrs again. pulled it out, did the heat gun, then did can of air + heat gun, then another round of dye. I could see I got a number of new areas. from there I started to target the lighter areas and the sides. few more rounds and I was pretty satisfied. you can't really see the checks from a ways away... but up close it looks great to me. the headstock has even smaller checks that wouldn't take dye. to be honest I would have liked a little more but my decal started to soak up the dye so I stopped there. have a lot to learn but pretty satisfied overall and the body turned out better than I had even hoped.- 229 replies
-
- 1
-

-
- telecaster
- thinline
- (and 3 more)
-
Three teles... Tuxedo is close...
mistermikev replied to mistermikev's topic in In Progress and Finished Work
============01/25/20=============== got the binding on the tuxedo... got some inlay done... but funny thing happened. turns out this 25.5" scale length fretboard has fret slots from a 24.75". the must have put the slots in the wrong one... (or perhaps I ordered a 24.75sl board. oh well. could order a new one and some new inlay... but this is an opportunity to try a 24.75sl on a tele... so think I'll go back to my orig blank and make that work. (mmmm, lemonaid). gold mop on granadillo and white mop on ebony... 780.24 kB · 0 downloads also, finally got my broadcaster to check... check please! remember, it's not the size of your check that matters...


- 229 replies
-
- 4
-
-
- telecaster
- thinline
- (and 3 more)
-
Semi hollow LP-profile neck-thru
mistermikev replied to Bizman62's topic in In Progress and Finished Work
so... one question... have you noticed an increase in sustain since recessing the jack? if so, I might try it! looks good. nice job. -
I did not enjoy doing magnets myself... pita... but I have to admit... it's nice when I need to get in the ctrl cavity. anywho, you cover looks nice and tight. I'd stain it and go light on the edges. can always sand them a bit after. be a shame to take a chance on ruining the great job you did there.
-
Adventures in industrial woodworking
mistermikev replied to Prostheta's topic in Non-Guitar Build Section
for some reason I'm really attracted to the dials/controls on old machines like that. I find them very pleasing to the eye. We have some crazy 50's printing presses at my work and the chrome labeling, bakelite dials... very stylish, have been meaning to take pics sometime. thanks for this... -
Build 2 - Dan's LP JR Double Cut
mistermikev replied to Norris's topic in In Progress and Finished Work
is this a competition? race to the grave is on... vaper, had heart attack, and have diabetes... and doctor who can't be bothered. (what do I win?) I often think of my remaining life in terms of how many guitars I can build! anywho, I commiserate with you regarding fretwork... man I dread it. that said my most recent - I did thin frets... man was that a quick/easy job compared to jumbo. someone needs to design an elec fret crowner. "I don't care what it costs... I'll take it". -
nice recovery!
-
interesting. not a violin guy but def will enjoy seeing this built. I imagine building another instrument (other than guitar/bass) probably would involve some valuable and translatable lessons. do you play?
-
Jenny Lind bed > bench thingy for the wifey
mistermikev replied to Mr Natural's topic in Non-Guitar Build Section
nicely done. you really turned it from trash to class. -
once again I'm out of likes... so I just wanted to say... I like this! thanks for sharing.
-
Three teles... Tuxedo is close...
mistermikev replied to mistermikev's topic in In Progress and Finished Work
thank you AD! yes, total pain. one strip spontaneously combusted... literal flame coming off of it from the heat gun at med setting! was tricky because I had to get the binding really soft to do those circles at the end... probably within a few degrees of starting on fire! thought about trying to build a channel to bend the binding then apply but I don't plan on using the same f hole over and over so... I just winged it. thanks again for the reply.- 229 replies
-
- 1
-

-
- telecaster
- thinline
- (and 3 more)
-
need some help from the finish gods...
mistermikev replied to mistermikev's topic in Inlays and Finishing Chat
I've read that too... but I've also seen vids of guys using a blow dryer for 5 mins followed by canned air for 3 seconds and all sorts of checking immediately. I will take that and try an overnight stay in the freezer just to see. thanks for the reply. -
Three teles... Tuxedo is close...
mistermikev replied to mistermikev's topic in In Progress and Finished Work
============update 1/19/20=============== note to self... next time separate the builds into a post each... pretty hard to follow 3 disparate builds! finished and bount my les flawes headstock. got a couple little spots at the points that will require some attention but pretty solid. got the top on for the tuxedo... the f hole is fully bound, top trimmed, binding channel cut just after this. working on adding the body binding now. On the radius for the top, I left a flat spot for the tele style trem king... was concerned I'd have little gaps as it transitioned from flat to radius (I broke them lightly) - but it turned out good. have 1 little spot where I didn't get glue squeeze out because I was a little too conservative with glue but pretty minor. took my pickguard and heat bent it over the body no problem. routed out the neck pocket (little overhang on the pickguard) and the p90 slot for it.

- 229 replies
-
- 3
-
-
- telecaster
- thinline
- (and 3 more)
-
so sitting watching paint dry on the broadchaser I'm building. cannot get the laquer to check. i've finished it first with two coats of mohawk white, then 4 coats of mohawk blond, then 4 or 5 coats of watco lacquer clear. generally 3hrs - 24hrs between coats. the last coat I put on med thick all others were med thin. been about 10 days since my last coat. I absolutely cannot get this thing to check. I have read on tdpri and a few others that watco is supposed to check easily and even within a few days. I waited and have tried the freezer + hair dryer, hair dryer + canned air upside down, left it outside in the sun then hit it with the freezer... the closest to check I got was w hair dryer and heat gun but there were really only micro checks that went away while I watched. pretty dry climate here in az. so... here is the label... lots of stuff listed and nitro is last so... does this mean a lot of plasticizers? will this check if I let it dry longer? Is it ever going to check or am i going to have to go the razor blade route? thanks in advance for any/all thoughts.

-
just another push pull based booster... based on the brian may treble boost with a variable filter... basically wanted to put a rangemaster in a guitar but not comfy with the potential issues of adding a ge transistor so... just a 2n5087. oops, pot is supposed to be 10k

-
I have little to no idea of what I'm doing...
mistermikev replied to JayT's topic in In Progress and Finished Work
I love the jigsaw and used it for my first 2 builds... in fact I had that exact jigsaw for 10+ years and only recently replaced it when the part that holds the blade sheered off. I usually left about 1/8" to the line... but it cut very straight for me and one thing that was key was the adjustment of the wheel. basically I had the wheel fully back. I believe this is what biz is referring to. worked a lot better like that. as also mentioned... the blades are key. still looking at your photos I think that is about as straight as your going to get cutting thick stock with a jigsaw and no relief cuts. I usually would just drill a few holes here and there to reset the blade. that said... nothing some creativity can't traverse. looking good so far.


